Leaderboard


Popular Content
Showing content with the highest reputation on 2018-02-09 in Posts
-
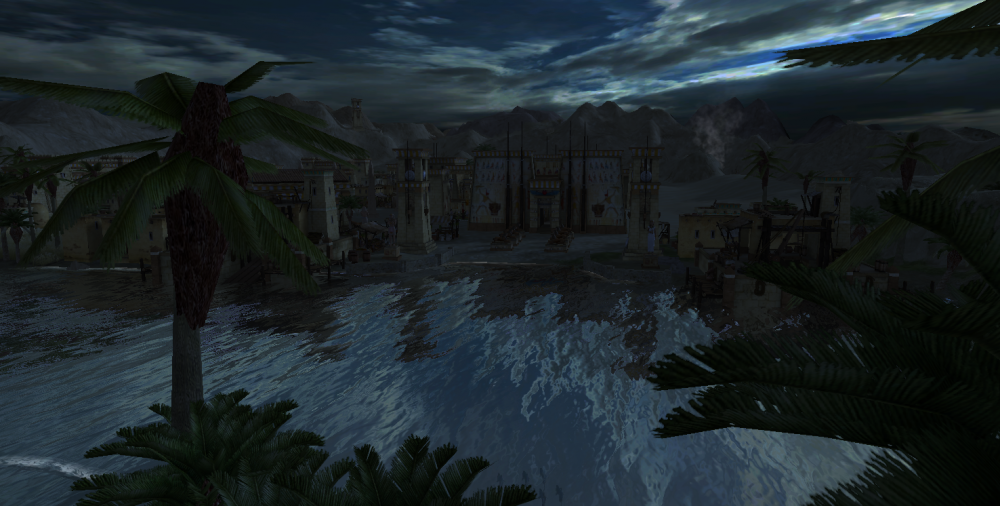
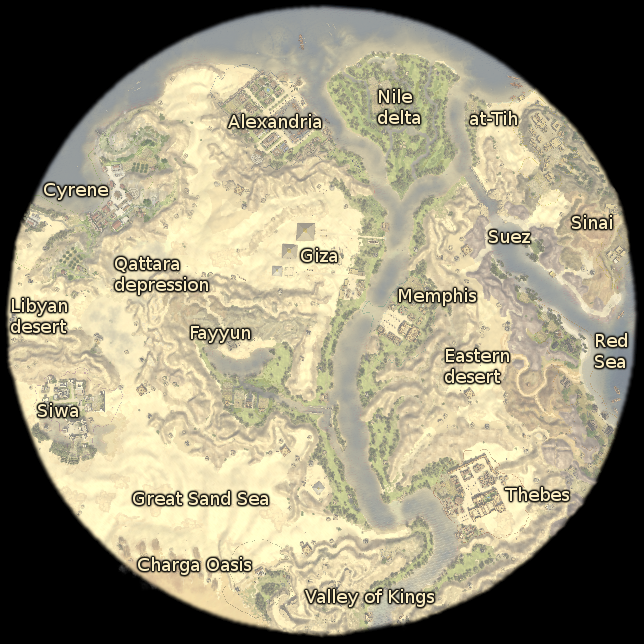
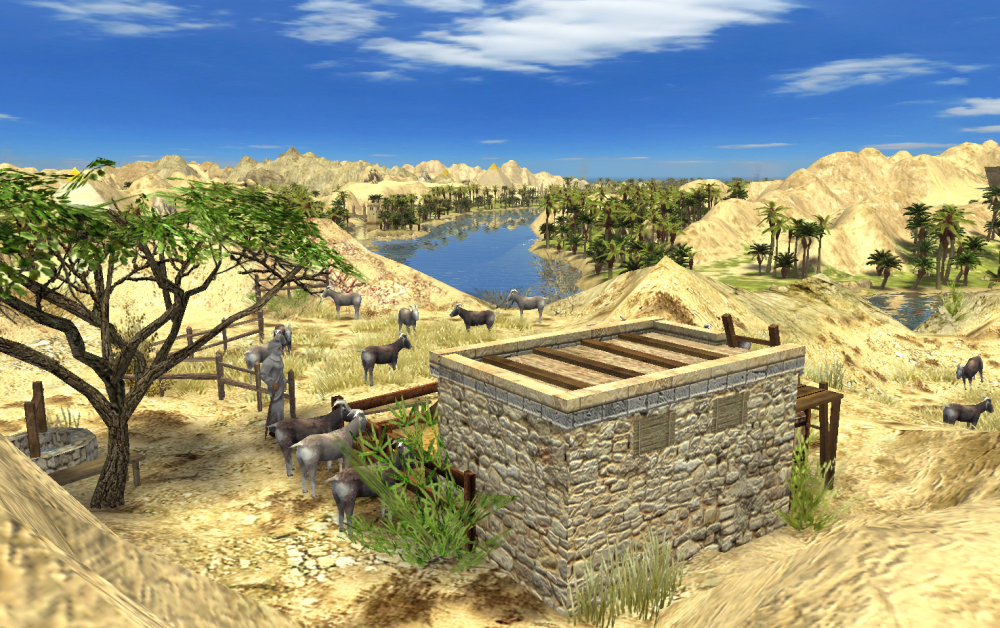
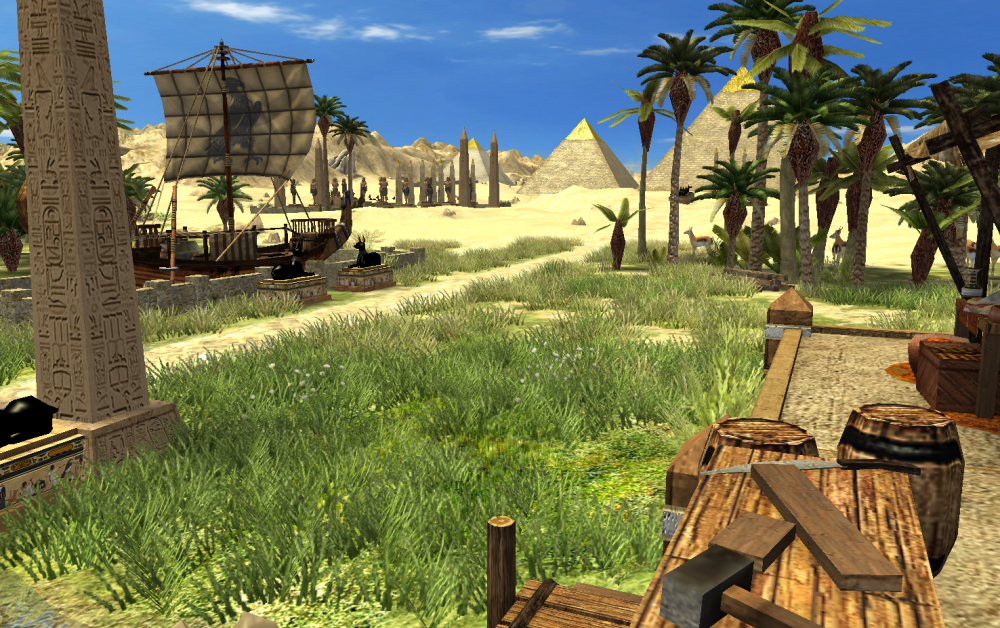
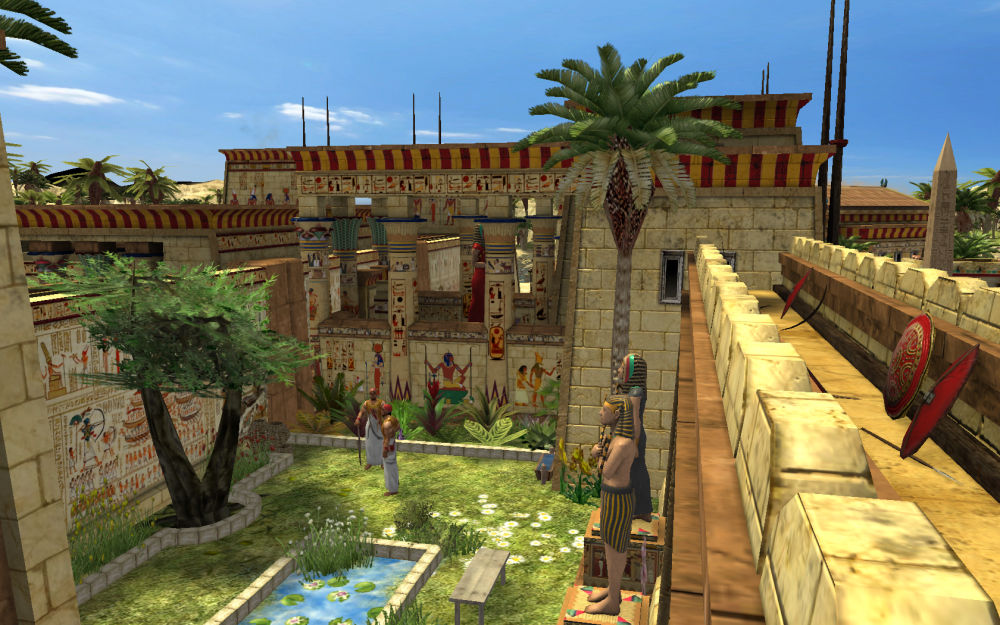
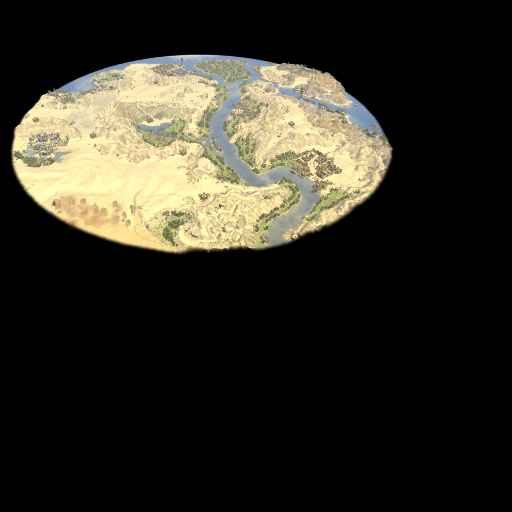
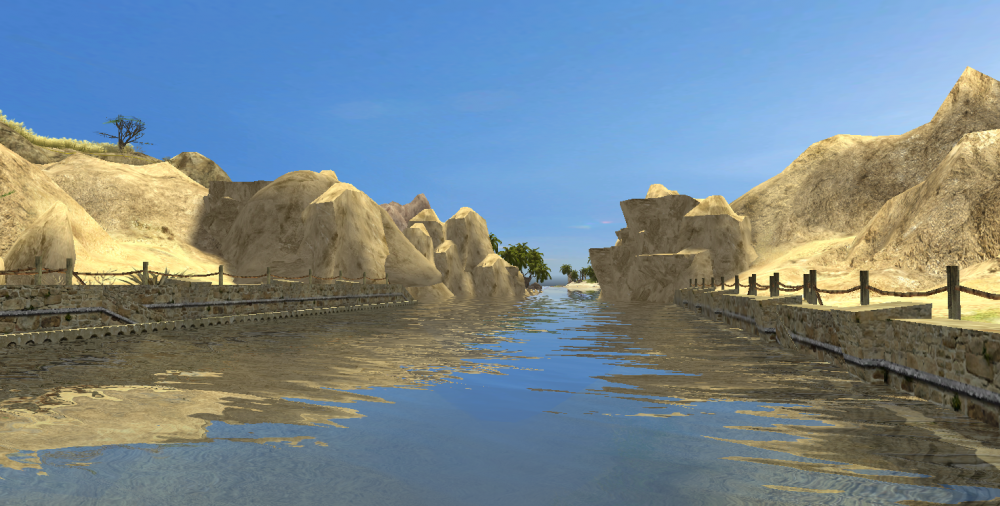
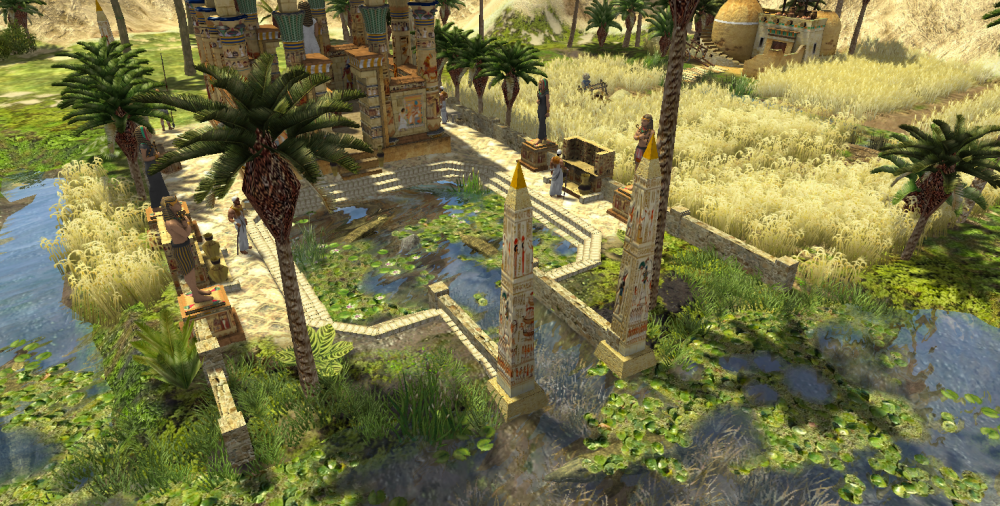
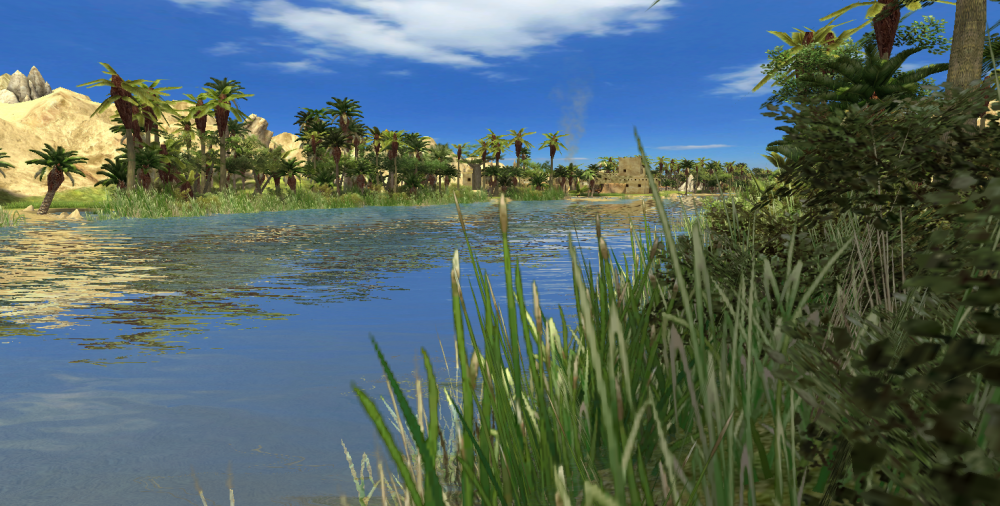
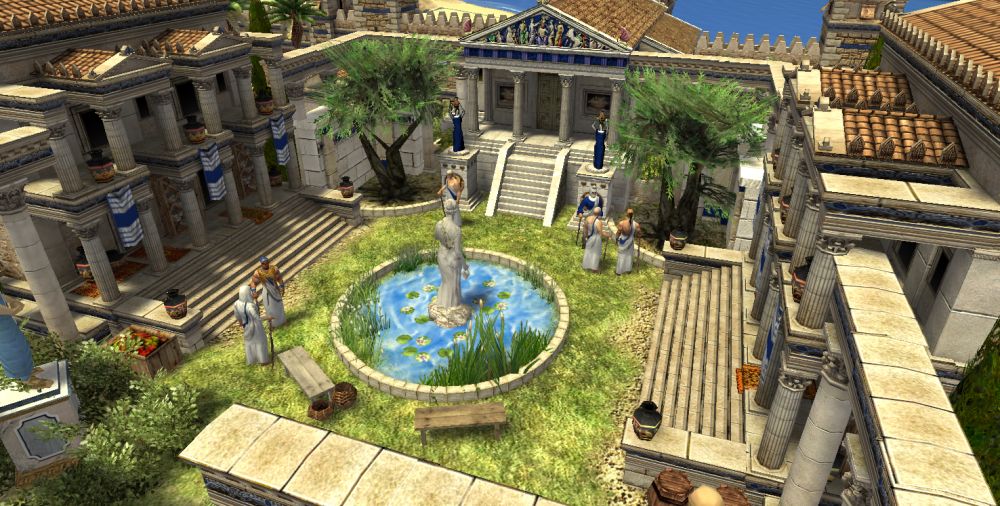
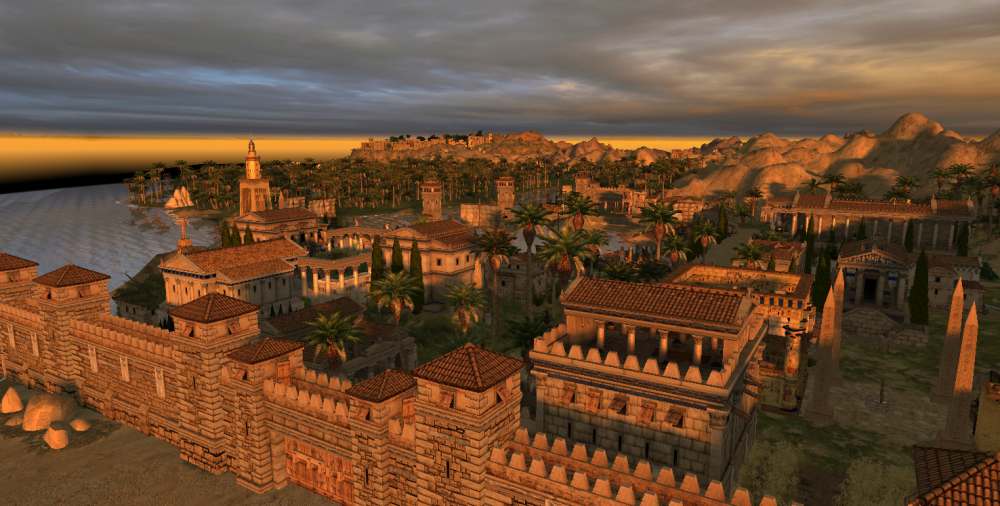
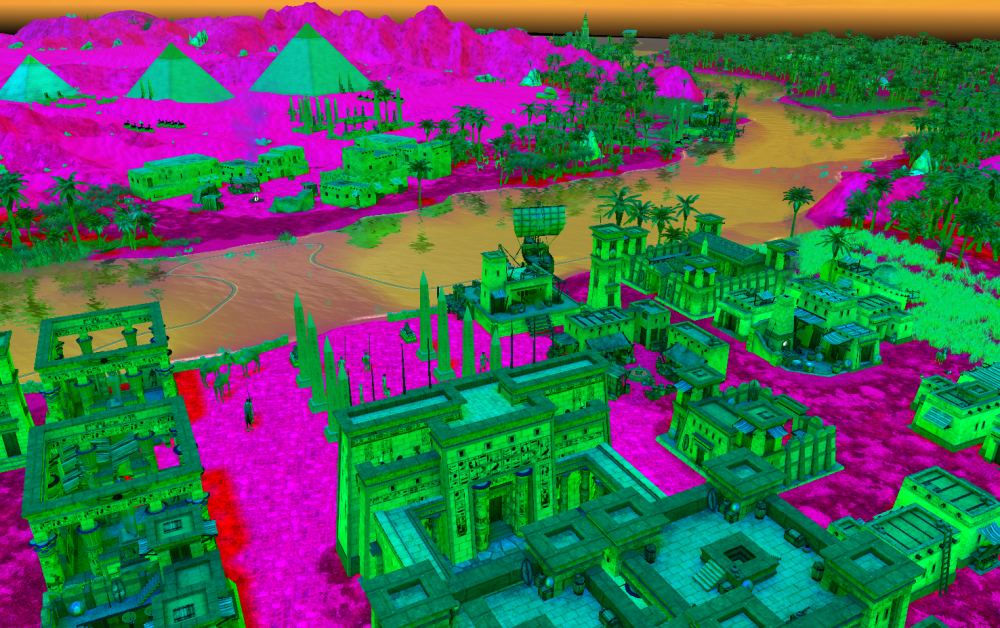
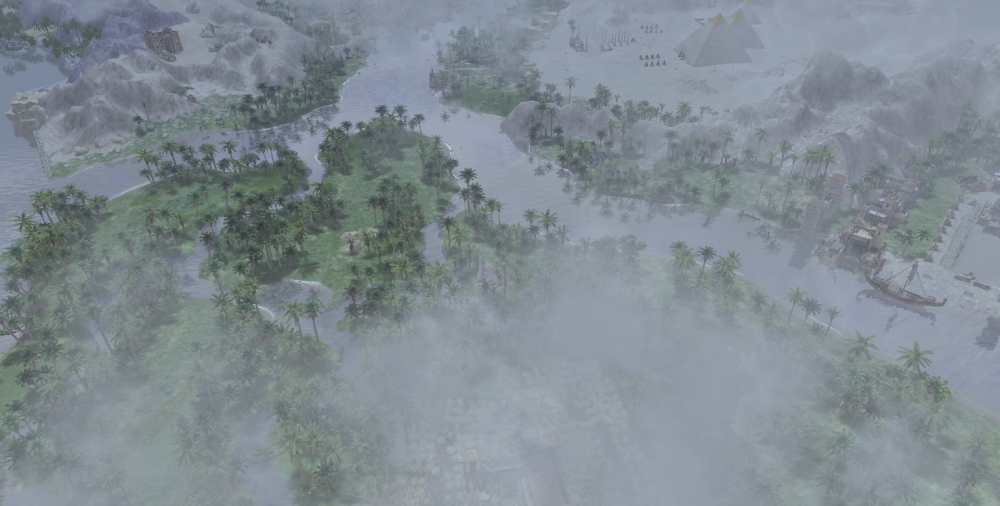
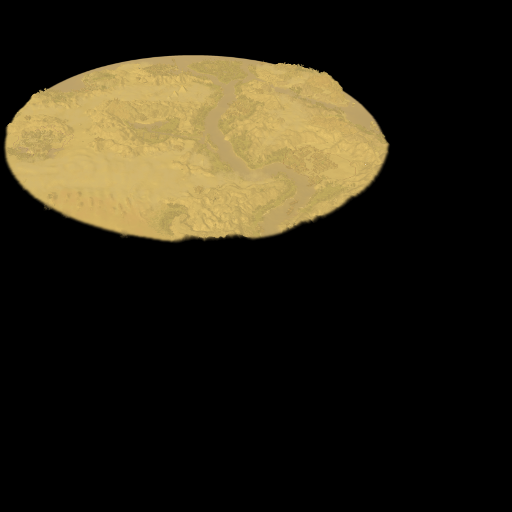
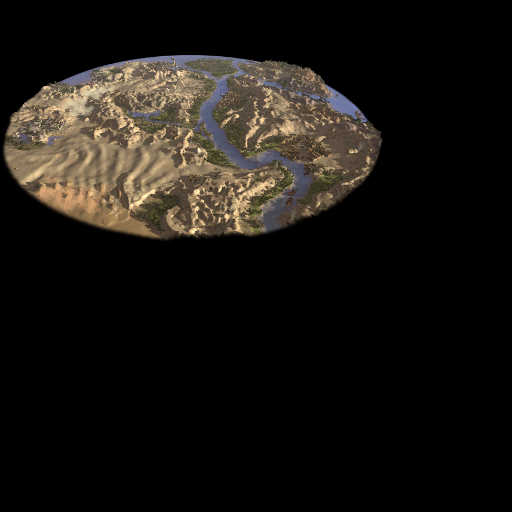
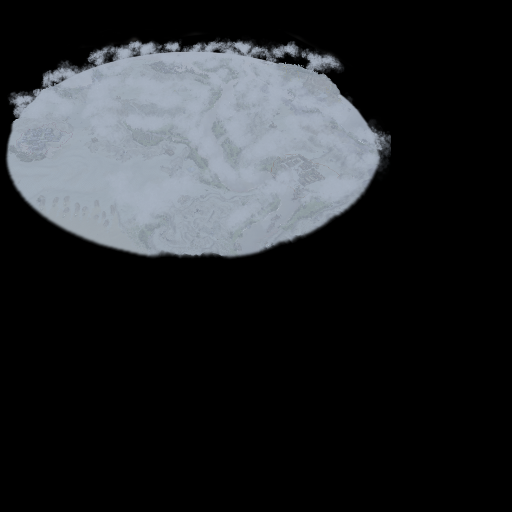
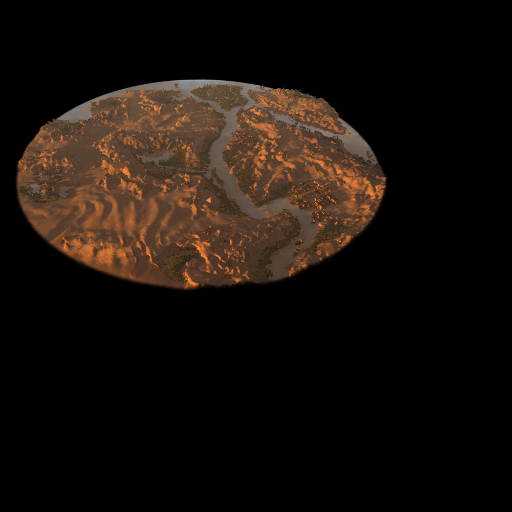
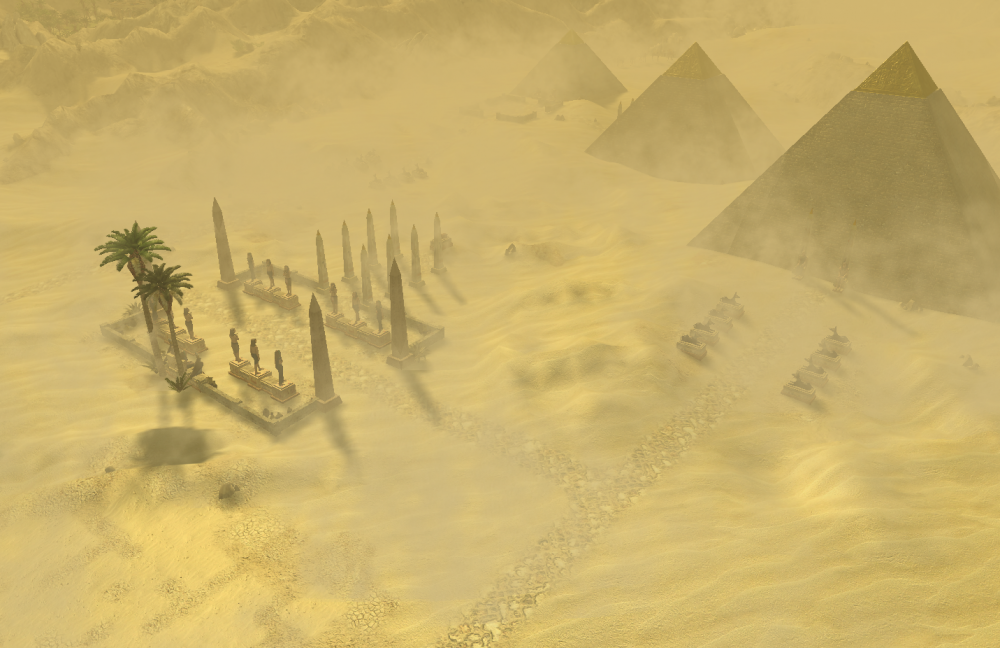
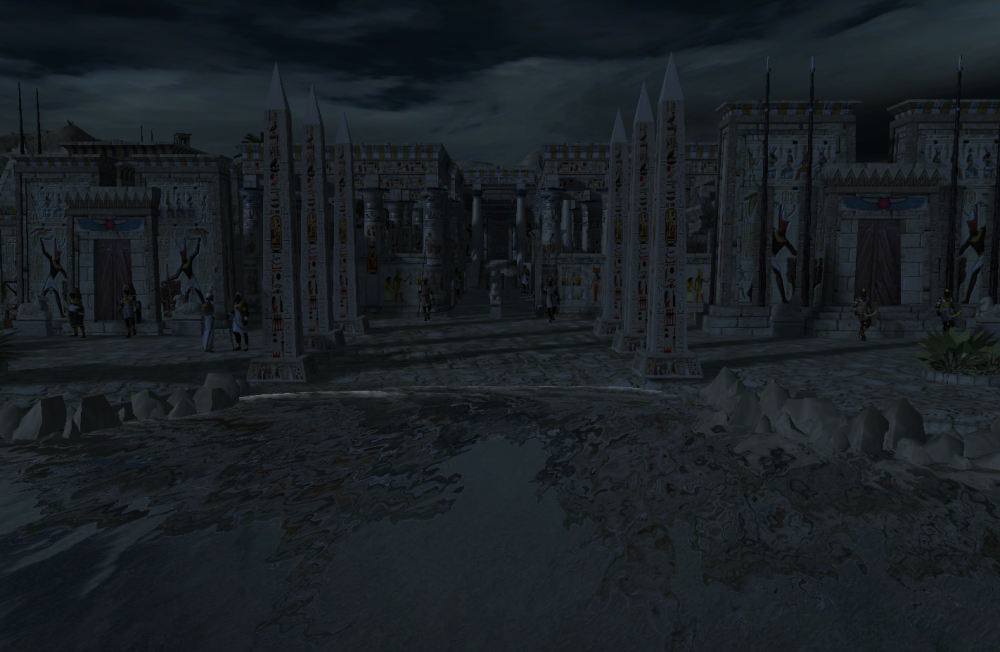
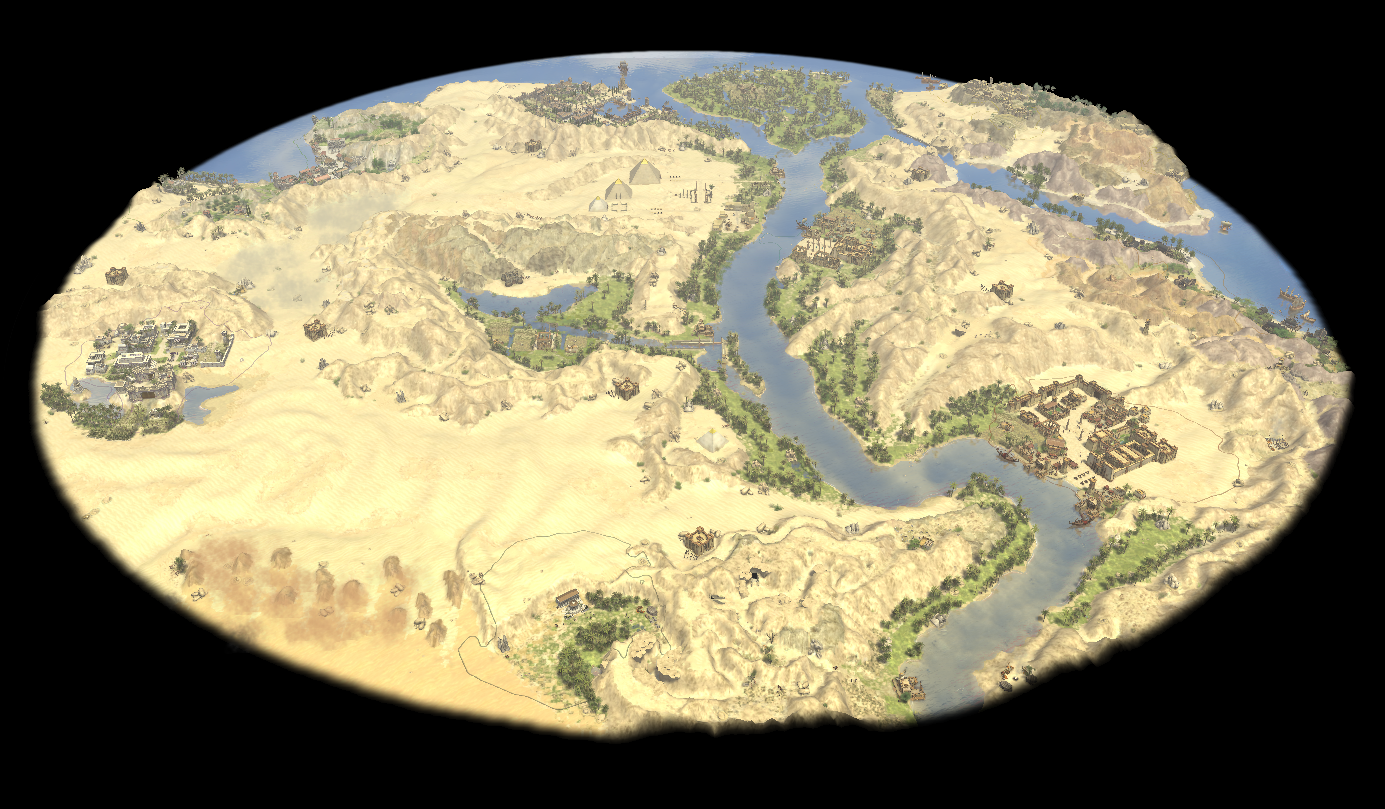
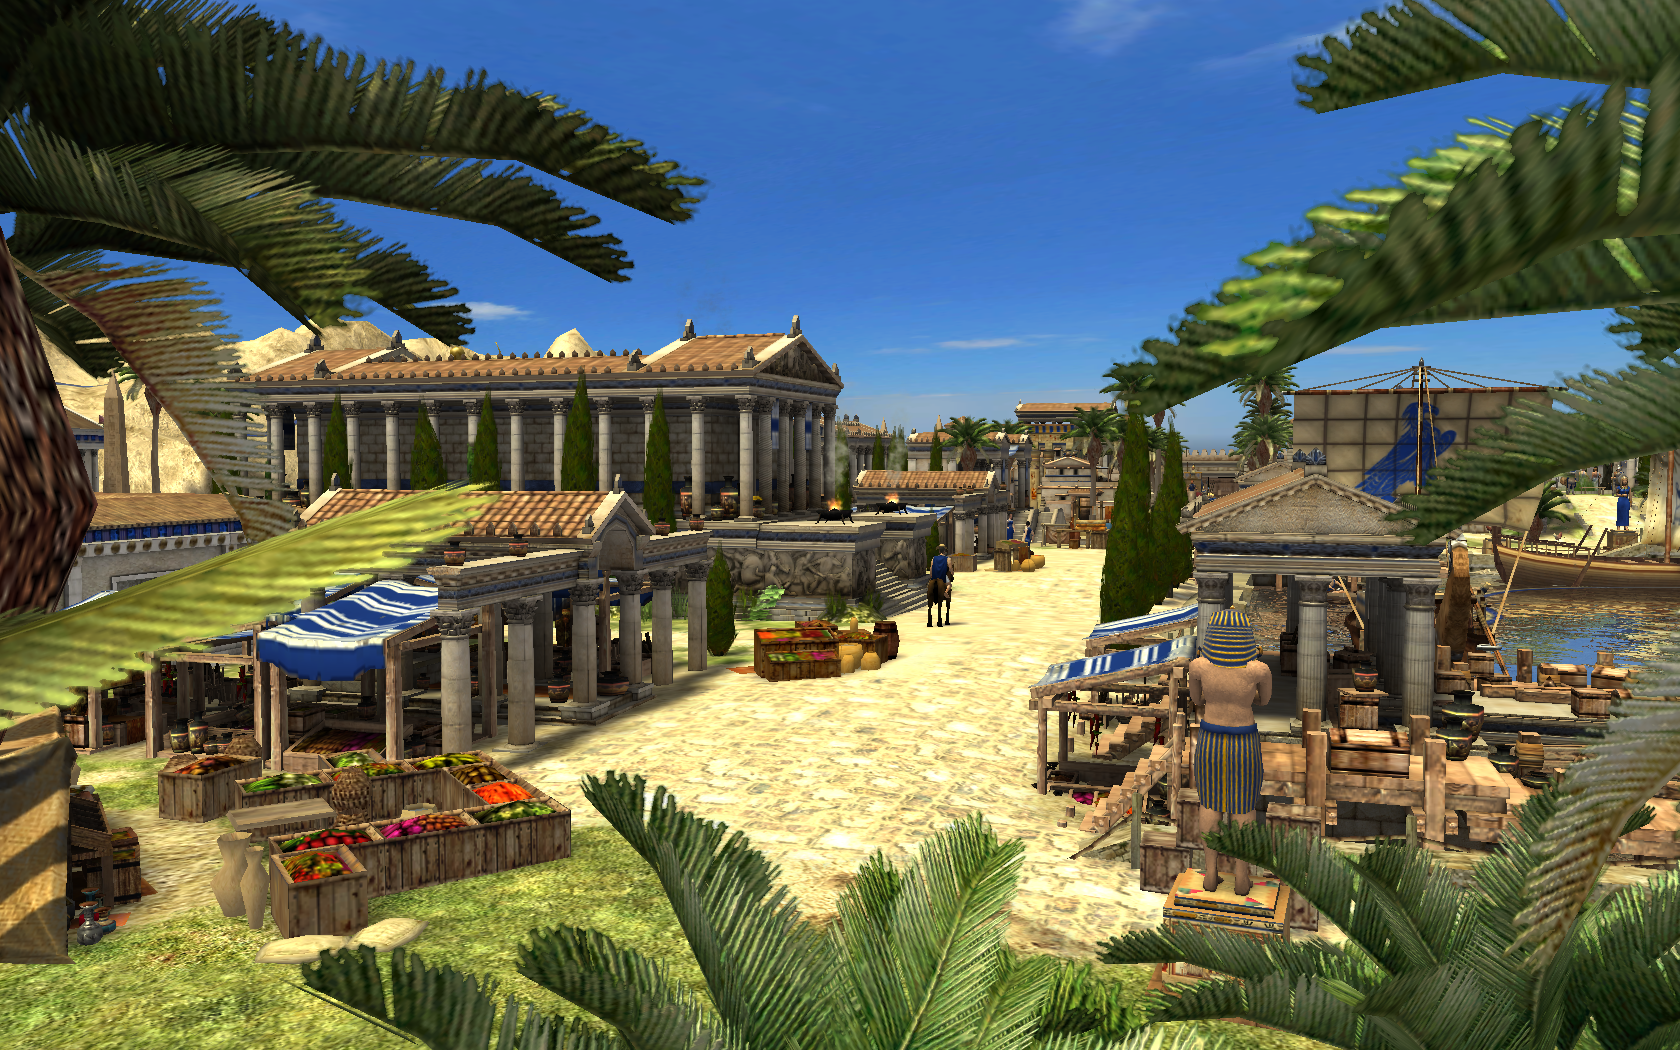
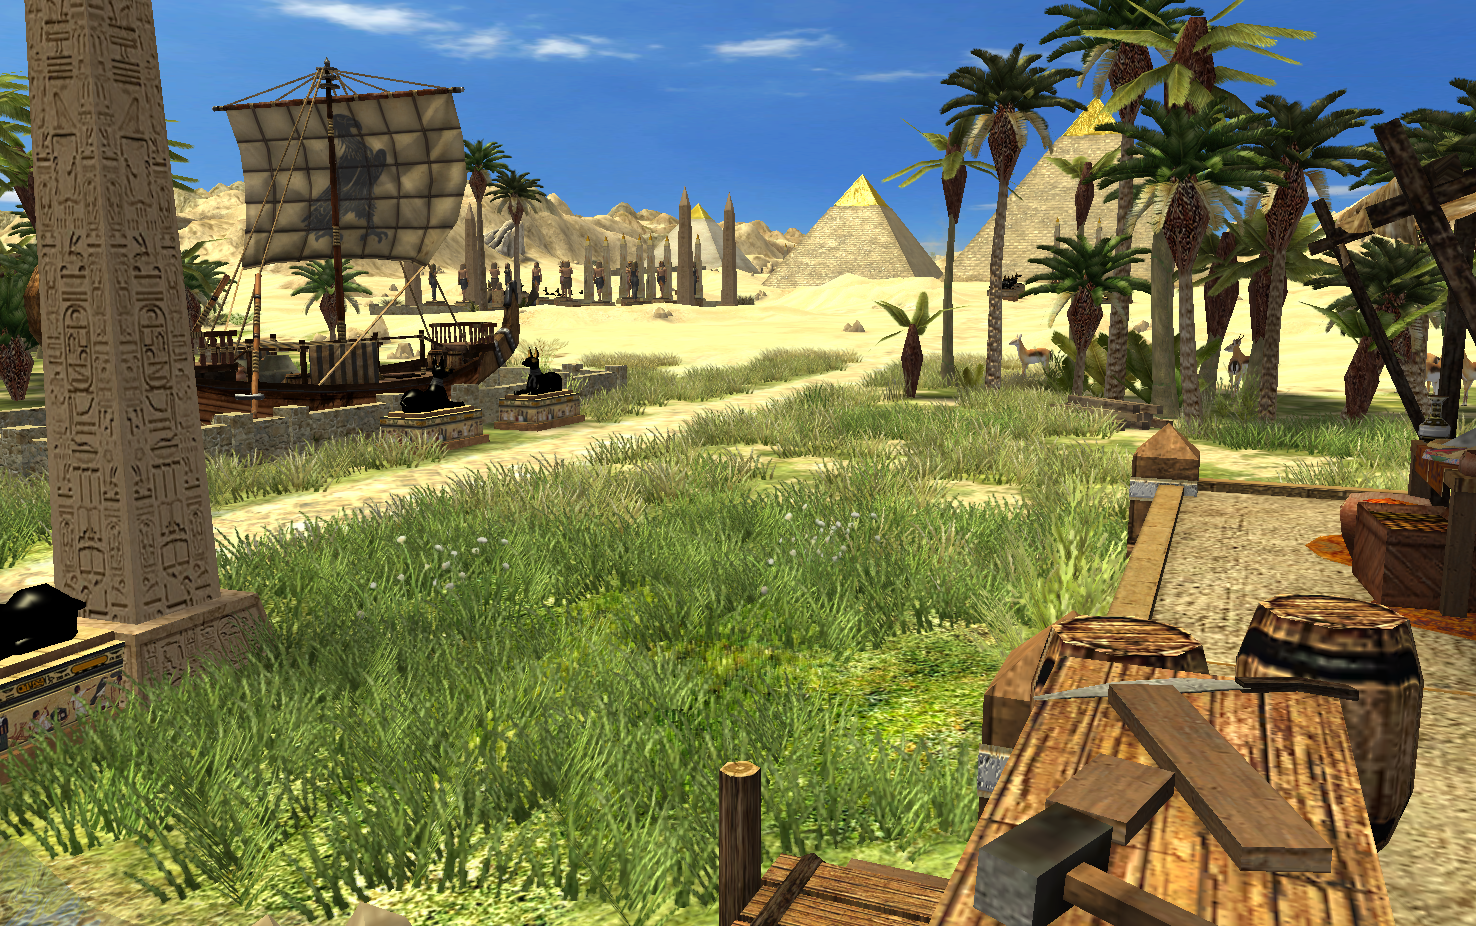
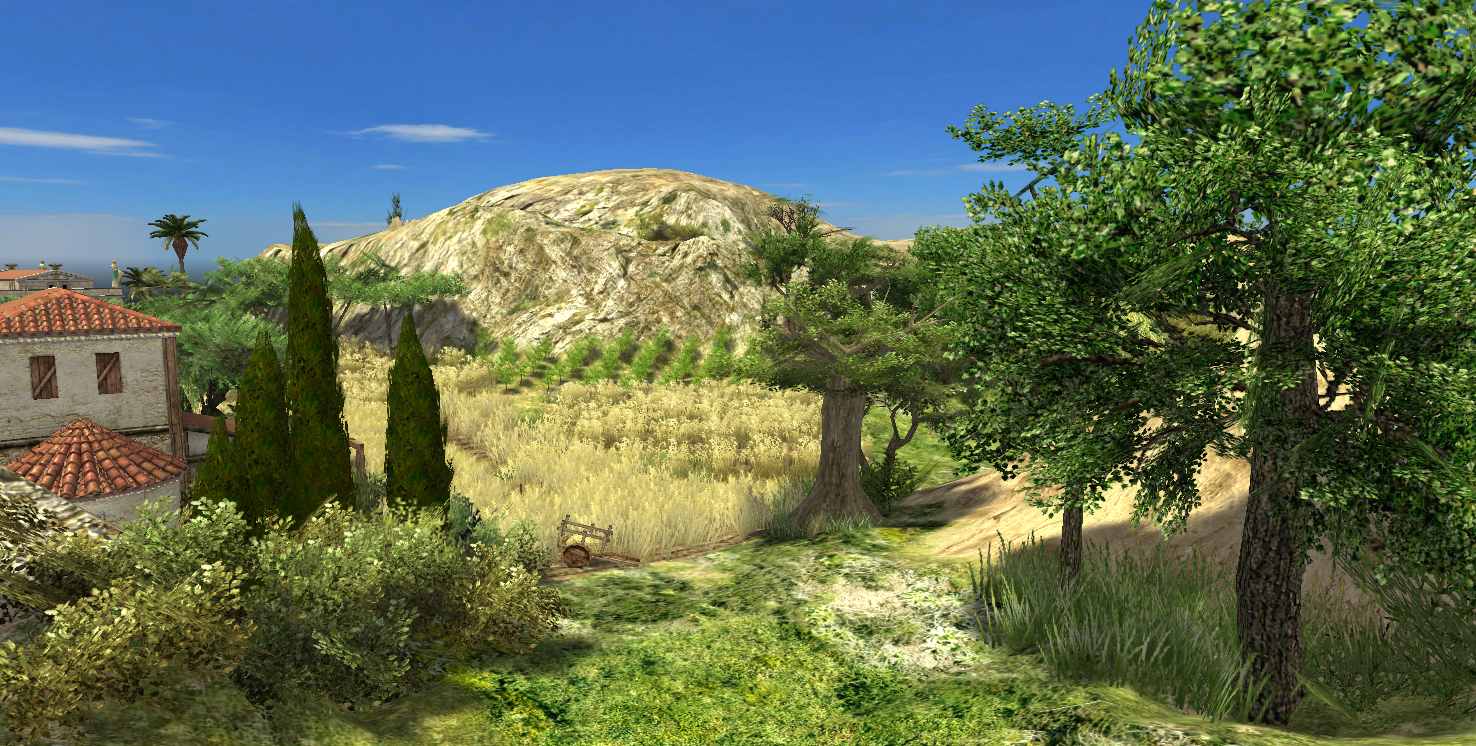
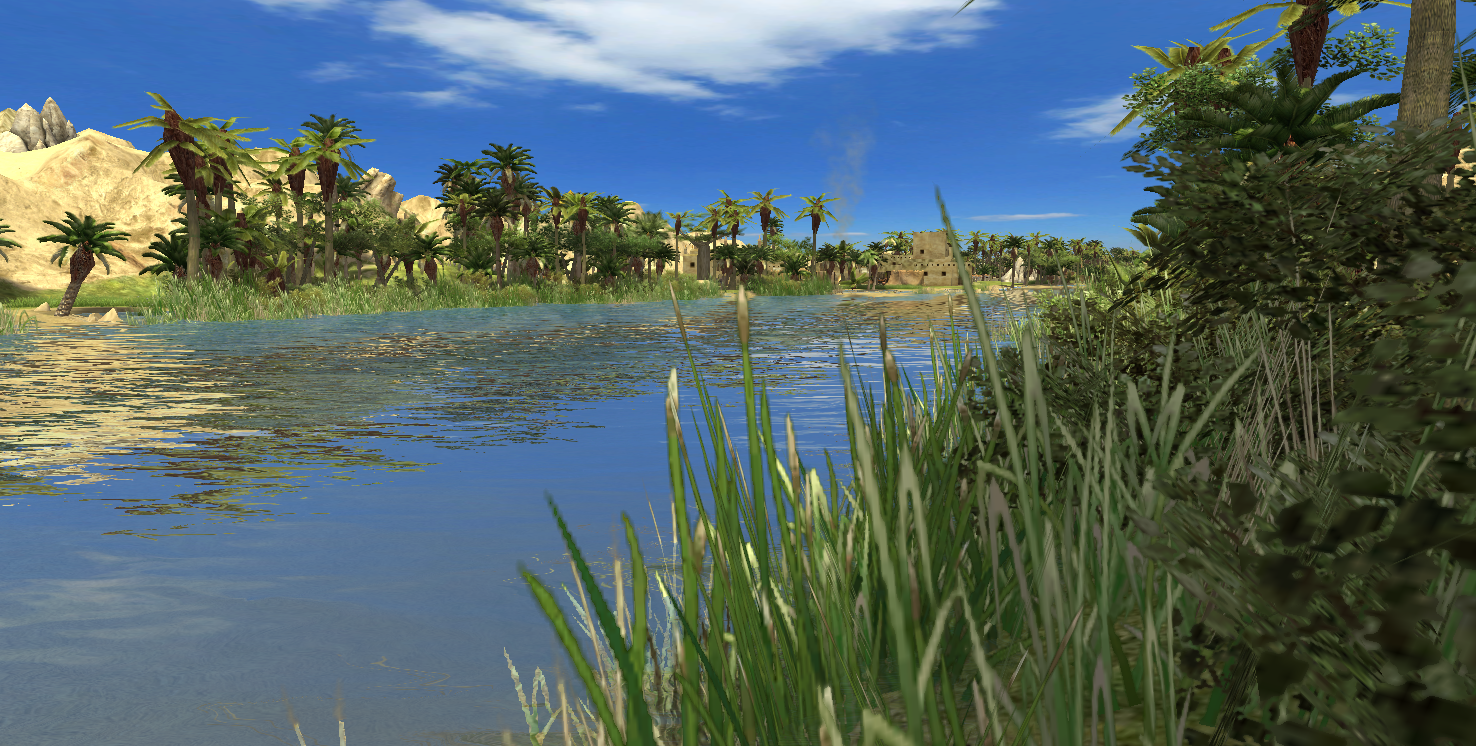
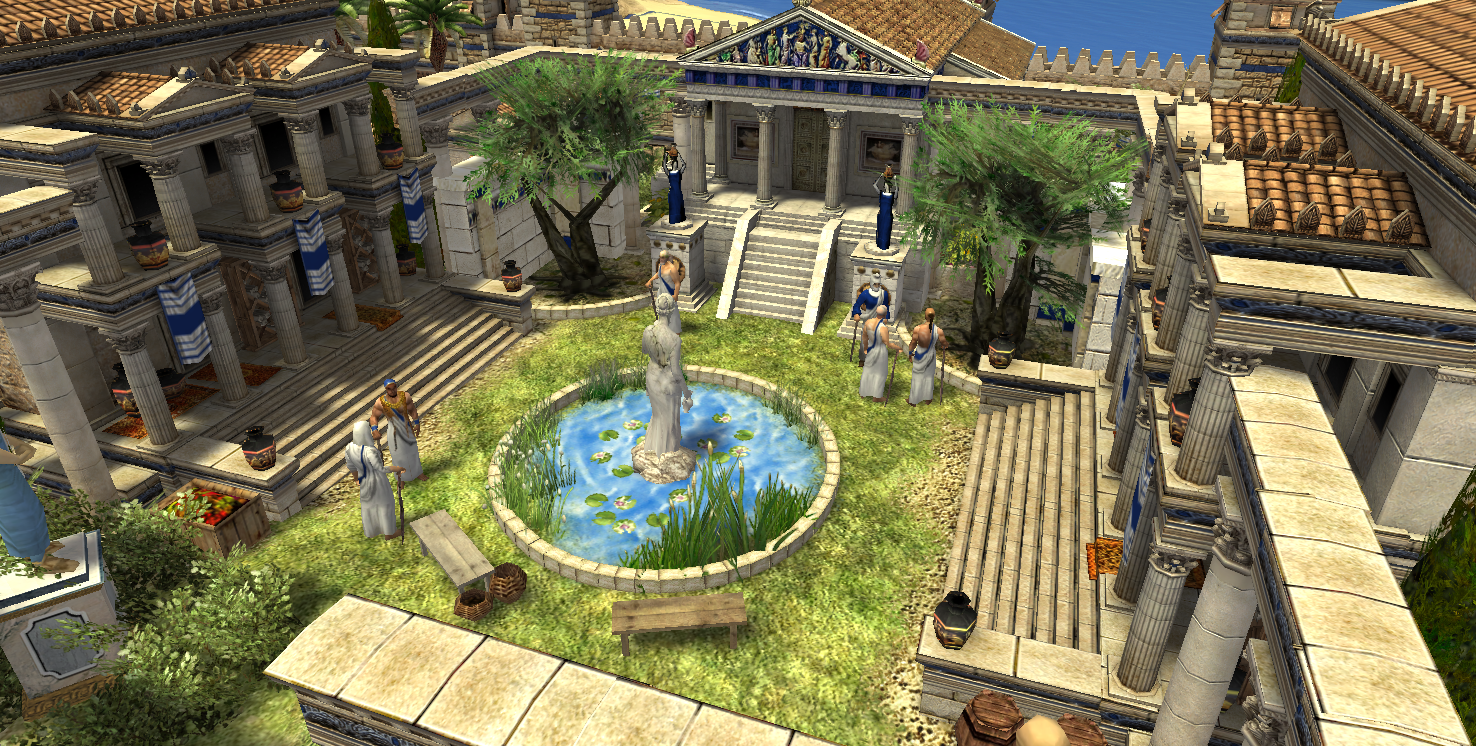
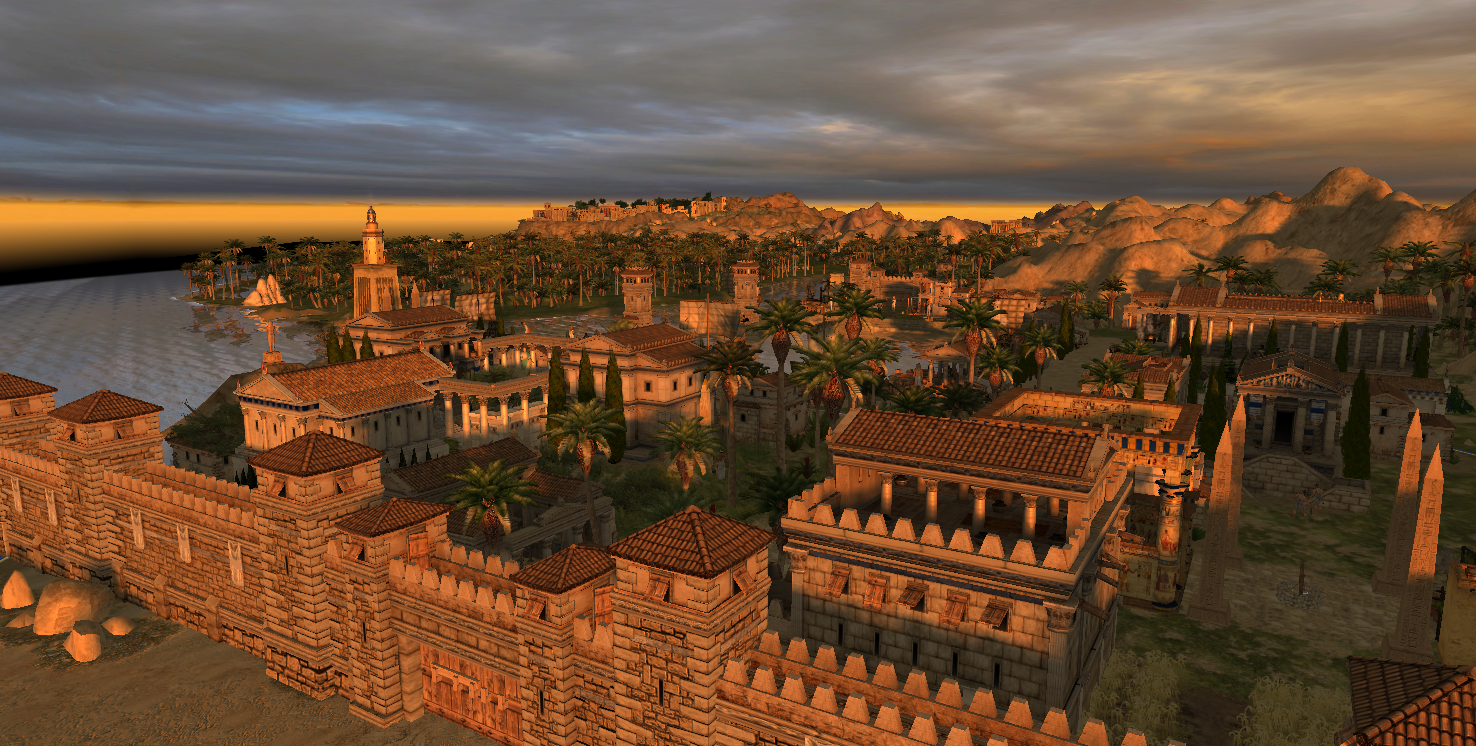
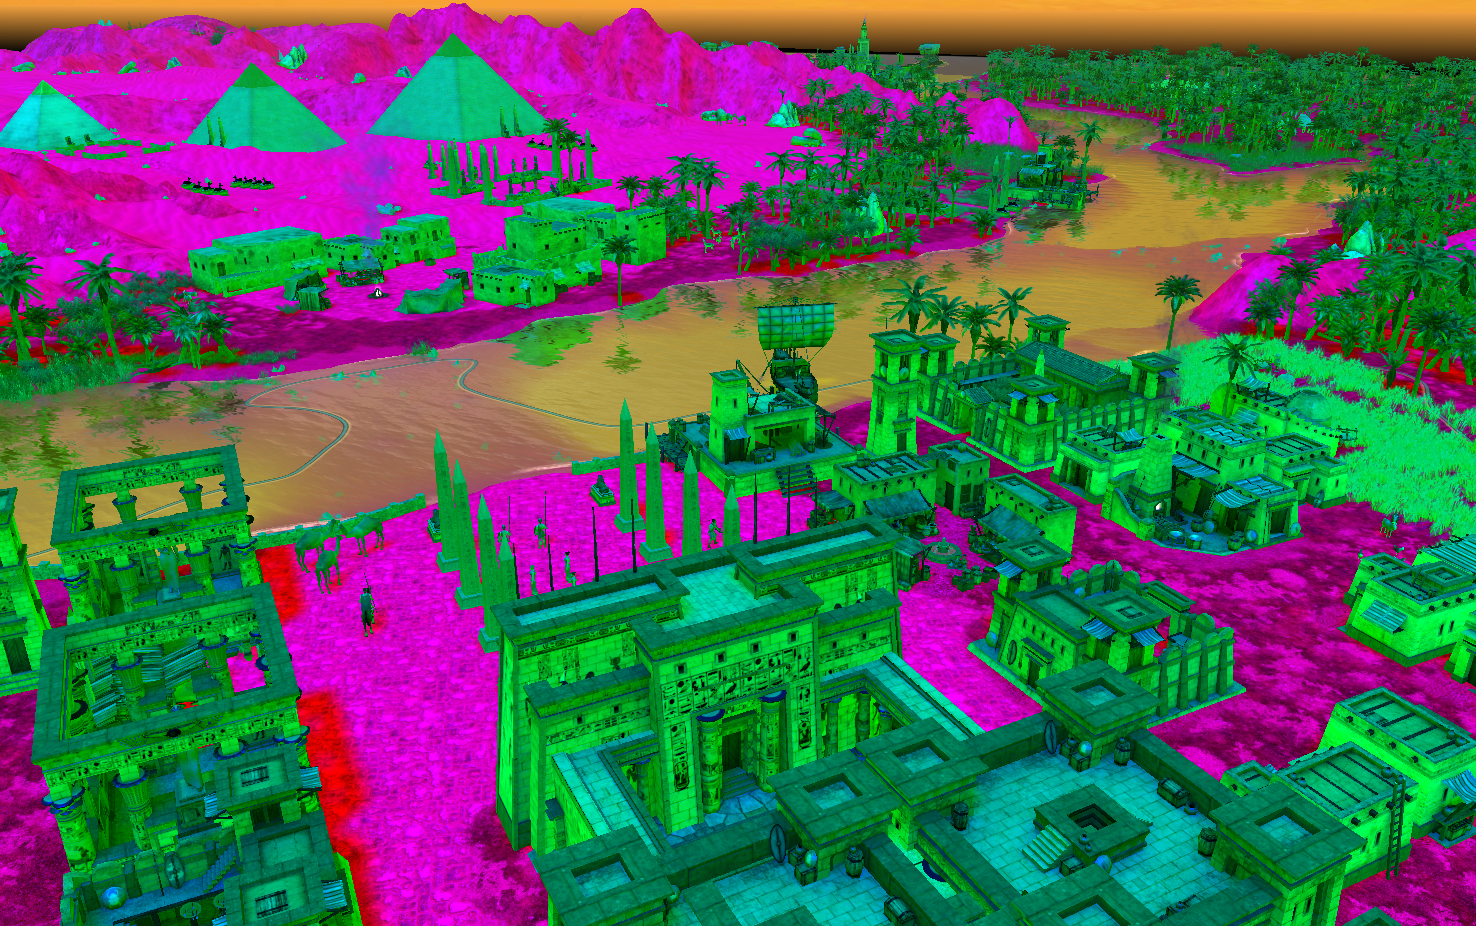
Update of map post alpha 23 (version 1.0.7 in the download section) --------------------------------------------------------------------------------------------------- Hi everyone! I wanted to share my first 0 A.D. map - well, rather a preliminary version - with you. I was inspired by the map of Assassins Creed Origins which just crammed everything Egypt into a single place, often disregarding realism in favor of aesthetics and gameplay, which I did as well. I did for example borrow the idea of moving Cyrene, which is around 700km to the west into Alexandrias vicinity in order to add some Mediterranean environment. A further reason for me to pick that setting was that it allows me to have a lot of different cultures on the map. The upper Nile area is dominated by ptolemaic retro-egypt buildings, whereas the city of Alexandria is dominated by hellenic influences. Cyrene gave me an excuse for adding the Romans with some greek buildings, while I put the Persians, who were admittedly not really present at that same time, in the east. For purely aesthetic reasons I let Carthage occupy the Siwa oasis, and the Red Sea became a tourist destination for Mauryan coral reef divers. Map variants First of all, please take note, that this is not a final product, not even close. The map already includes most of the geological features and special locations I intended to add, but there are many areas that severely lack in detail, which is quite ok for sand deserts, but looks odd in places like coasts, riverbanks and rocky deserts. Blocking the map is also an issue, mainly because it feels strange, when the AI builds farms in the middle of the desert. The greatest thing that needs to be taken care of is balancing. Basic properties Type: skirmish Map size: giant Players: 6 Game version: alpha 23 (re-release) Right now (8.2.2018) I will only publish a 1 vs. 1 map. This has the benefit of being at least a little easier to balance out. I will provide A regular day version And a full-moon night version, because it looks just darn beautiful. I really love what you can do with the lighting and ambient conditions ... Update march 2018: A 3 vs. 3 map variant is now available and several small fixes regarding terrain, blockings and balancing have been made. On the long term I will try to release two varieties of the map regarding gameplay An all-in map: This one is outfitted with full grown cities and you will start with huge amounts of resources and a sizable army. Don’t try to play this with 7 AI players, as it will probably lag horribly. A stripped down version: Everything, except for the most prominent points of interest (e.g. the library) will be deleted. The difficult thing about this is that I will need to create a mod in order to achieve what I desire: See, if I make these buildings actors, all units will just pass through it, and if I leave them as entities, they will be taken over by the players within a few seconds and this would severely unbalance the game. Thus, I need to create a mod, which has all these buildings in a special version. I will increase those buildings capture points by a huge amount and also make them invulnerable, such that capturing them remains the only option. In some cases I might also try to reduce their functionality. Thanks to all the guys who helped me with useful tips and insights regarding modding. Gameplay In this map I tried to elongate the distance between neighboring players and create straight routes between the distant ones. In order to achieve the first requirement, the rare shallow banks of river Nile, meandering mountain tracks and marauding packs of soldiers prohibit straightforward shifts of large armies. On the other hand far away players can often be reached via wide patches of desert, which act like highways on this map. One major problem was the city of Memphis, which is located almost in the center of the map. I order to provide this city with a slight chance for survival I shaped the eastern and western desert like a bypass circumventing Memphis and relocated the city to the eastern shore of the river Nile, which I made impassable from north to south, while only the western riverbanks remained open. The Mediterranean Sea and the river Nile are navigable, which serves as much better means of transportation than the walk along the river by foot. Every player has wood in close vicinity to the starting point. No player will run out of wood easily. The banks of river Nile are especially rich in palms for obvious reasons. Stone is predominantly located in mountainous regions. Limestone can be found close to the pyramids and there is a rather large granite quarry in the very south. As I wanted the player to travel through the sandy dunes a lot metal can be found on the borders of sandy deserts. If you play the map, please let me know where you found too much resources and where they are missing. Players & Matches (and faction recommendations, mostly for esthetic reasons) Currently (9.3.2018) only the six players are available. Player #1: Alexandria (with greek and ptolemeaic entities) in the center north as Seleucids Player #2: Thebes in the very south as Kush Player #3: Siwa/Charga Oasis in the west as Carthage Player #4: Sinai in the north east as Persia Player #5: Memphis in the center as Ptolemeis Player #6: Cyrene in the north west as Romans Player #7: Red Sea in the east as Mauryan (buildings might be reverted to random later) Player #8: Desert nomads from the south west (random) Note: The AI does not get along with that map too well. It will soon be very crowded and very laggy if you choose a game with too many players. Proper matches would be: 2 players: Lower Egypt (#1 Alexandria) vs. upper Egypt (#2 Thebes) Lower Egypt currently has the edge, due to access to the Nile delta. 3 players: Lower Egypt (#1 Alexandria) vs. upper Egypt (#2 Thebes) vs. Siwa (#3) 4 players: Egypt (#1 and #2) vs invaders (#3 Siwa and #4 Sinai) Slowly approaches being balanced (version 0.19.10) 6 players: Egypt (#1, #2, #5) vs invaders (#3, #4, #6) Slowly approaches being balanced (version 0.20.7) Points of interest (selection) Alexandria: library, harbor, lighthouse Memphis: necropolis, pyramids, Apis sanctuary Fayyum: Crocodile sanctuary, Bahr Yussef channel & dam Thebes: Temple district, valley of kings Western desert: Siwa oasis with fortress, Great sand sea, Quattara depression, guelta Eastern desert: Red Sea coral reefs, mount Sinai, "Suez channel", deep wadi I collapsed some more screenies for you here ... ToDo and Changelog My ToDo-List is growing and shrinking all the time. If you have suggestions, please let me know. Unfortunately I cannot promise you, when or if I will implement them. You know, real life can be unpredictable ;-) Download Download the files and put them into the specific folders for maps and preview images. The paths I will state below are default paths for typical Windows 10 installation but may vary depending on your system and installation path. In case subfolders do not exist yet on your system, simply create them. Map files: Download: Version 0.19.6 (1 vs. 1) Version 0.19.10 (currrent) Version 0.20.7 (for upcoming release alpha23, new route through the red sea for balancing) Version 1.0.7 (30.12.2018, based on published version of 0 A.D. version alpha 23, design enhancments: red sea riffs, more nile river bank vegetation, parapets for persian base, fire places for town centers, small secret garden, other small fixes like missing ground textures, etc.) Path: “C:\users\yourname\documents\my games\0ad\mods\user\maps\skirmishes” When is the good time for deleting older versions from a post? Can I make the XML files all use the same PMP file? I noticed a zipped xml is about 10 times smaller. is the community OK with zip files? Map preview images: Download: Path: “C:\users\yourname\appdata\local\0 A.D. alpha\binaries\data\mods\public\art\textures\ui\session\icons\mappreview” In case you are playing this map, please let me know about anything that can be optimized. Thanks a lot in advance. Greetings mimesot


 5 points
 -
Hello everybody, Today I present you an 0 AD tournament from the German youtuber CigarO. It is a German tournament, there fore I write rest in German. Um sich bei dem Turnier anzumelden muss man dem Discord Server beitreten[https://discord.gg/sHW6KnD] und im Channel 0AD-Turnieranmeldung folgendes ausfüllen: Name/Nickname im Spiel: XX Spielerfahrung in 0.A.D.: XX Mikrofon vorhanden?: XX Iternetverbindung: XX Startpunkt: unbekannt Teilnehmer:10 mfg Ougaming2 points
-
In your config folder find the user.cfg or local.cfg file and add the following line gui.scale="2.0" That option should be added at some point until we properly fix high resolutions like yours To find the config file look at https://trac.wildfiregames.com/wiki/GameDataPaths2 points
-
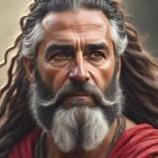
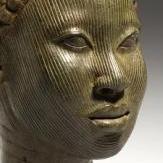
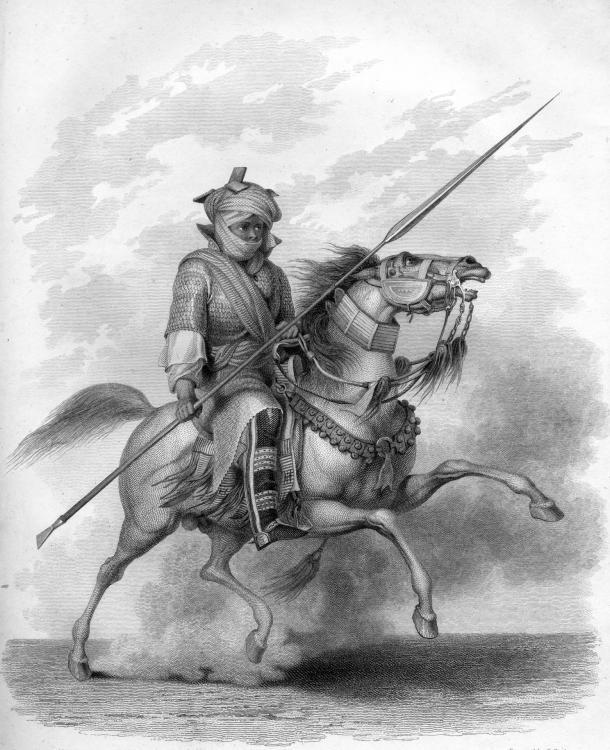
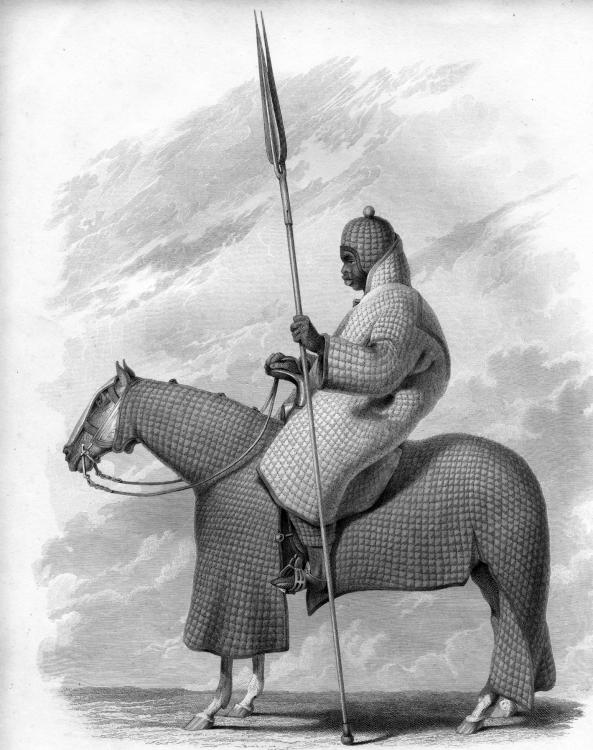
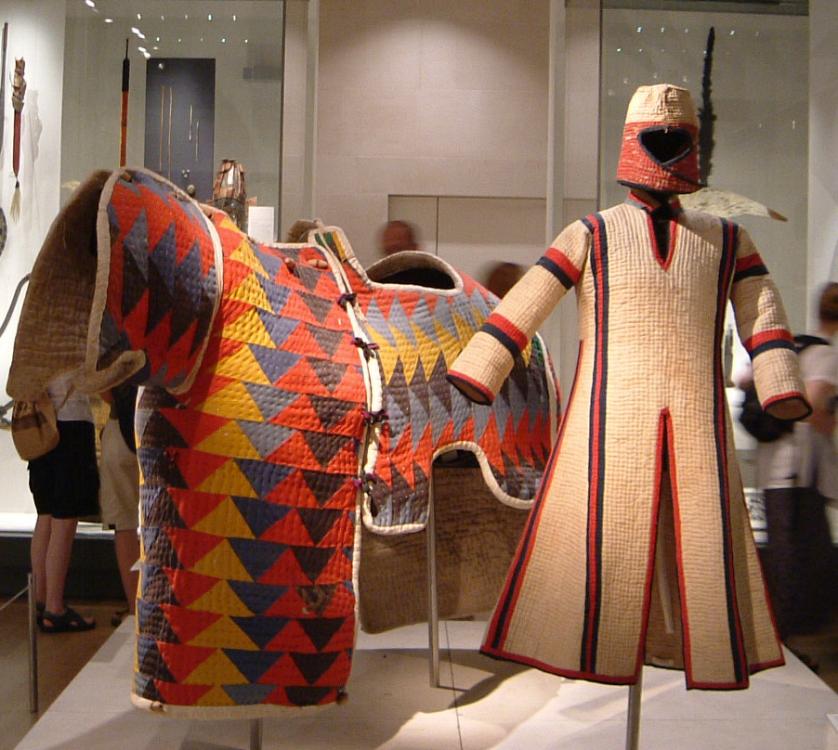
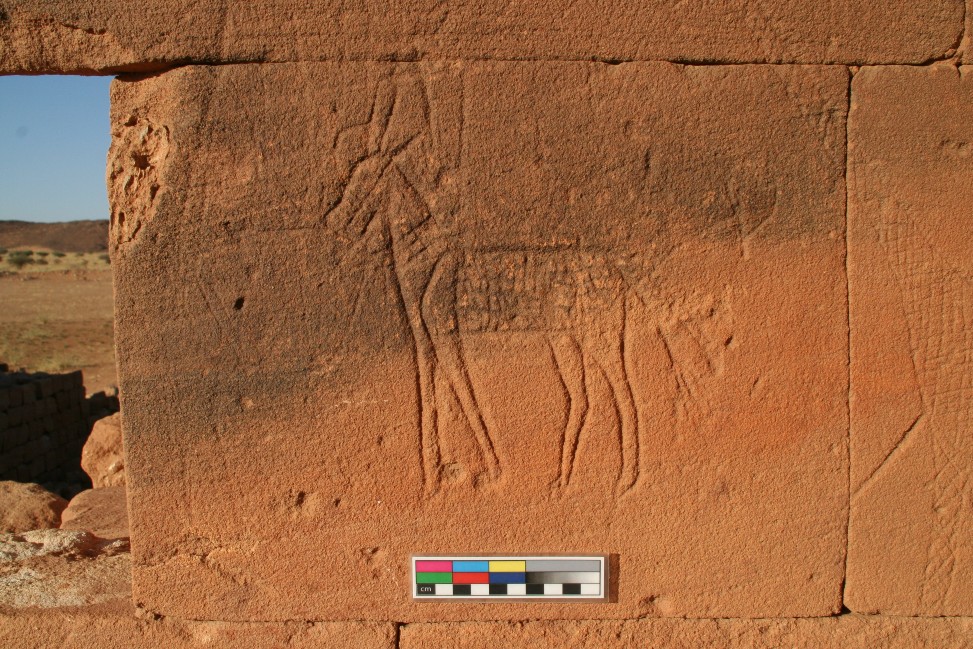
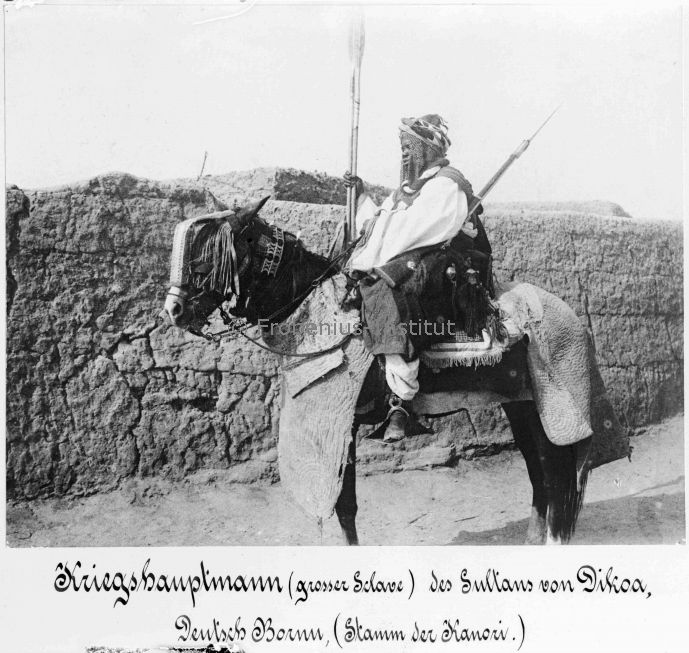
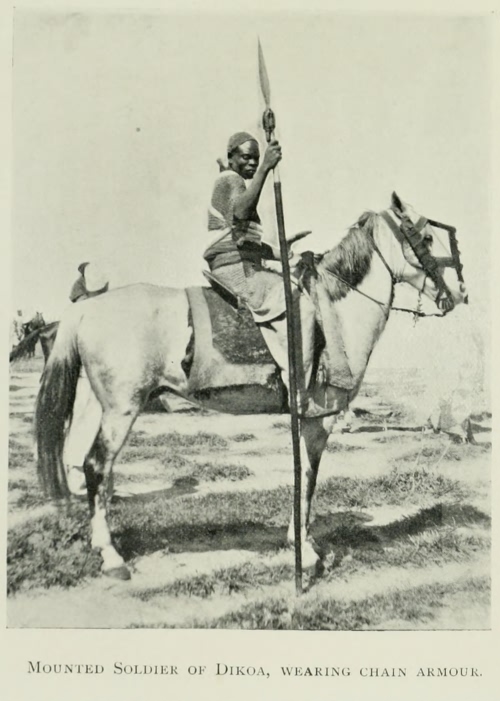
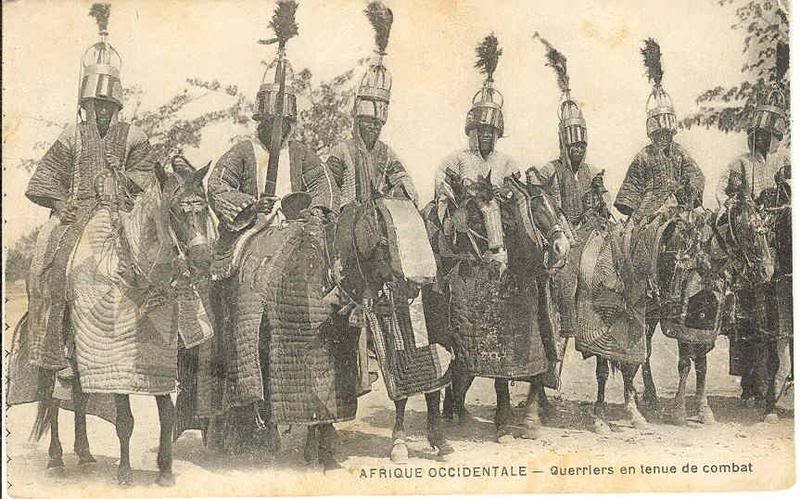
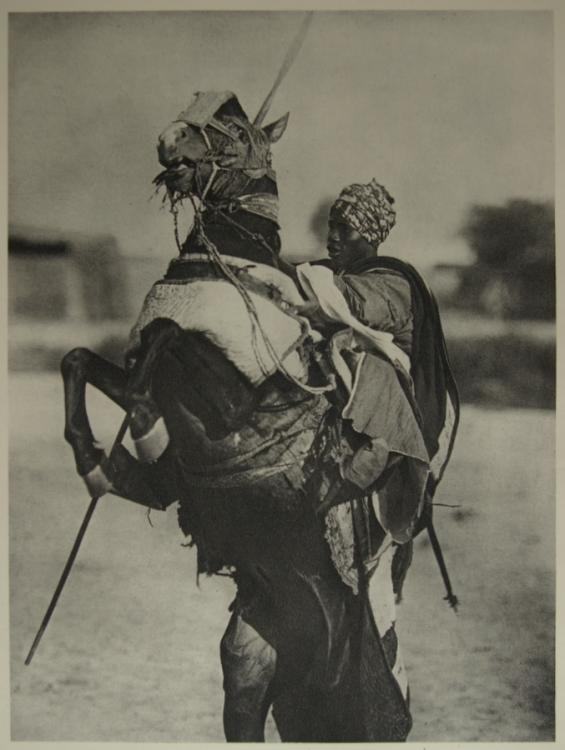
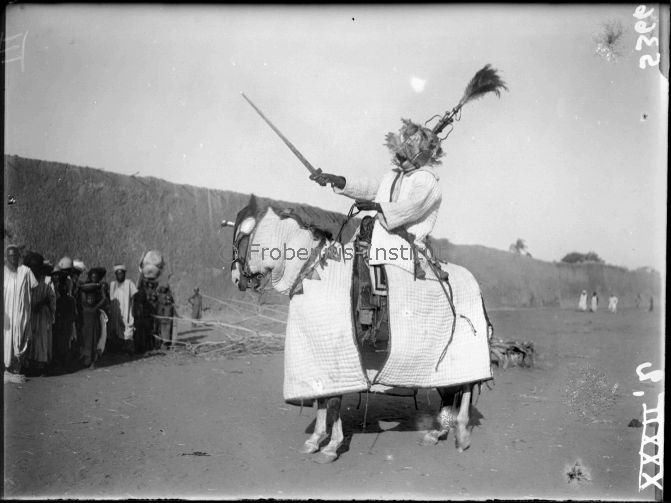
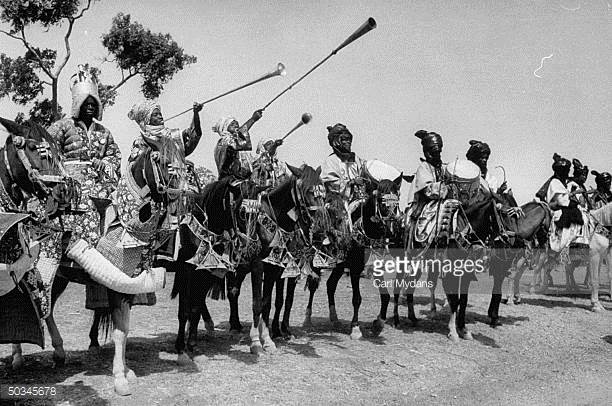
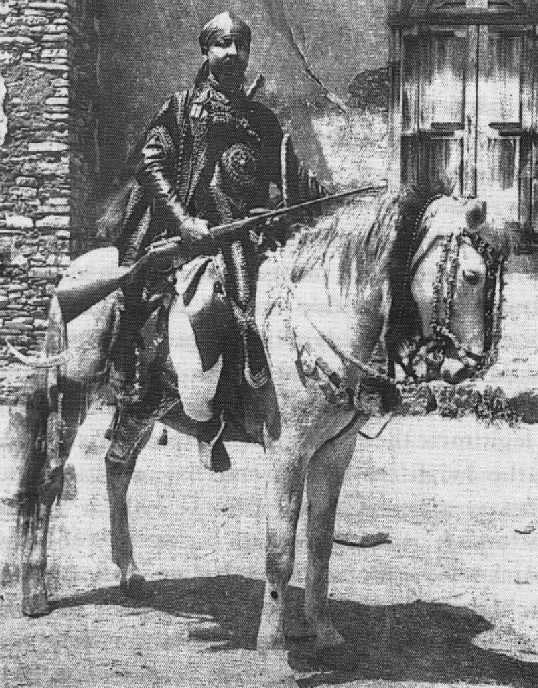
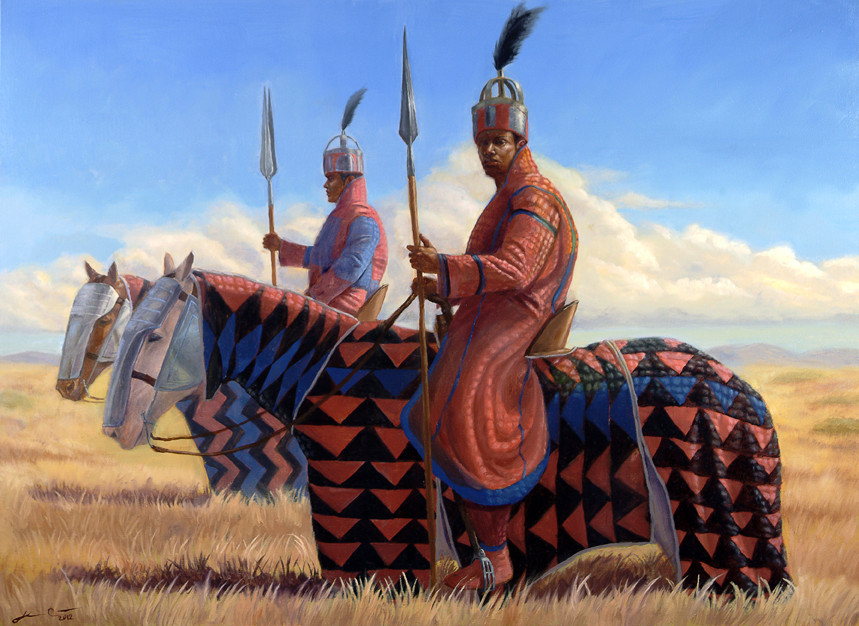
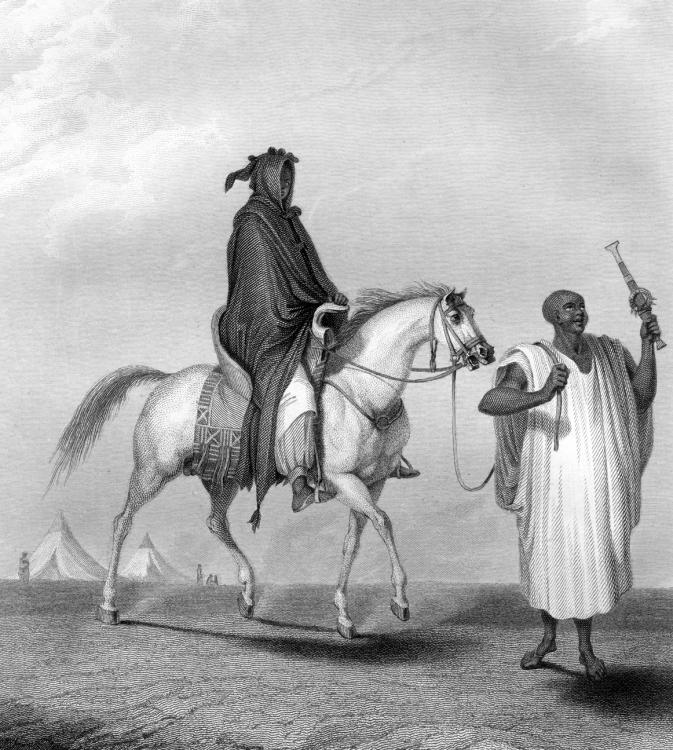
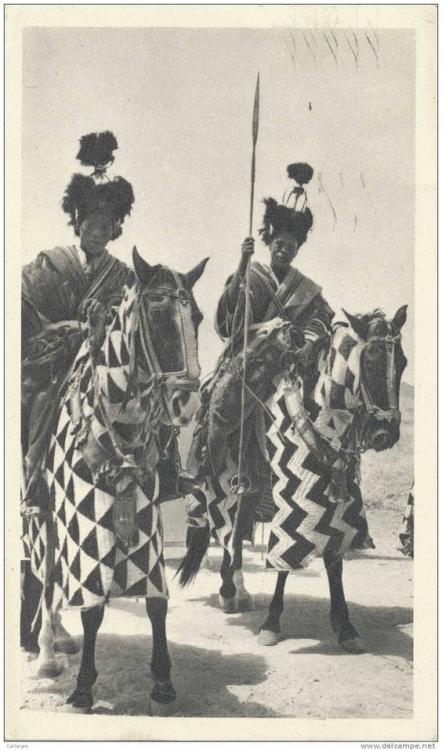
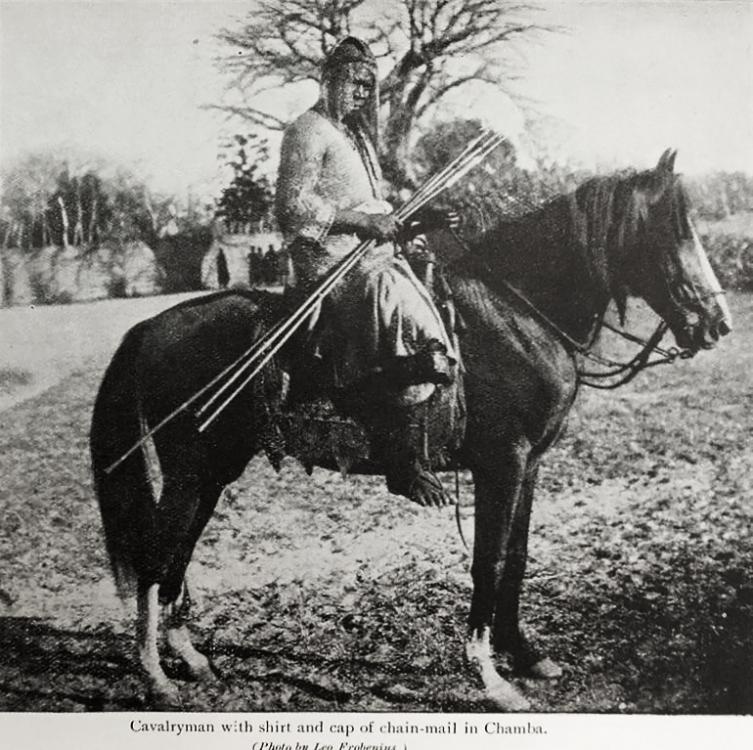
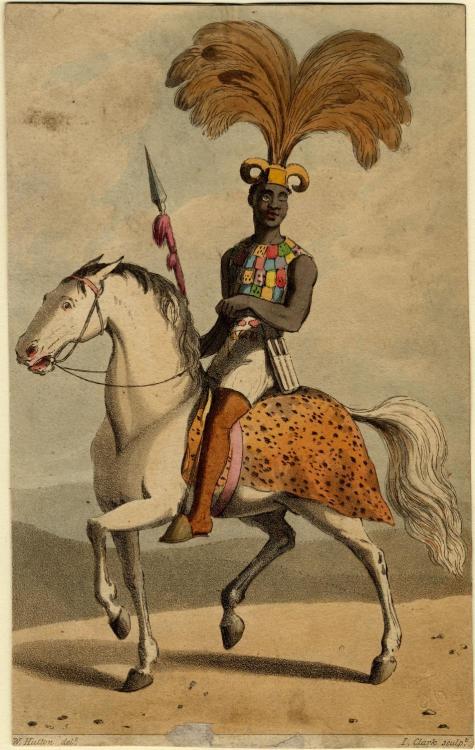
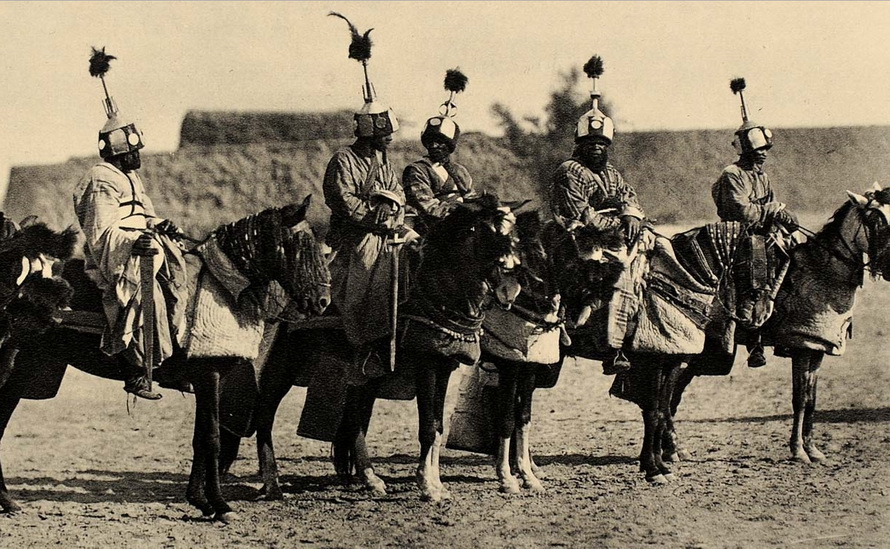
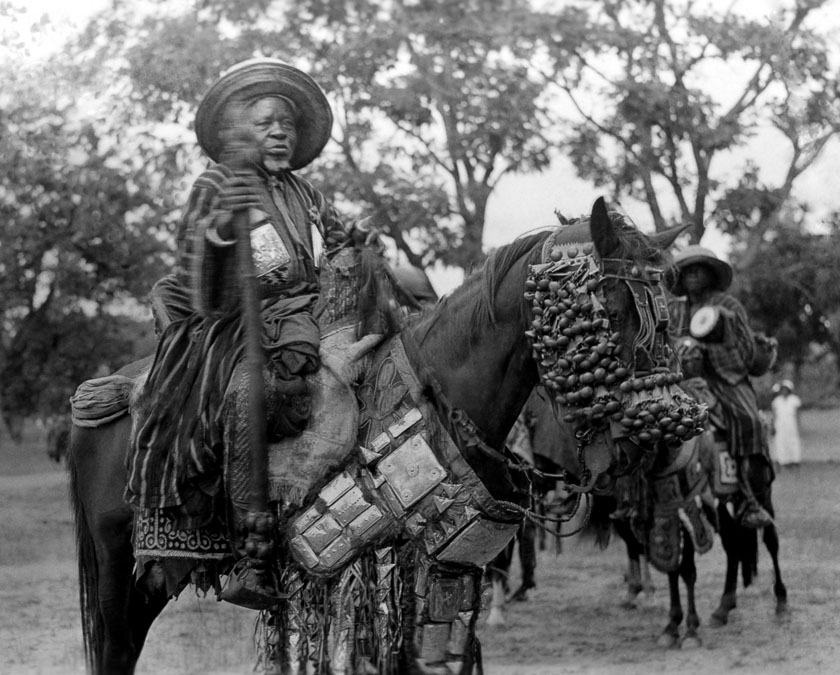
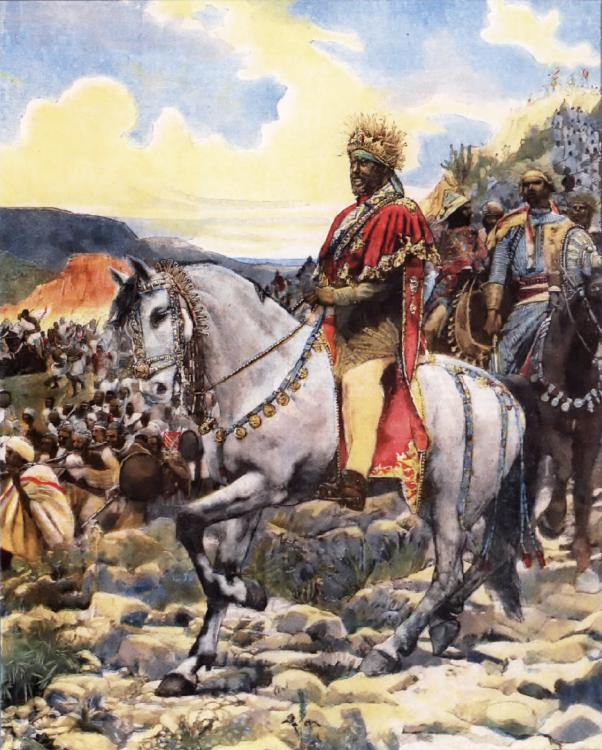
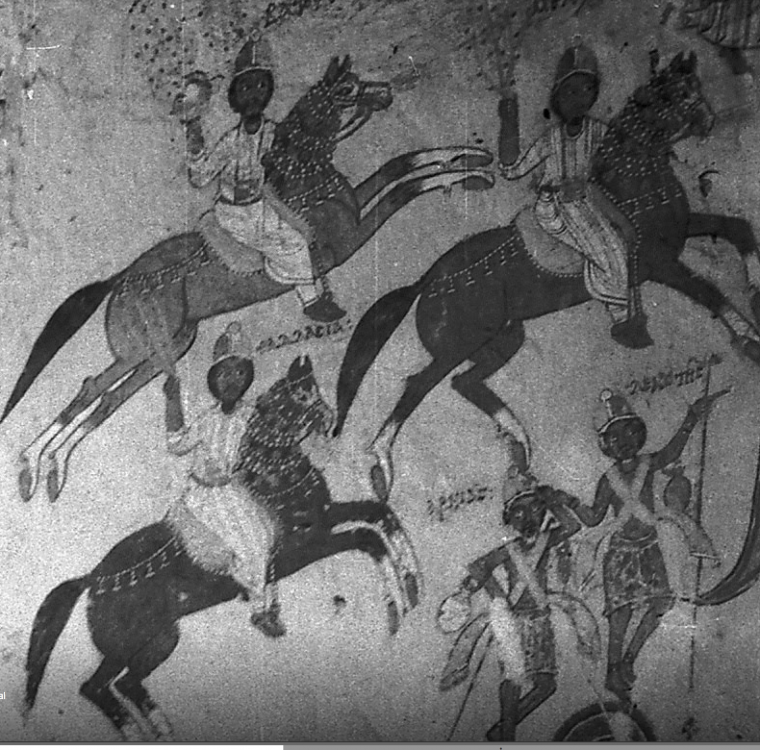
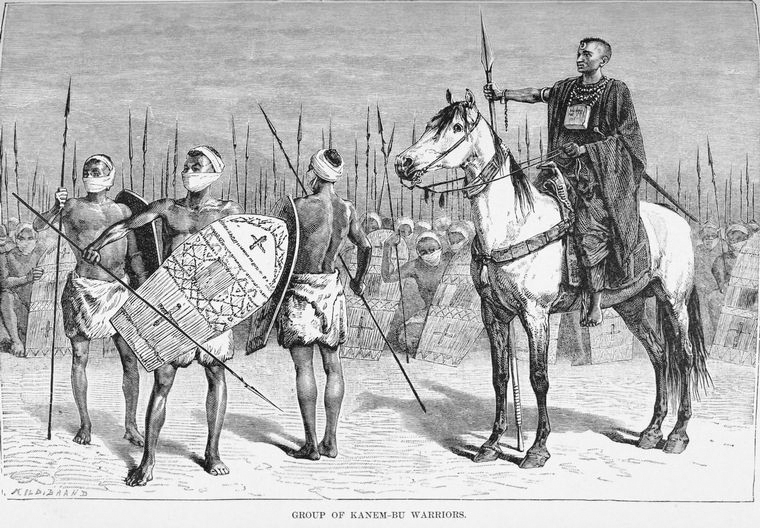
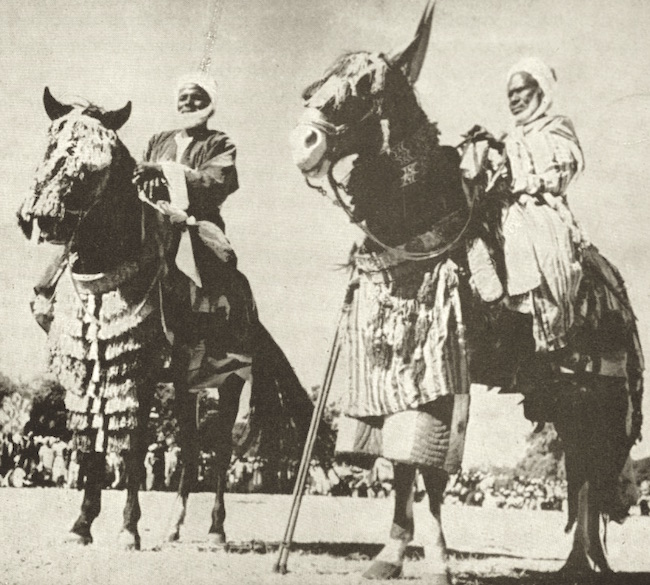
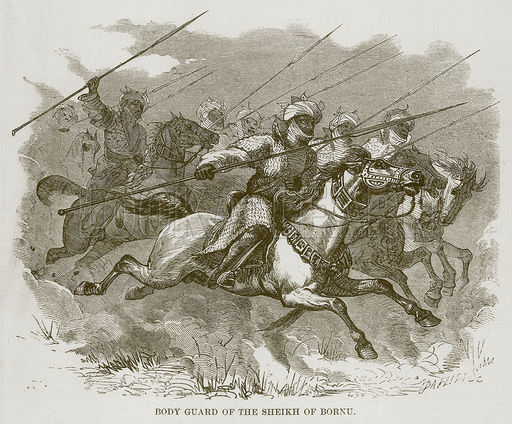
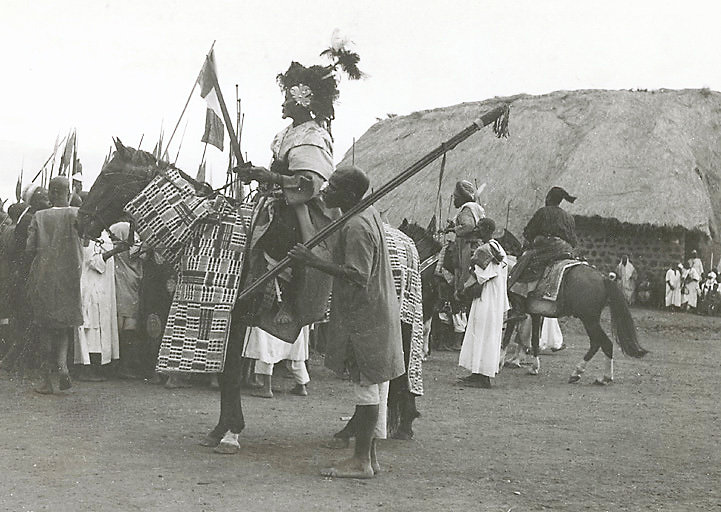
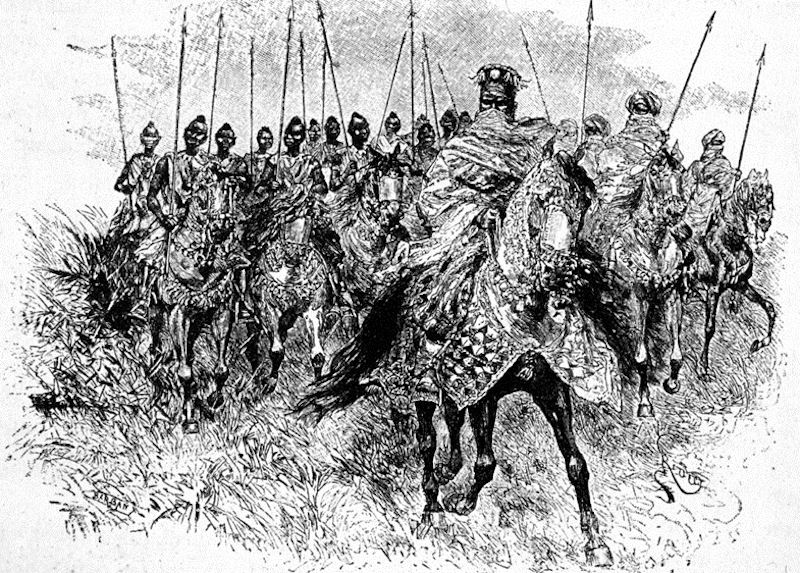
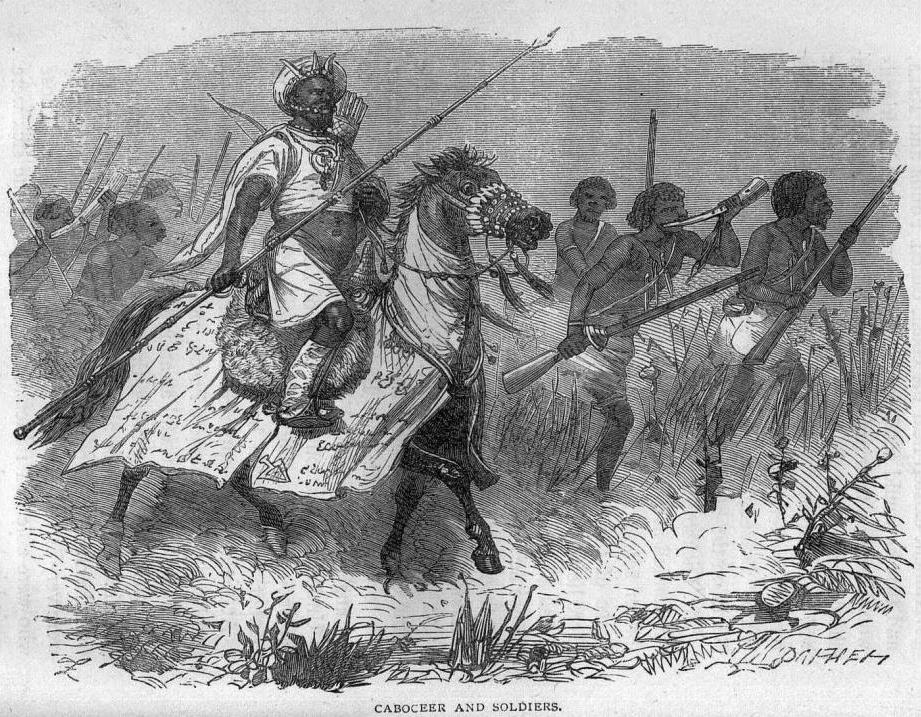
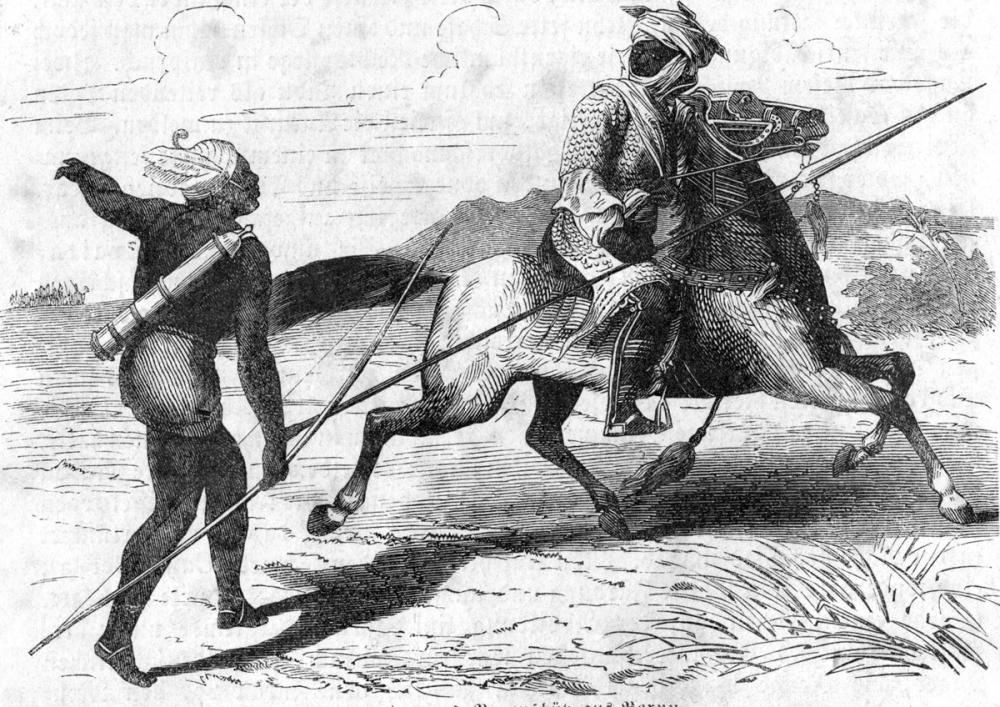
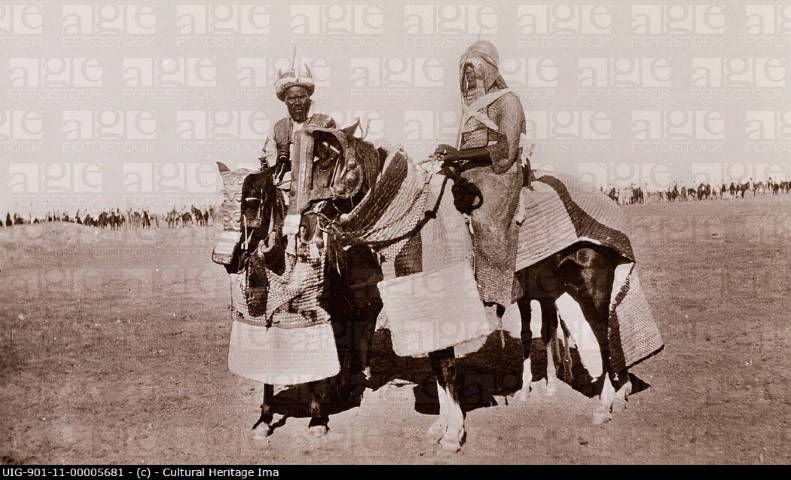
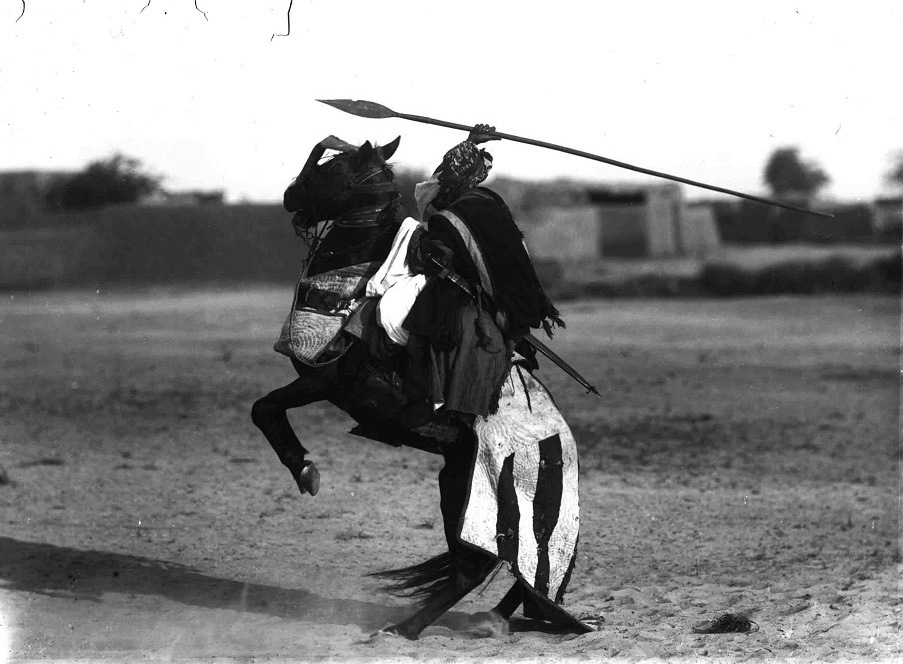
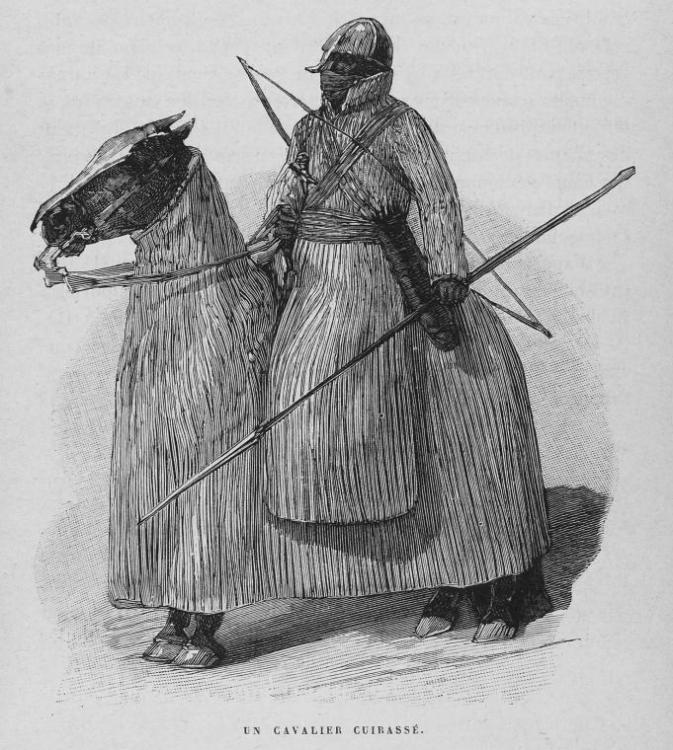
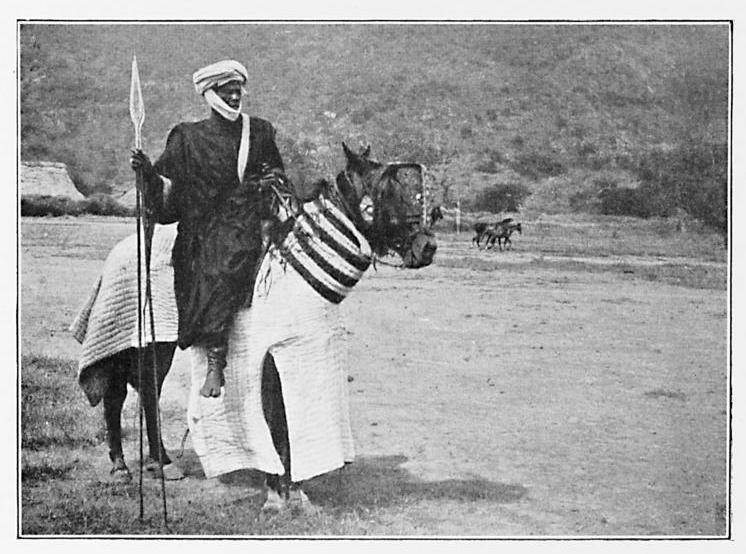
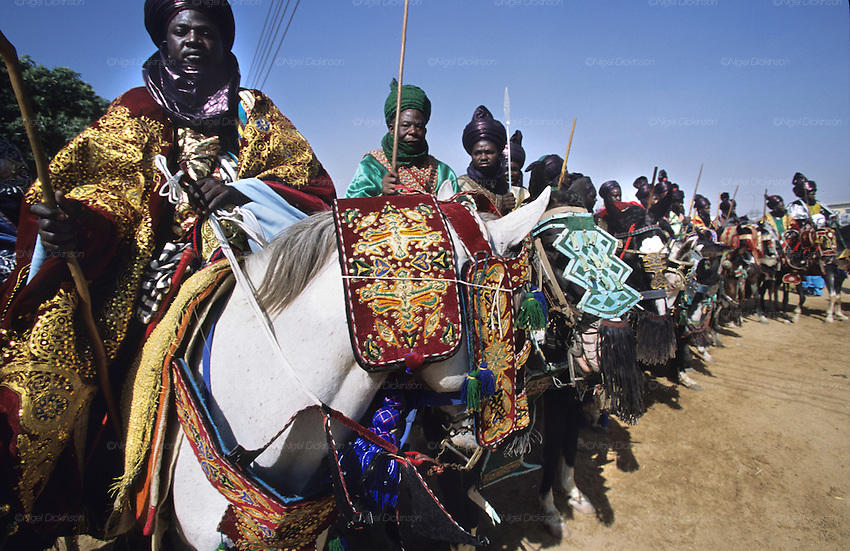
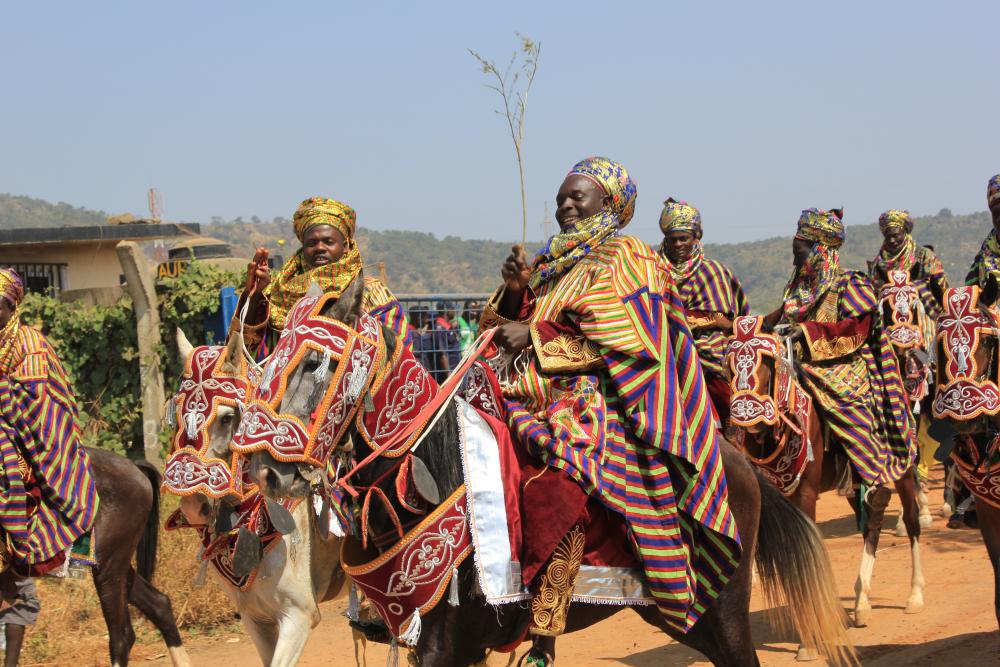
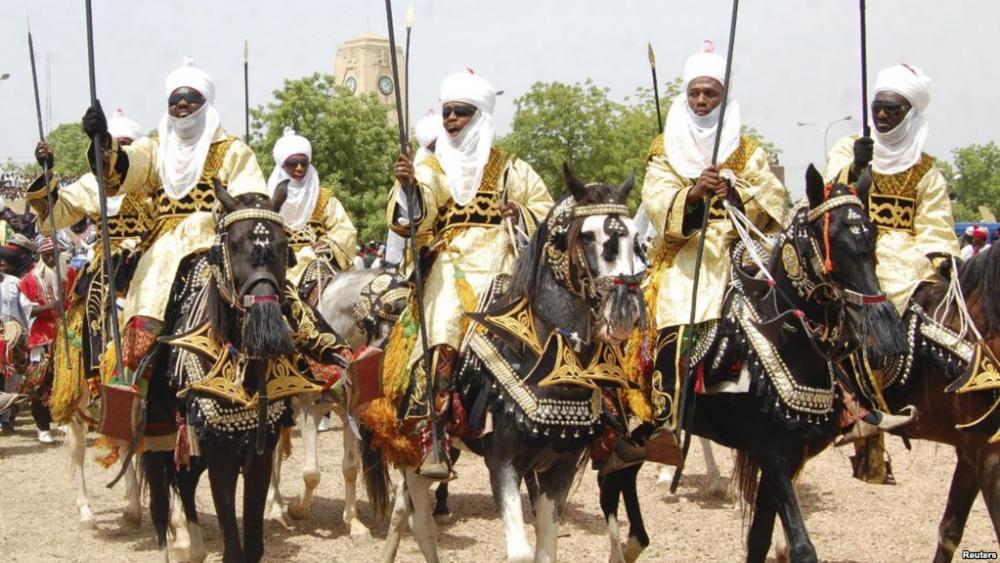
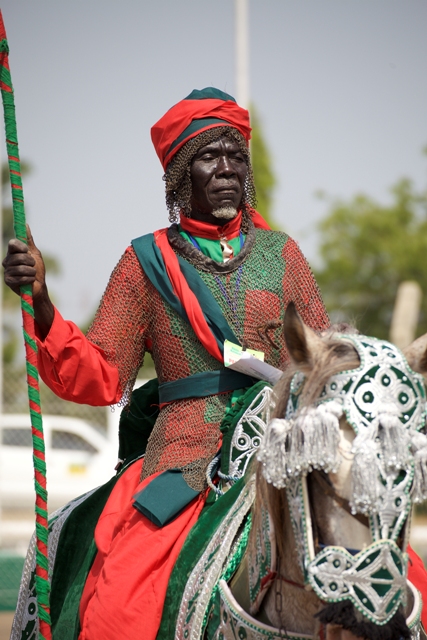
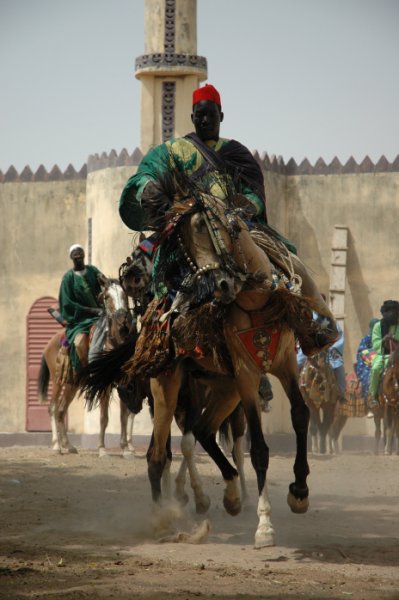
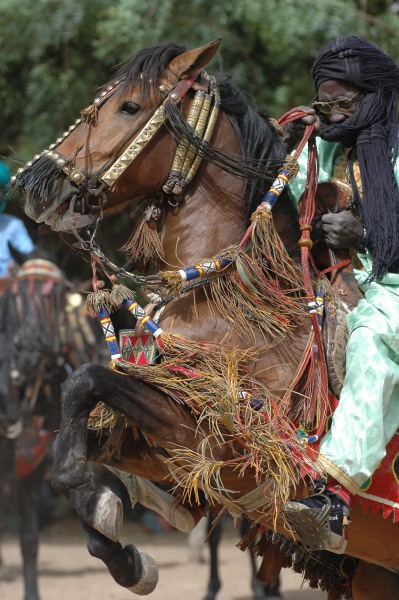
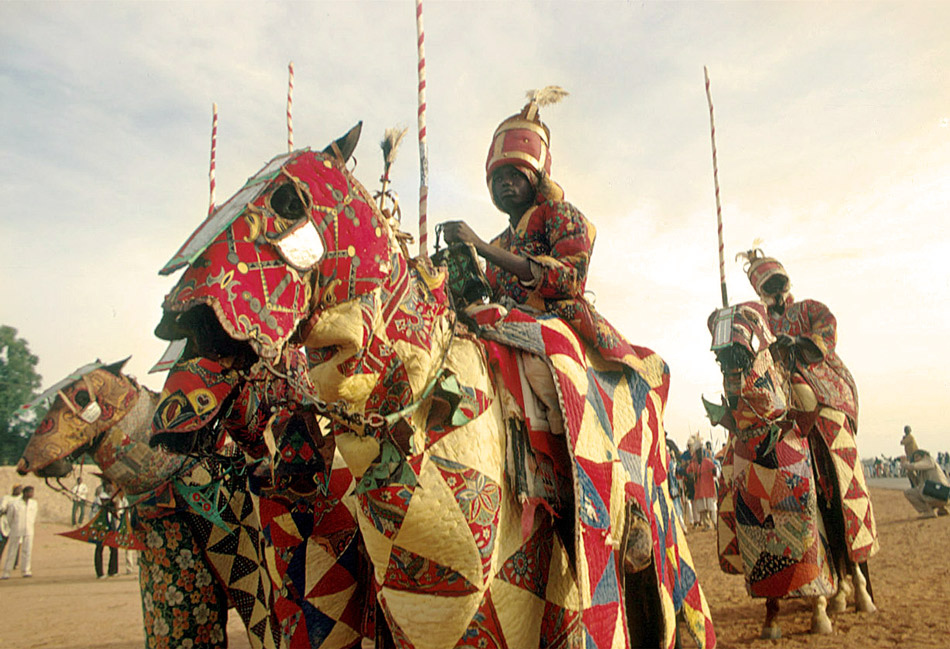
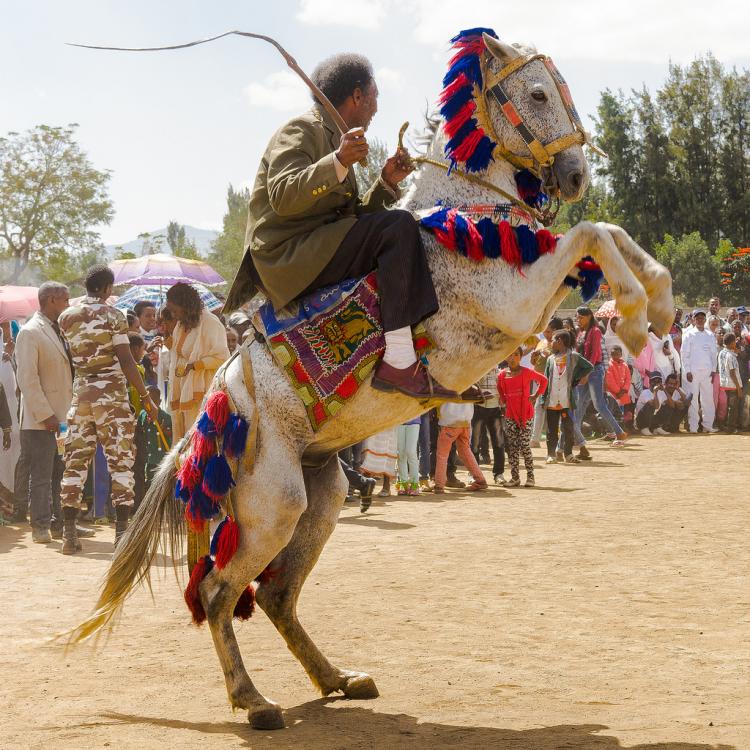
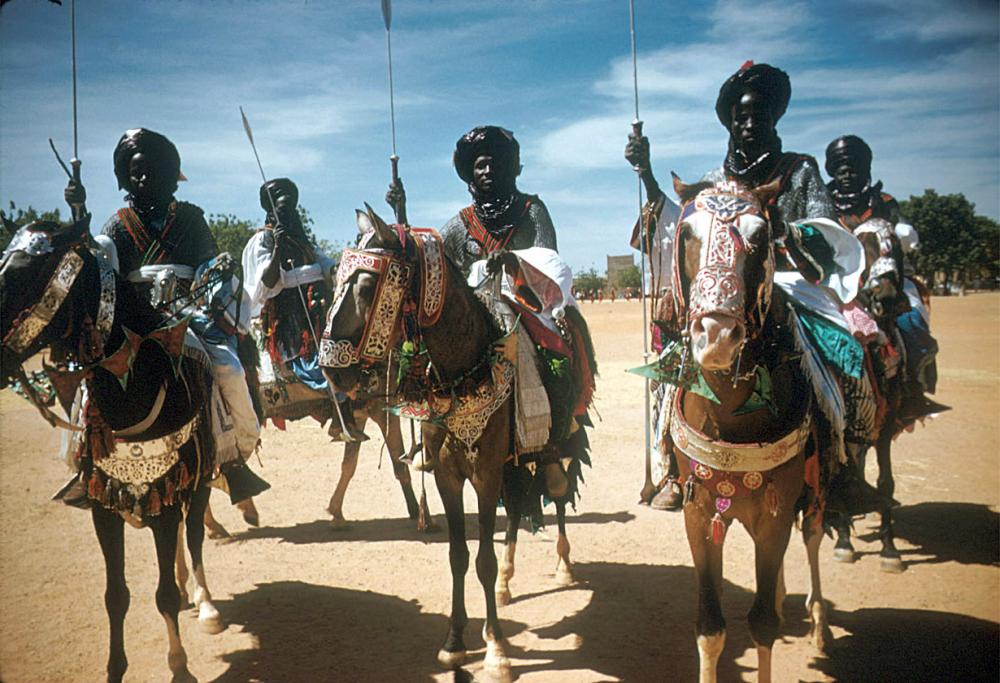
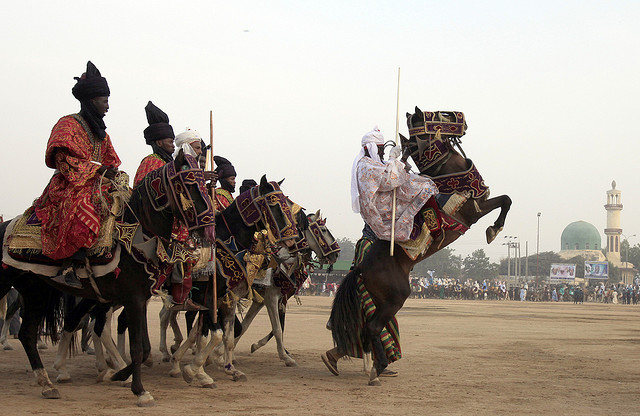
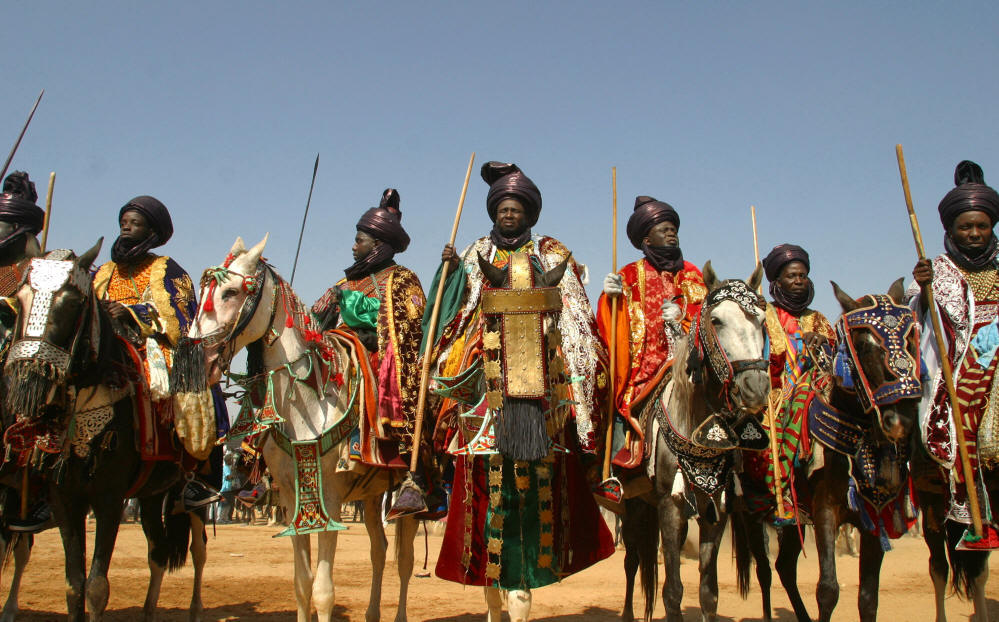
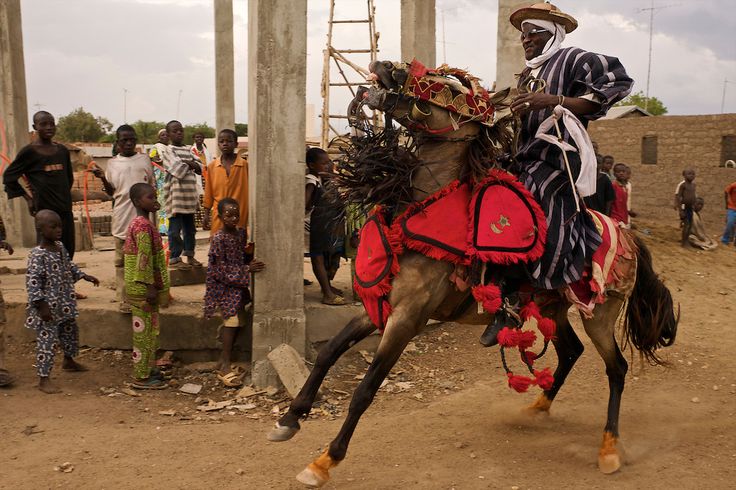
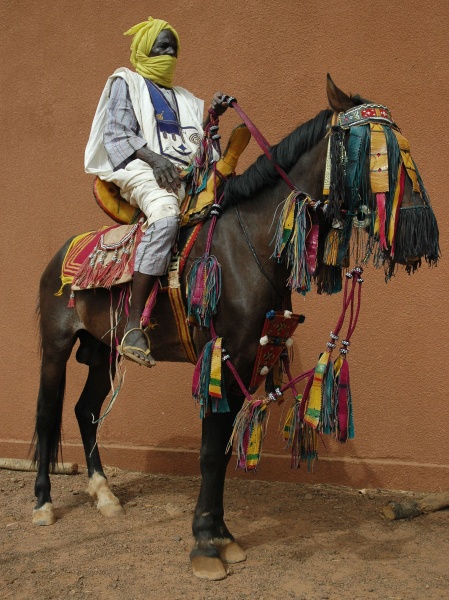
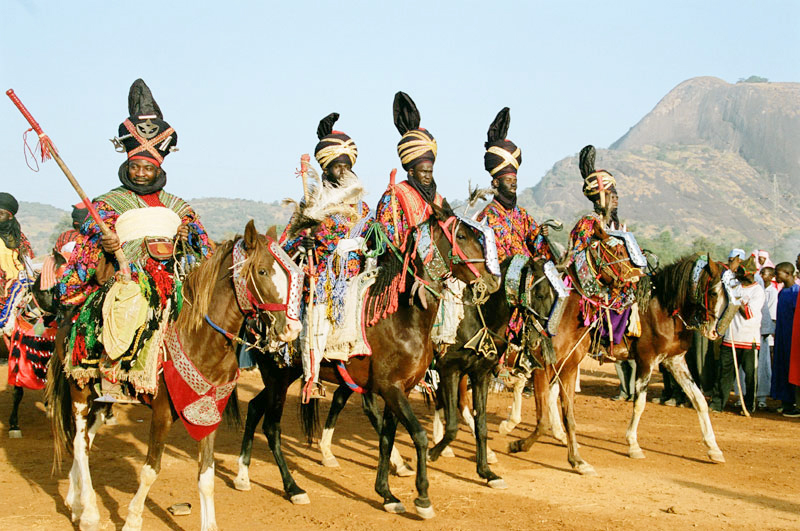
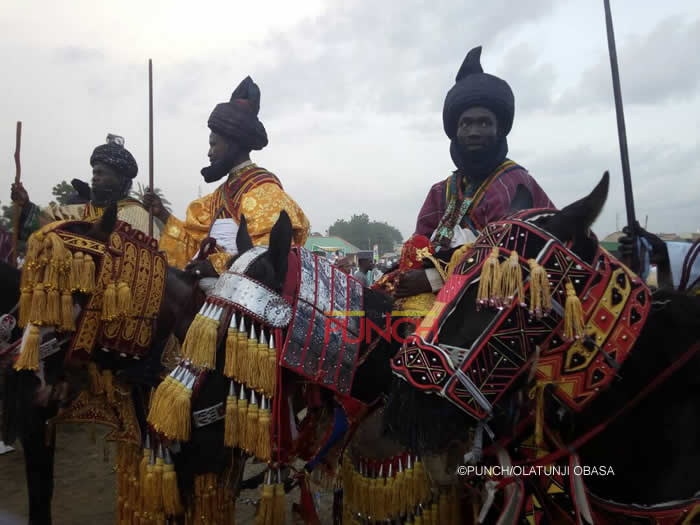
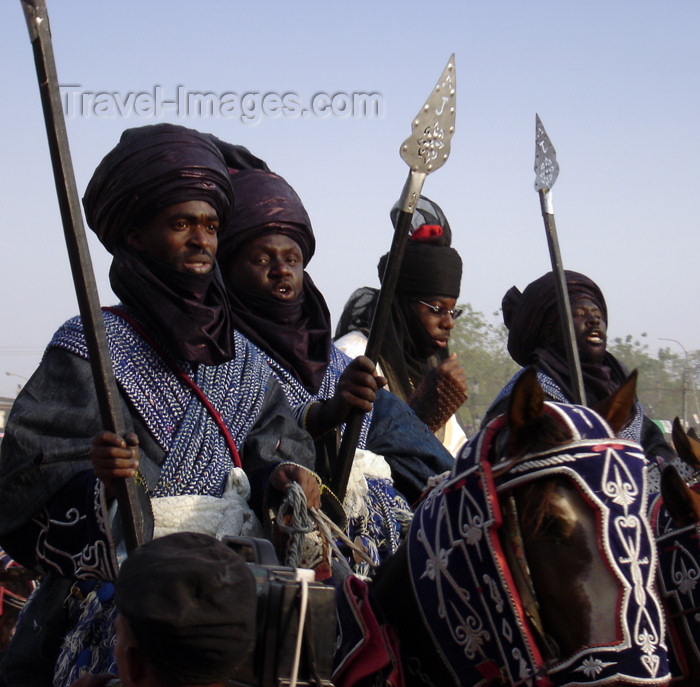
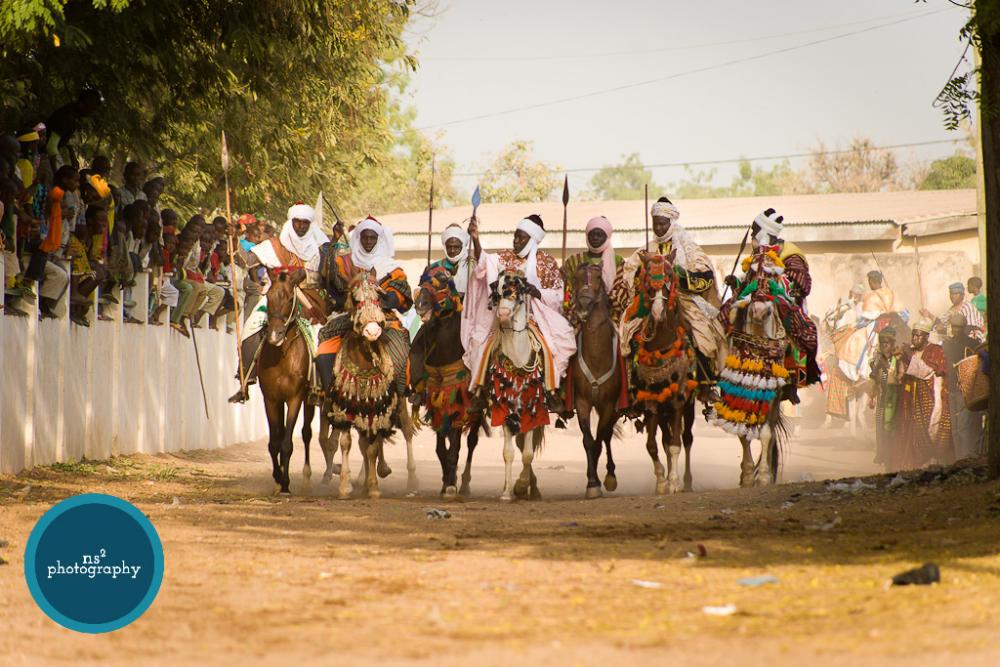
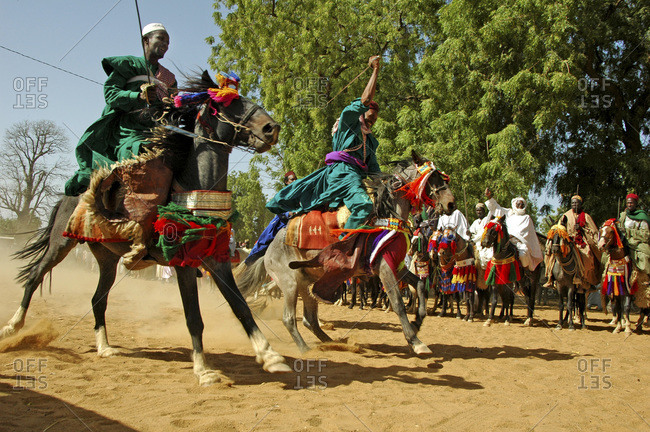
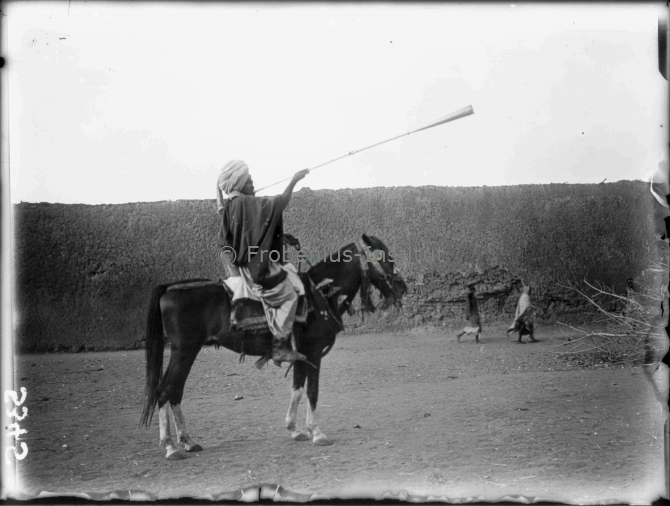
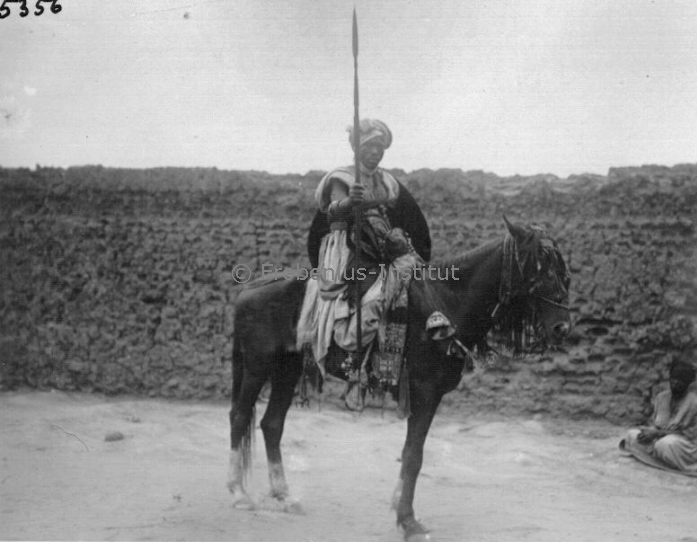
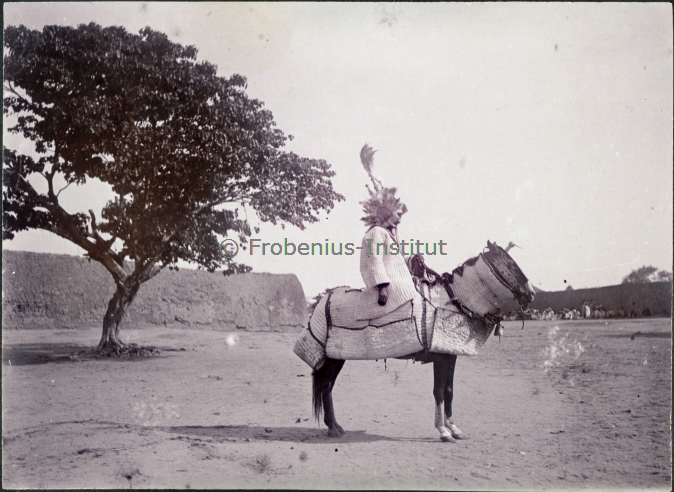
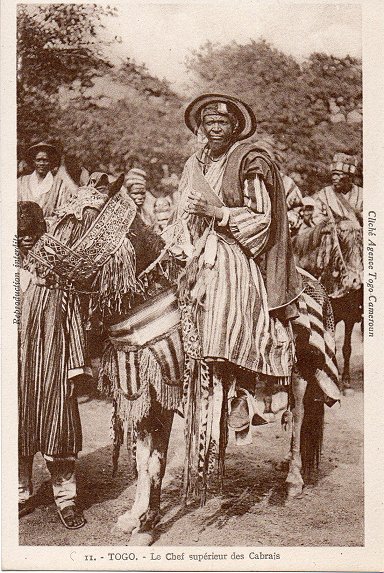
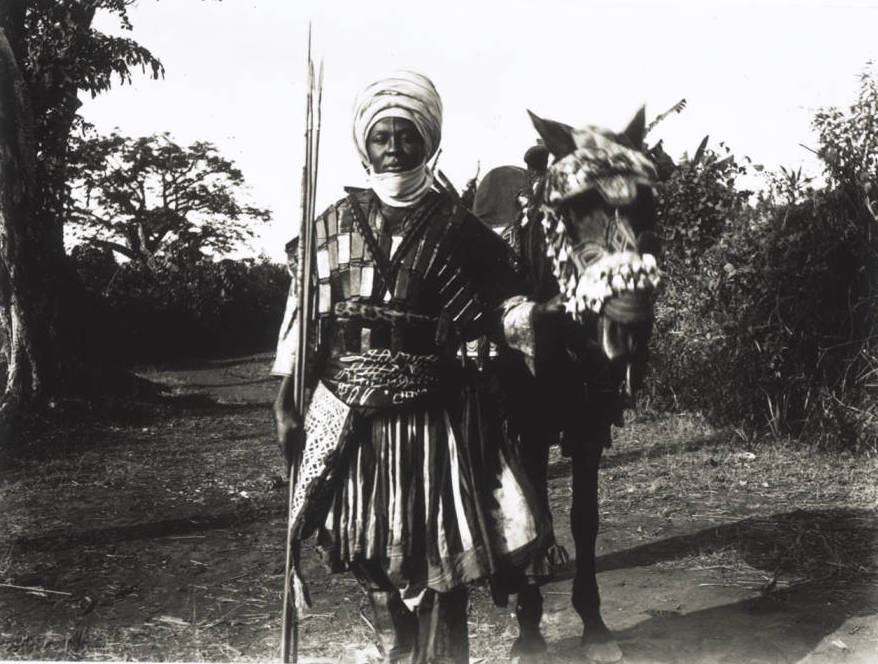
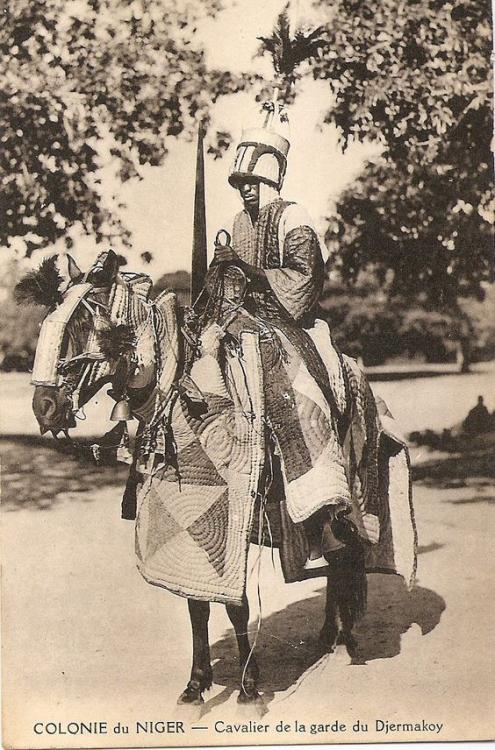
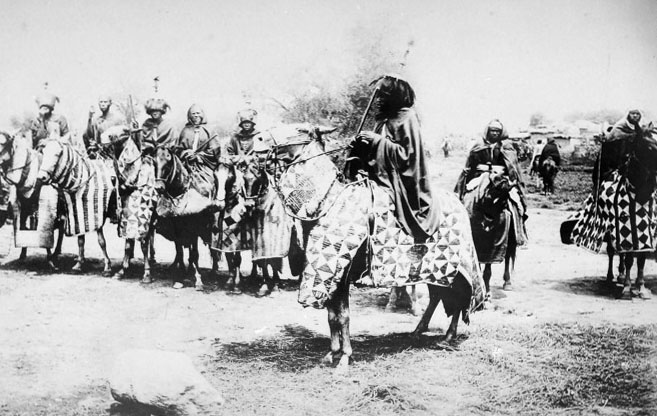
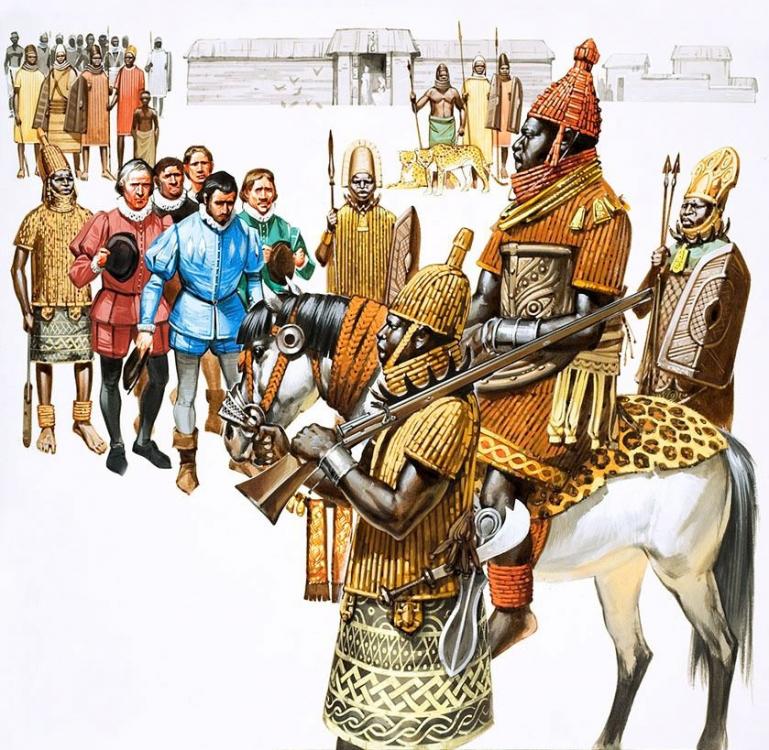
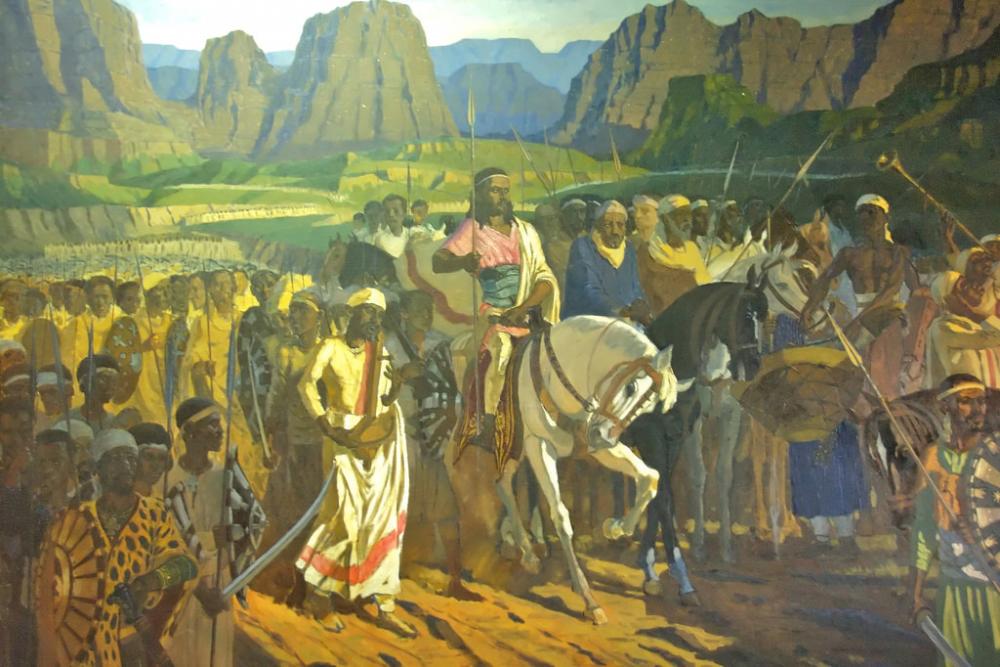
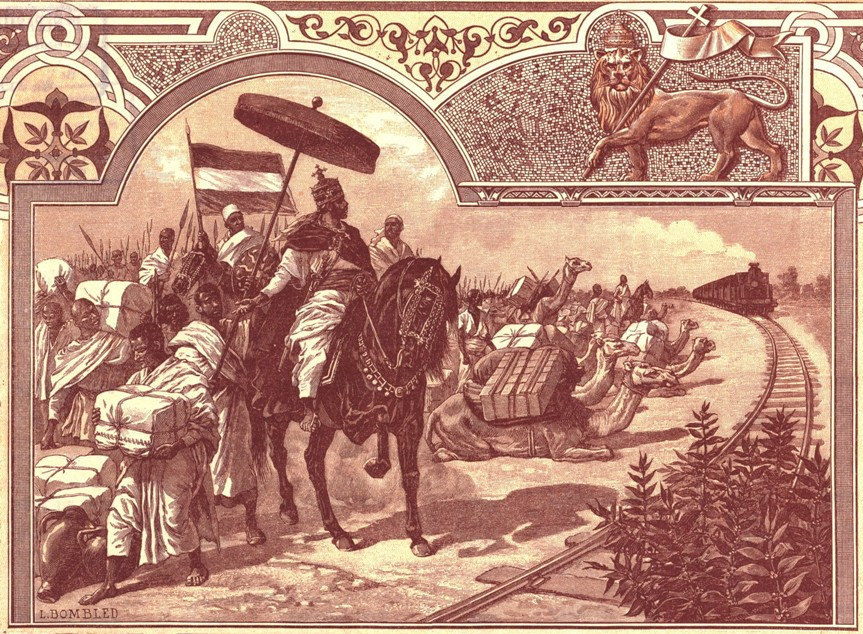
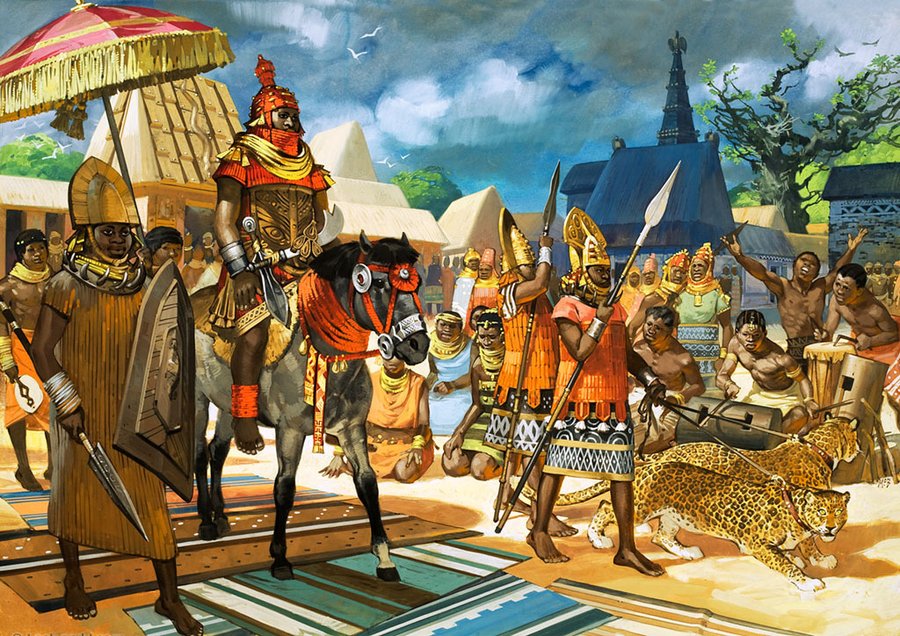
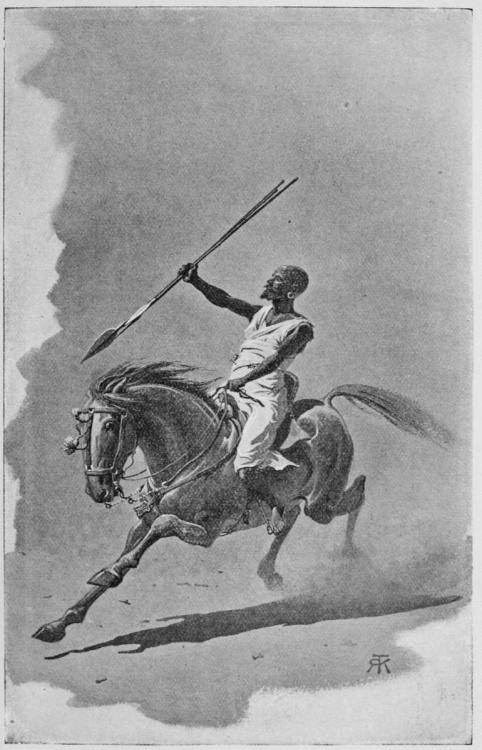
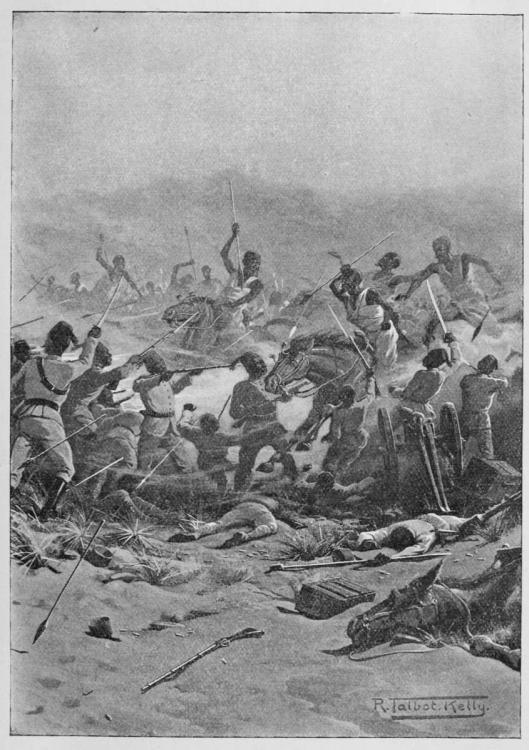
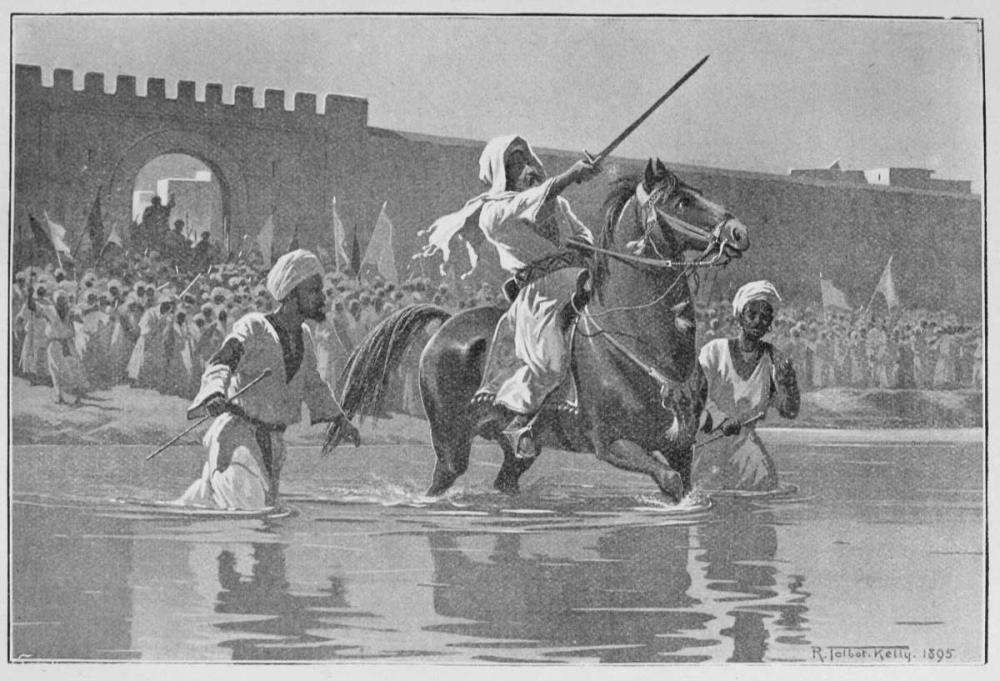
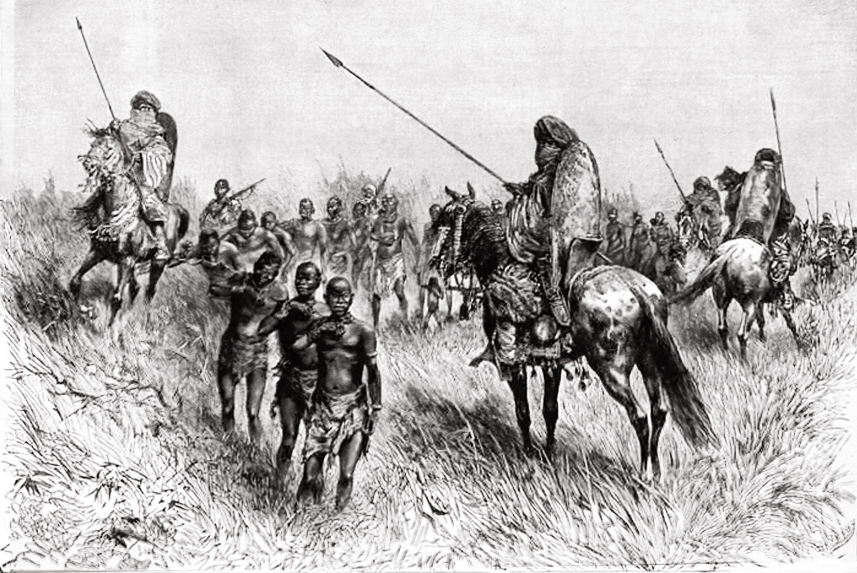
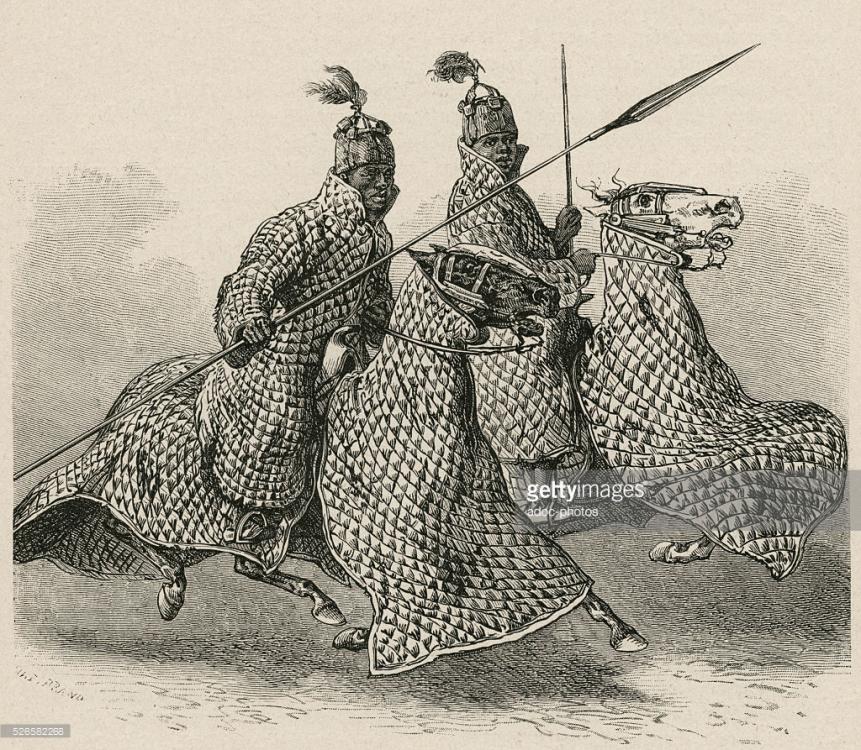
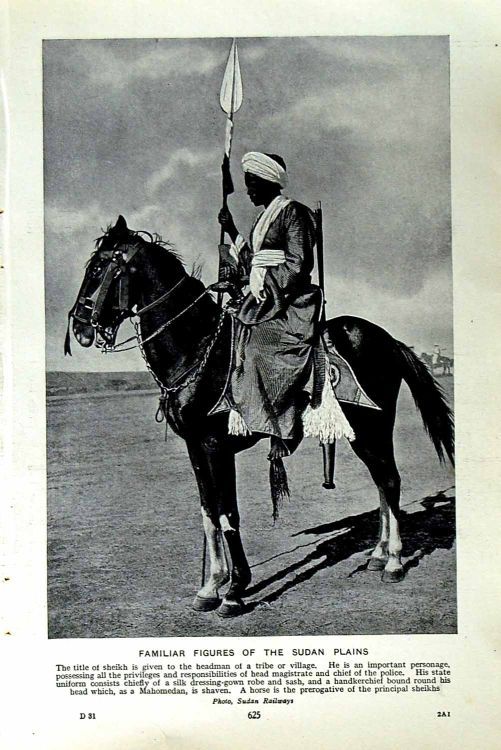
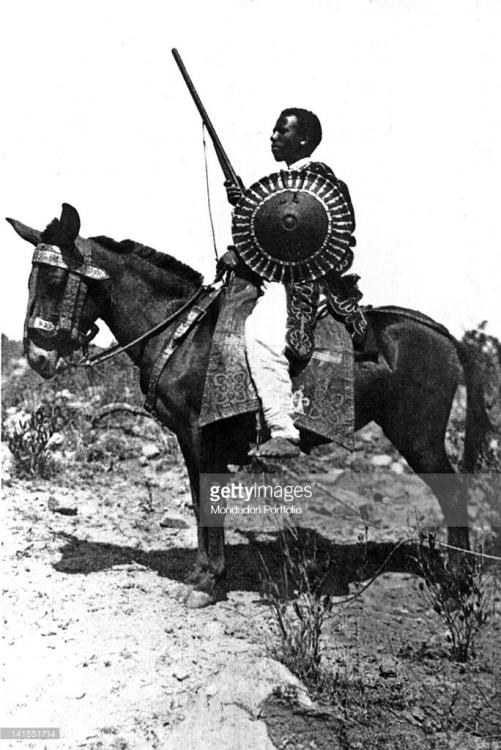
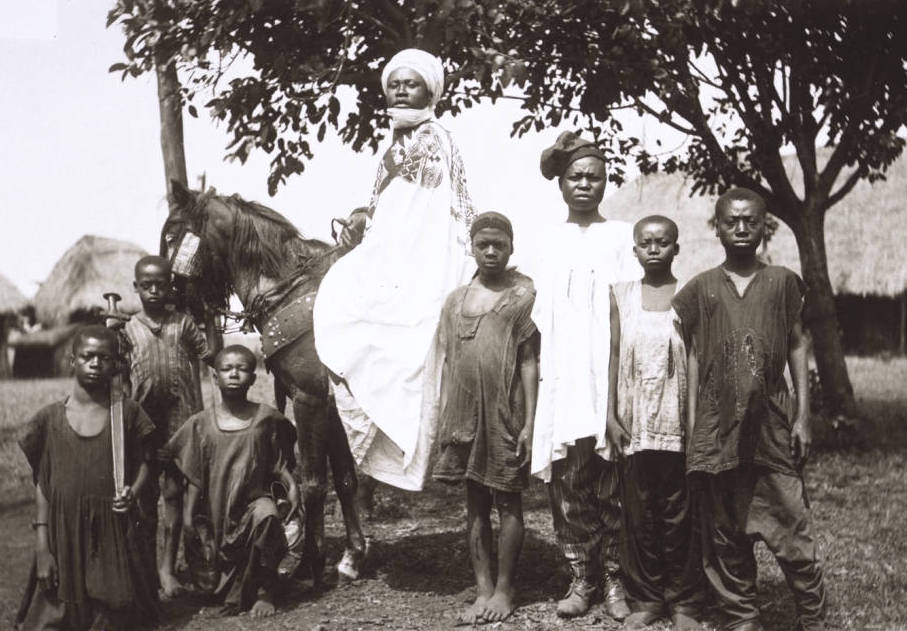
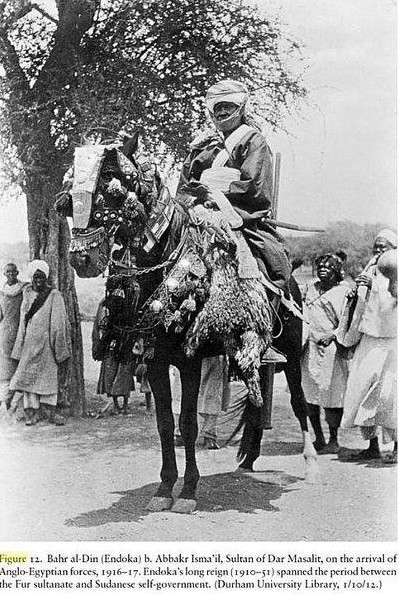
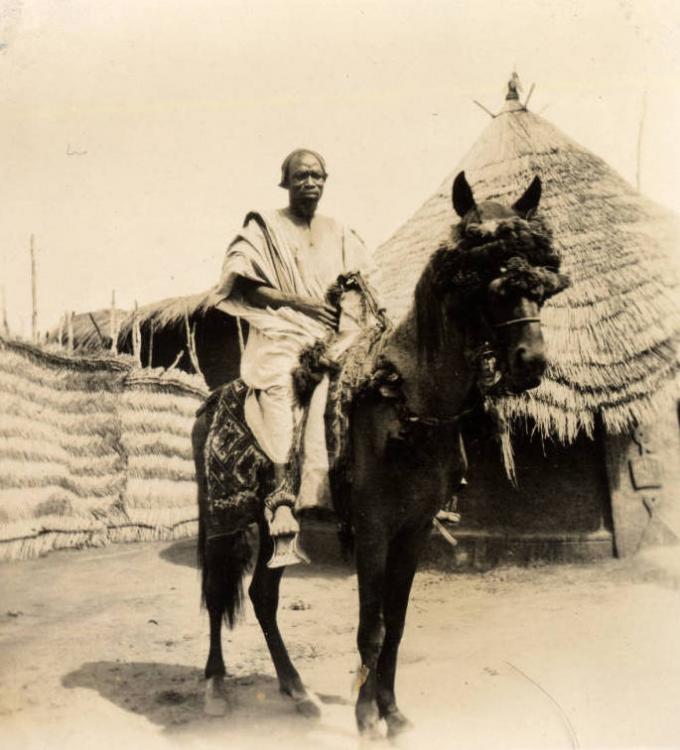
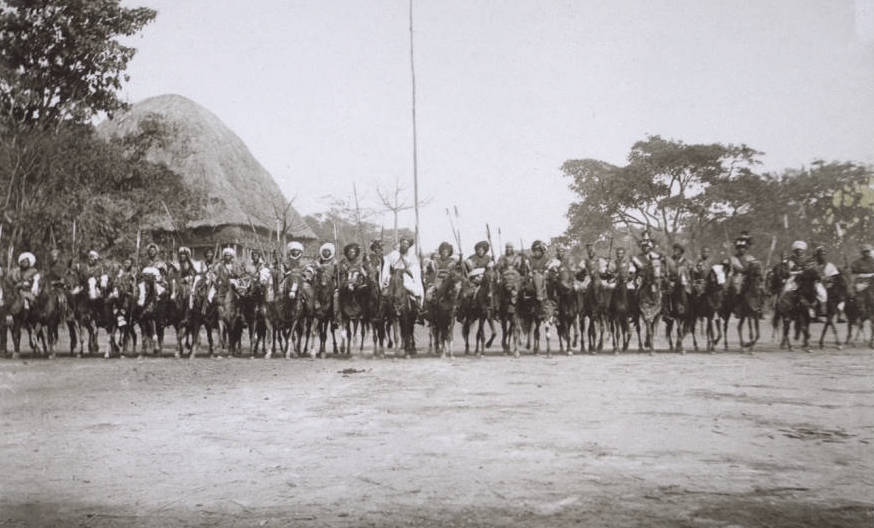
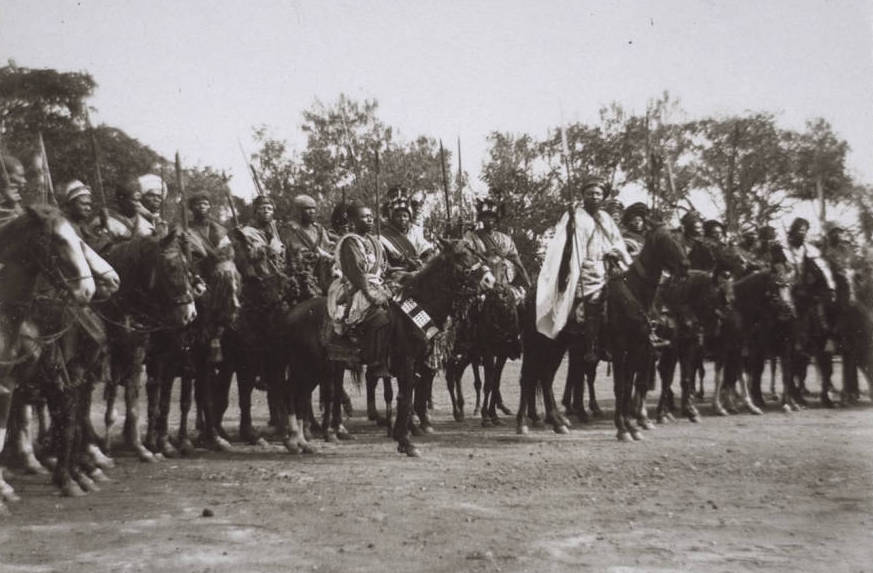
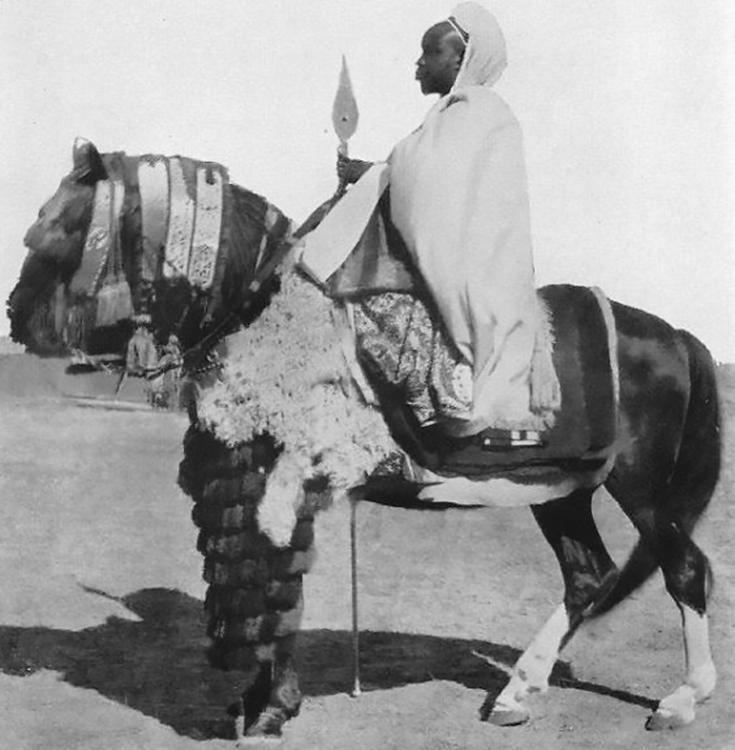
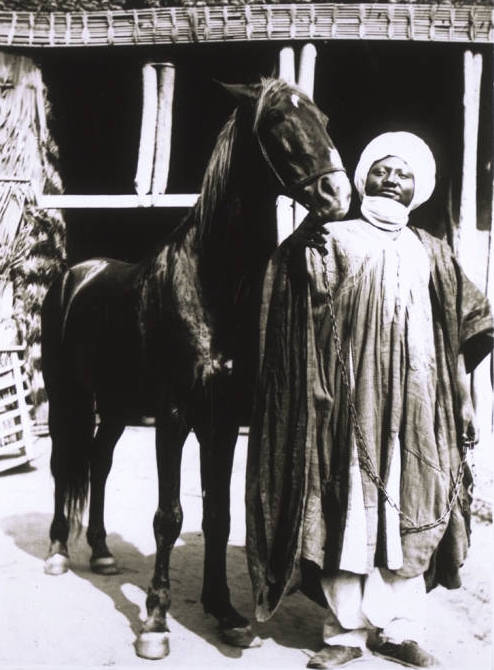
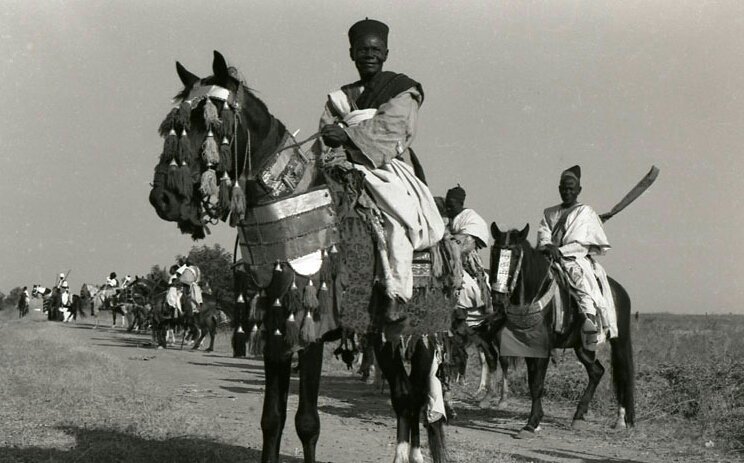
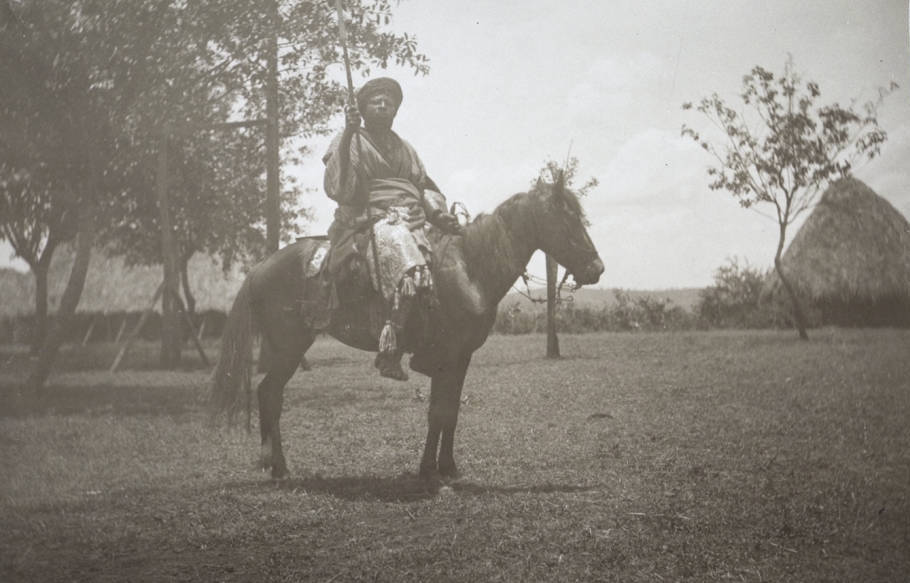
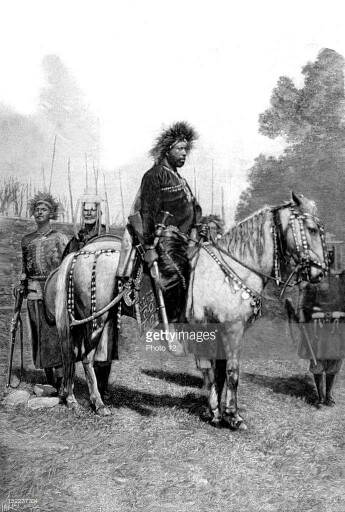
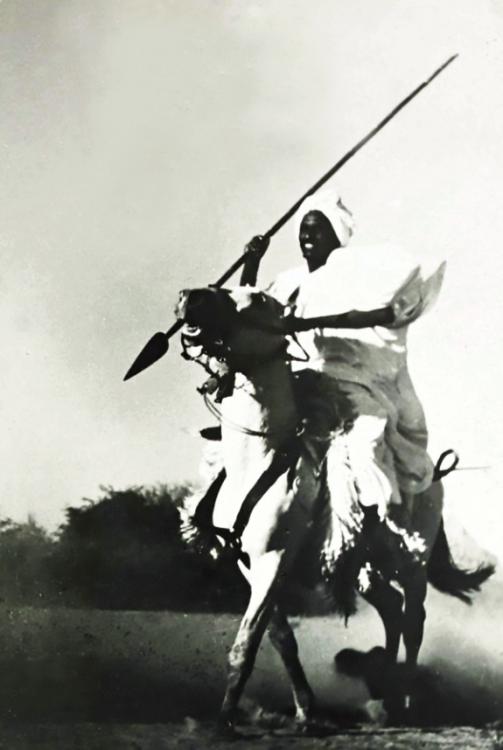
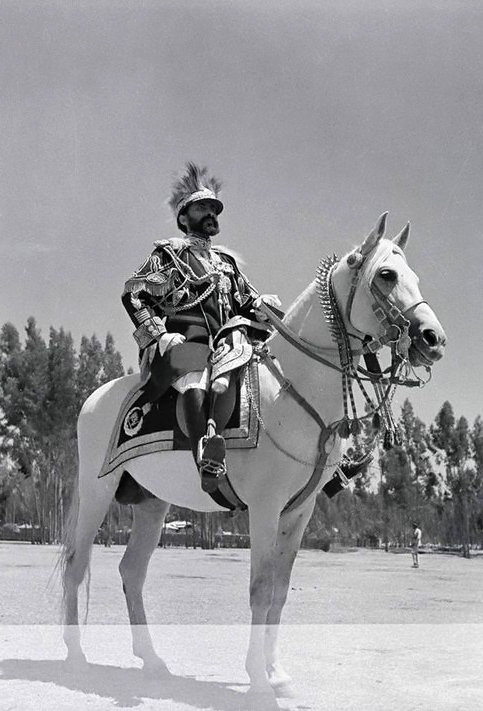
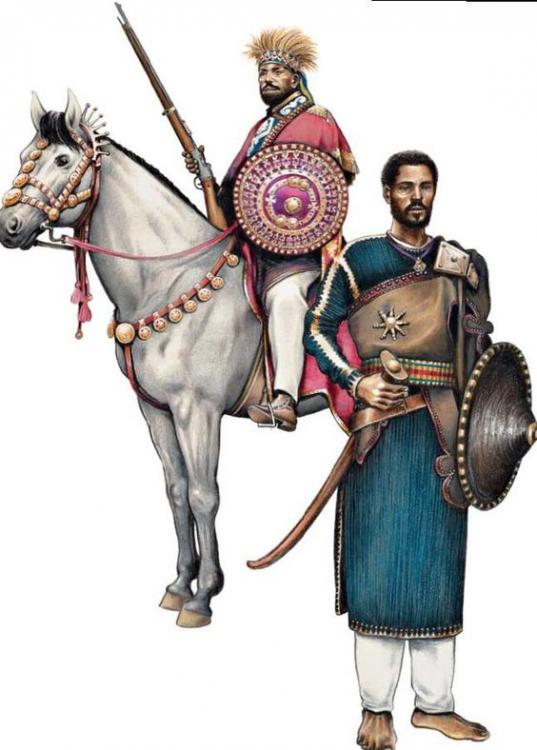
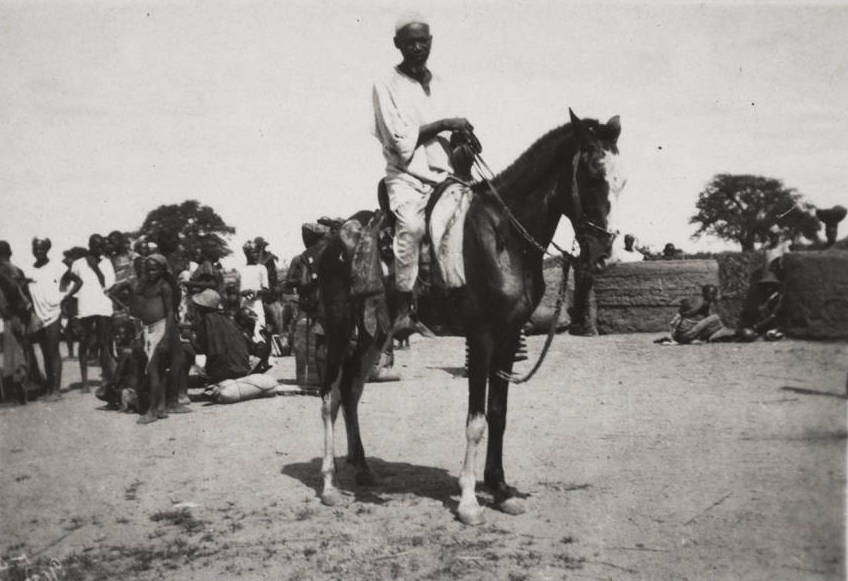
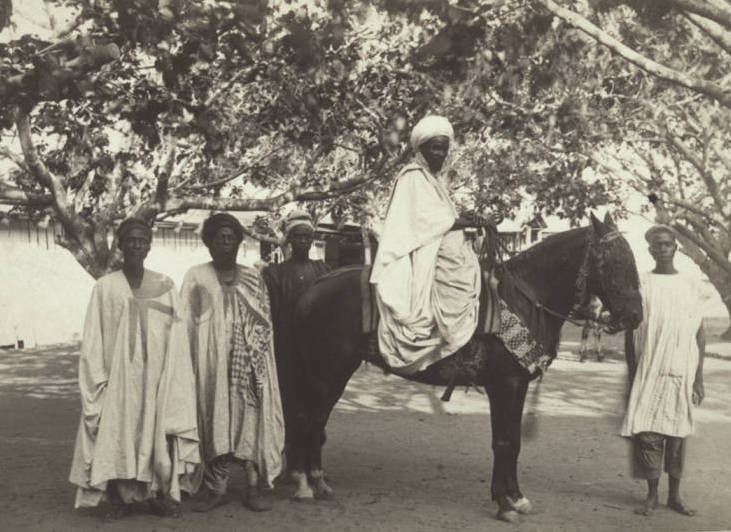
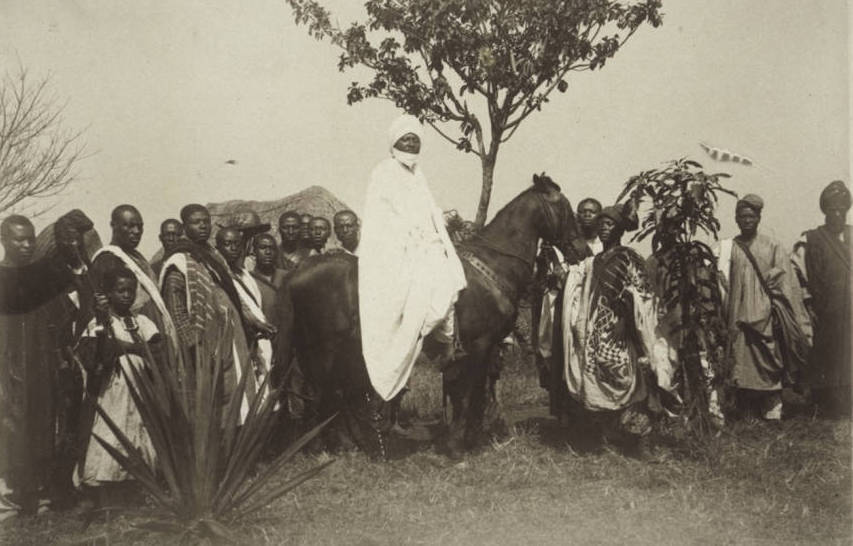
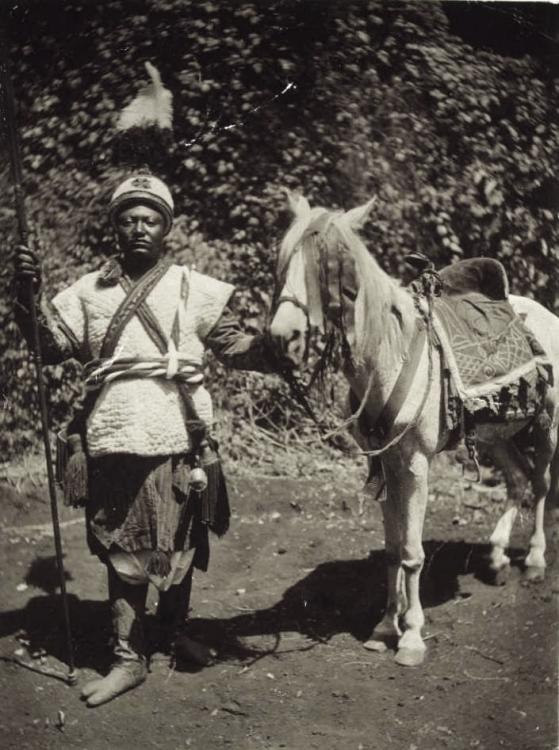
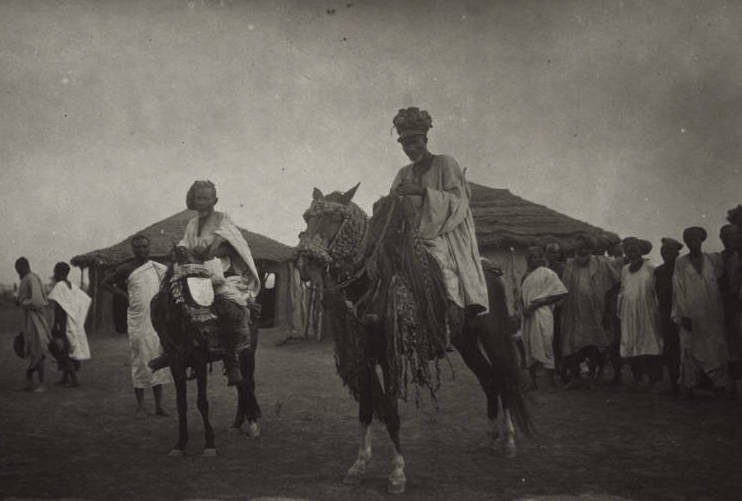
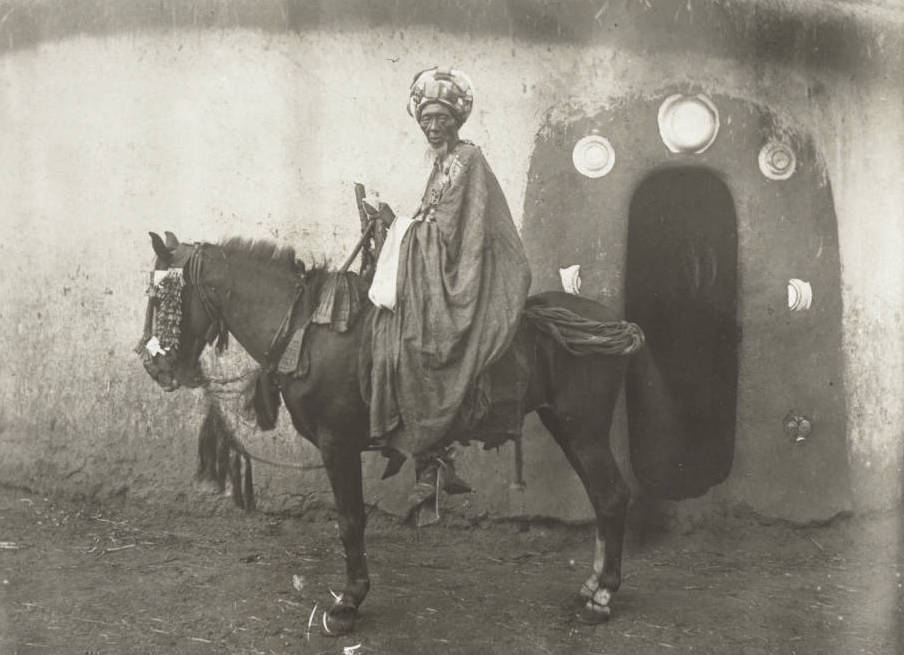
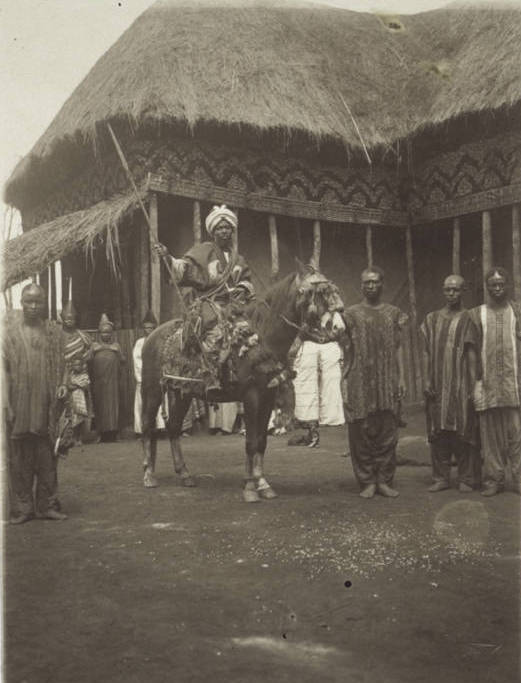
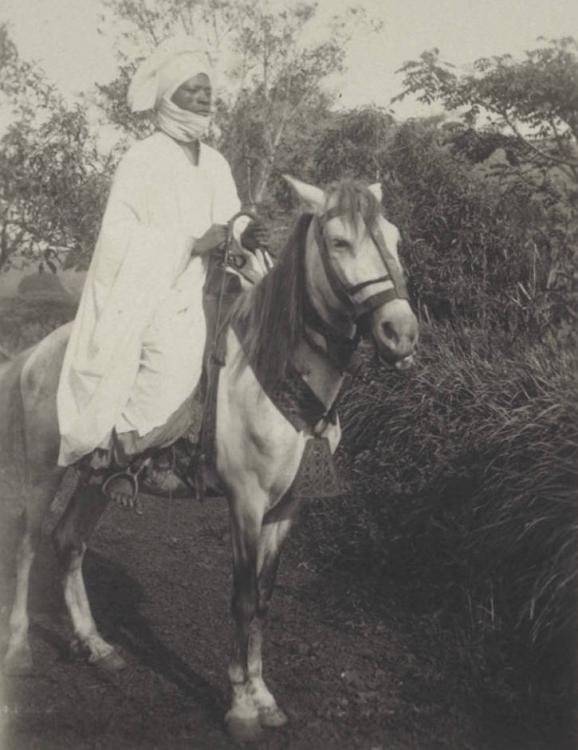
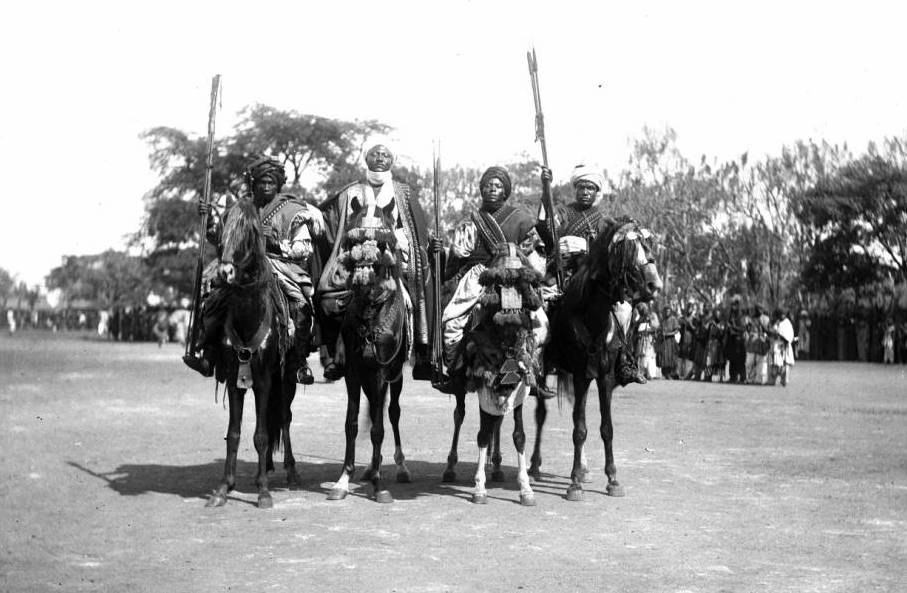
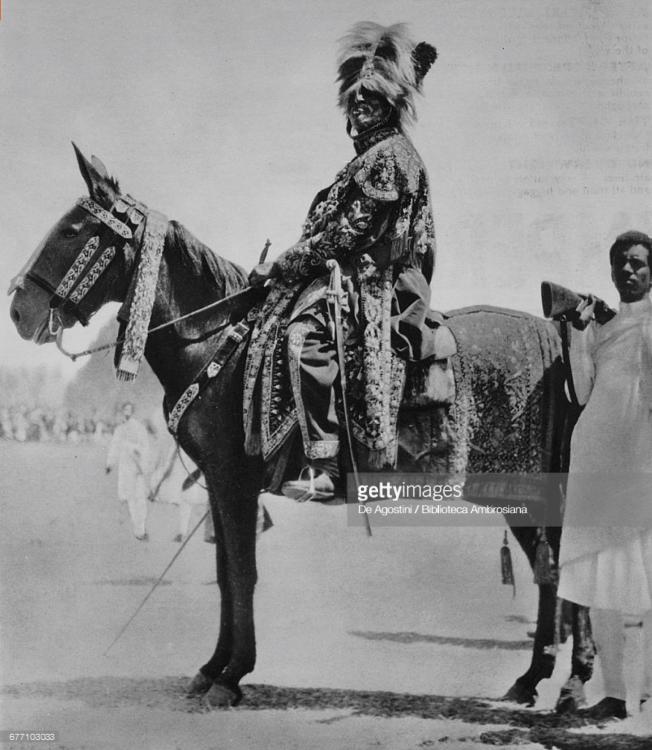
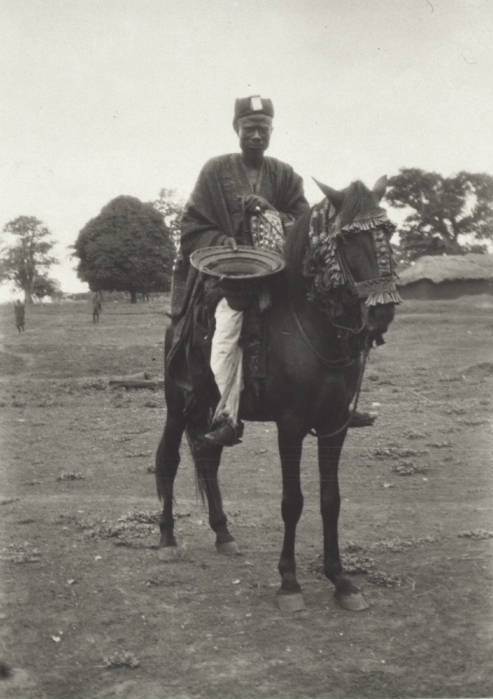
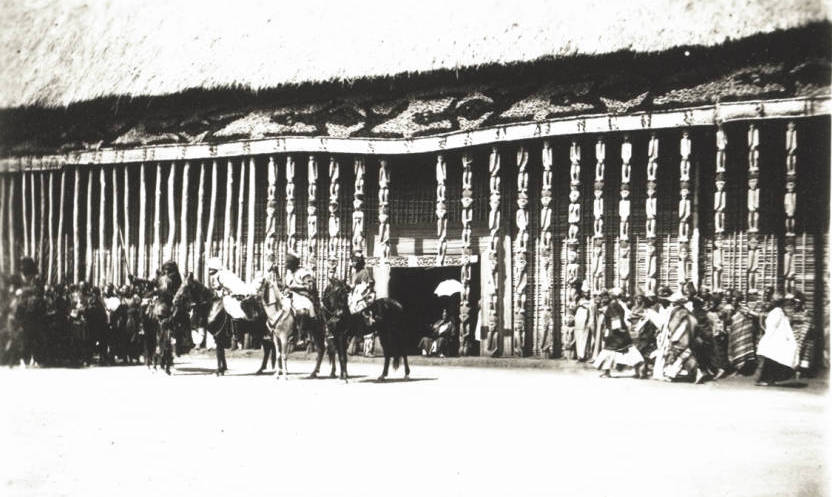
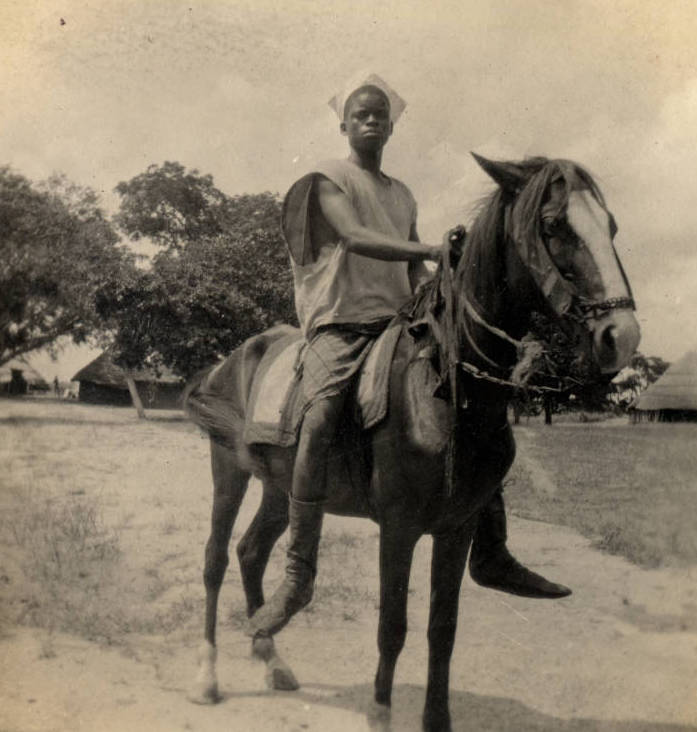
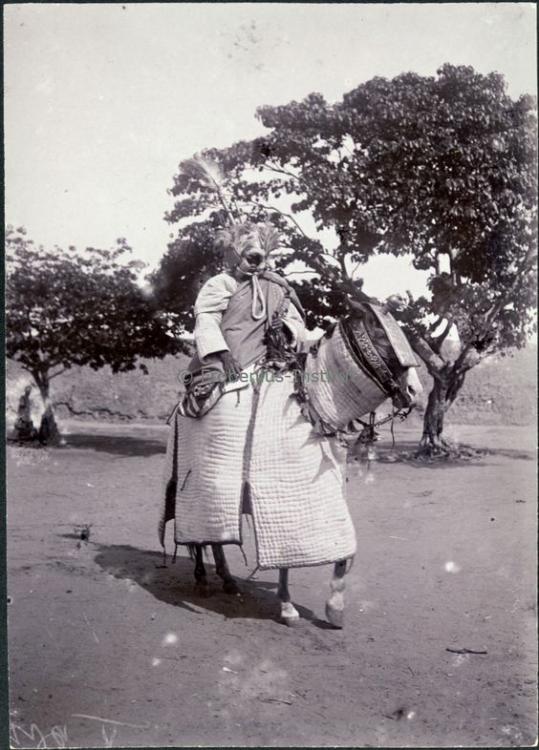
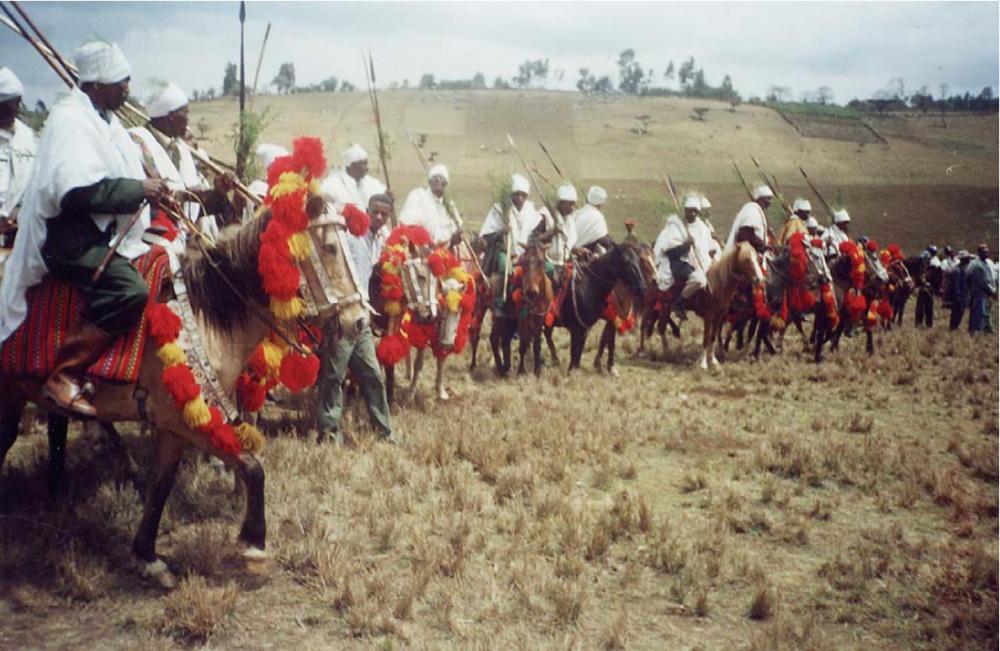
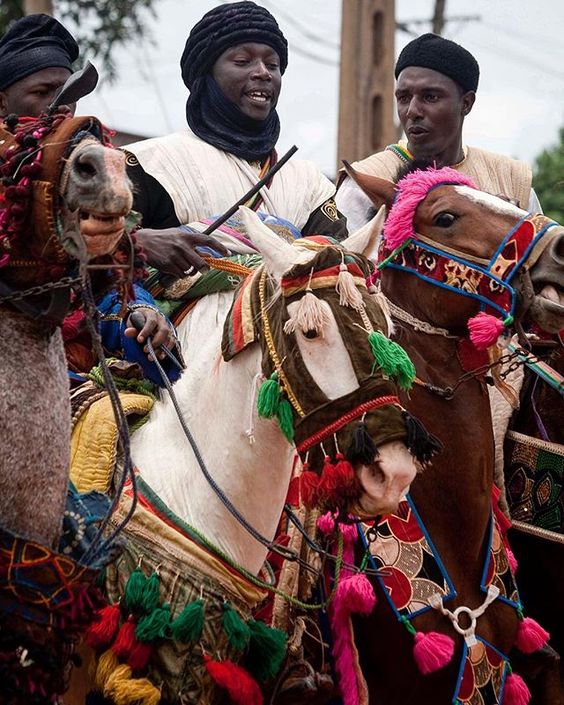
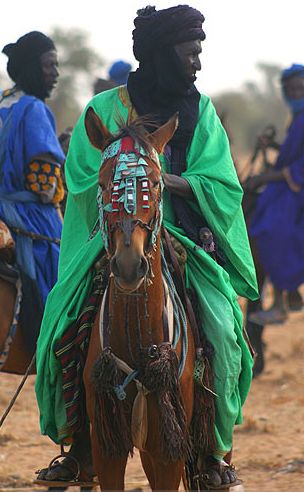
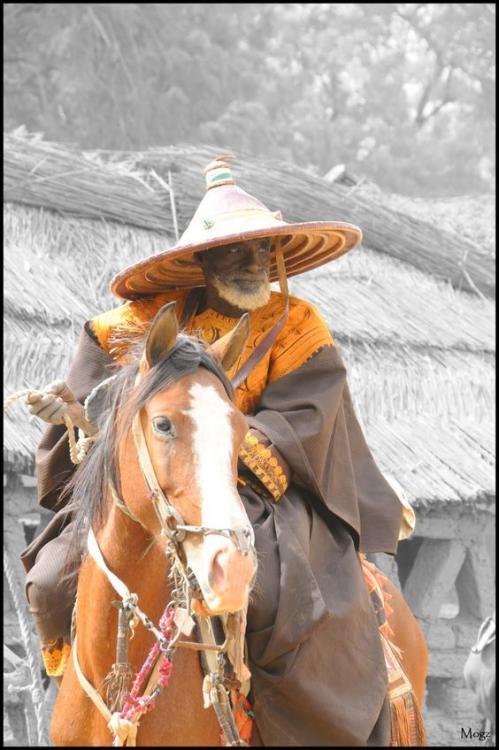
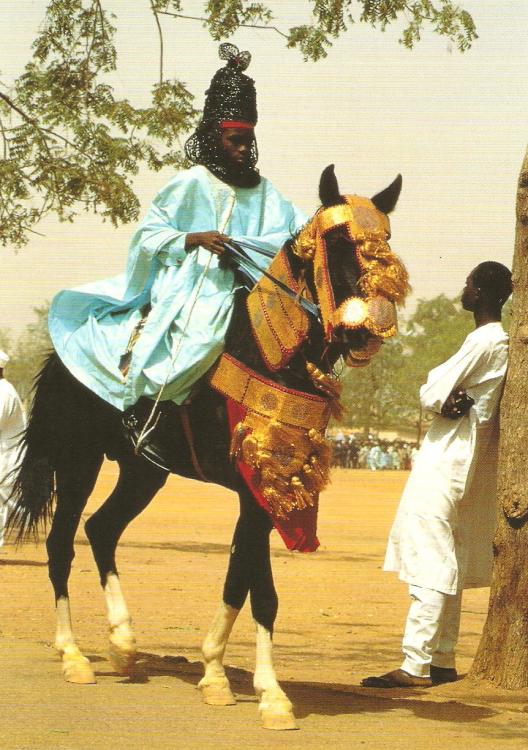
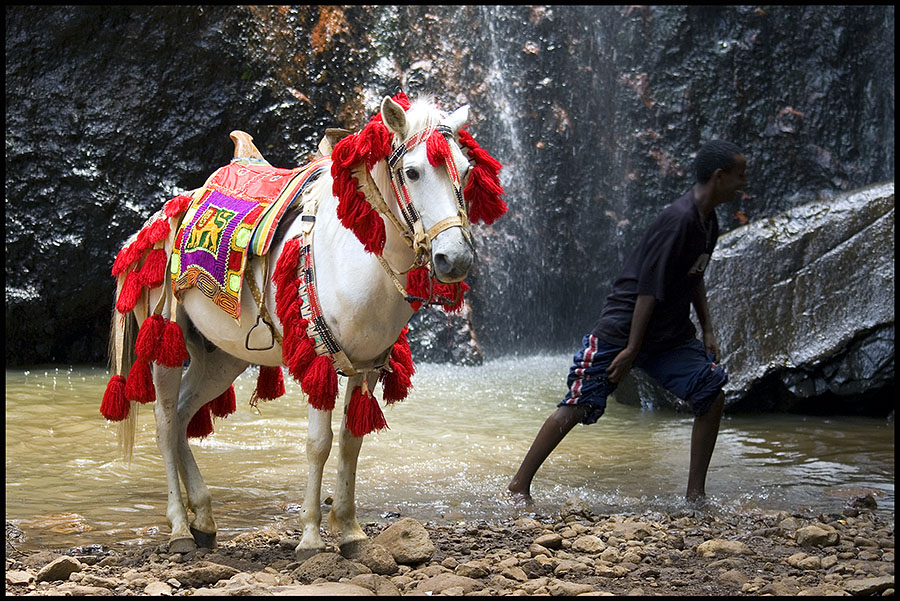
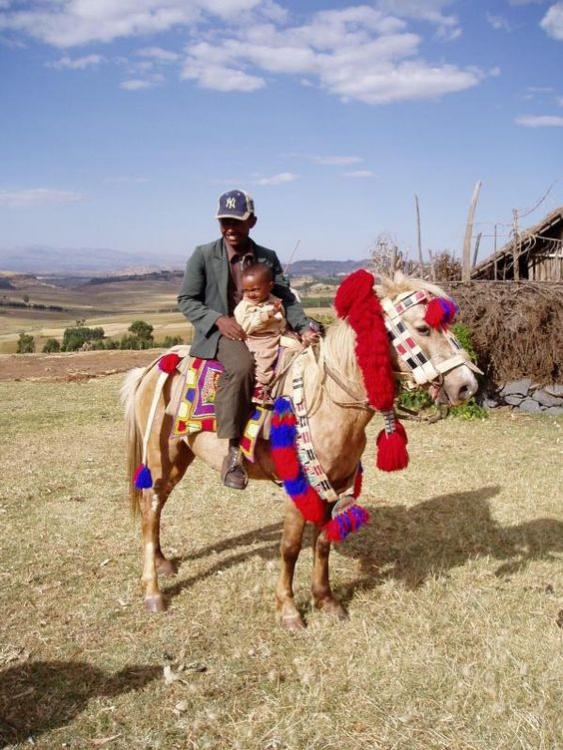
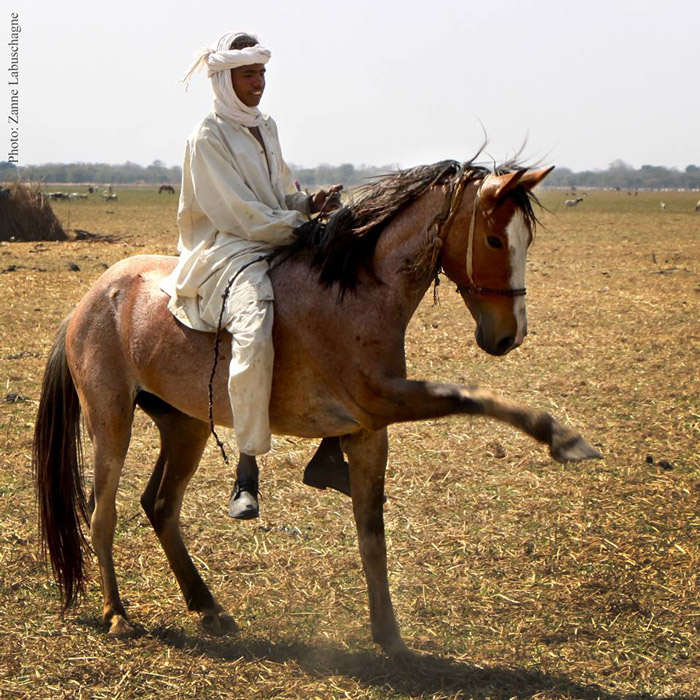
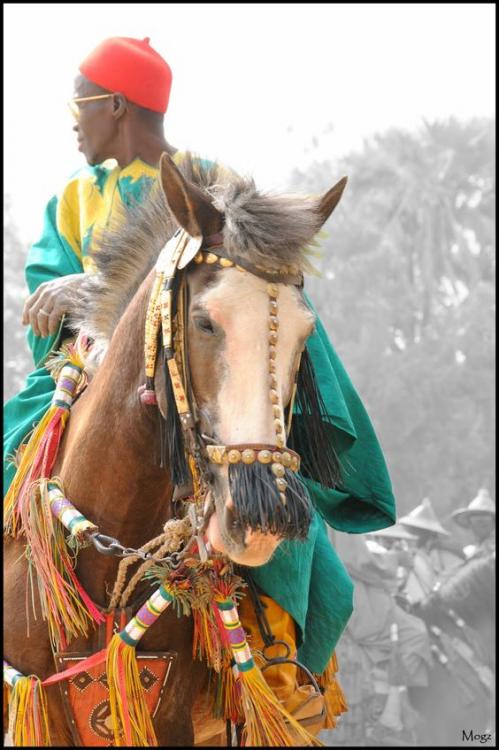
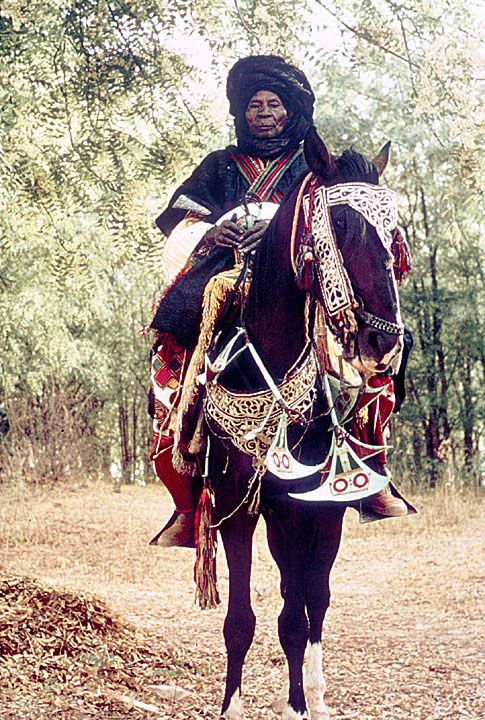
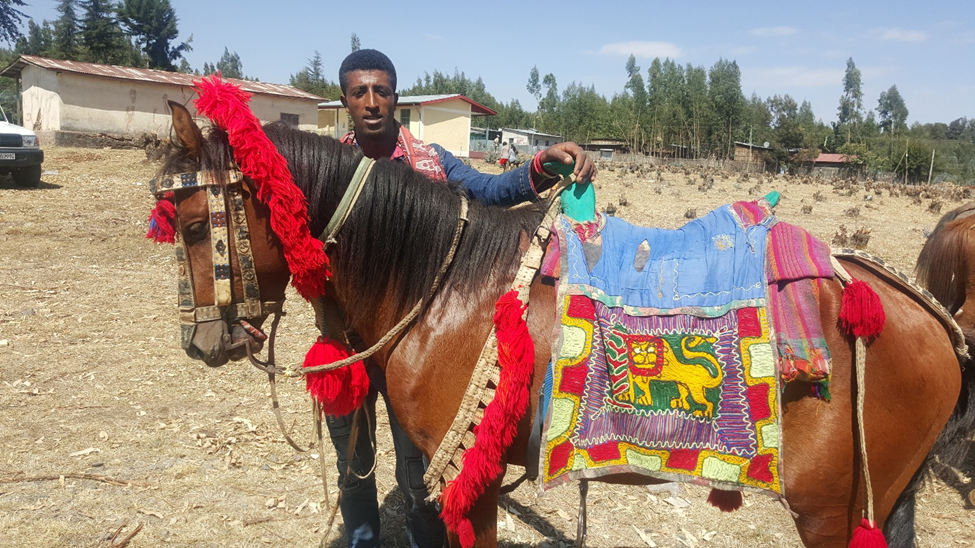
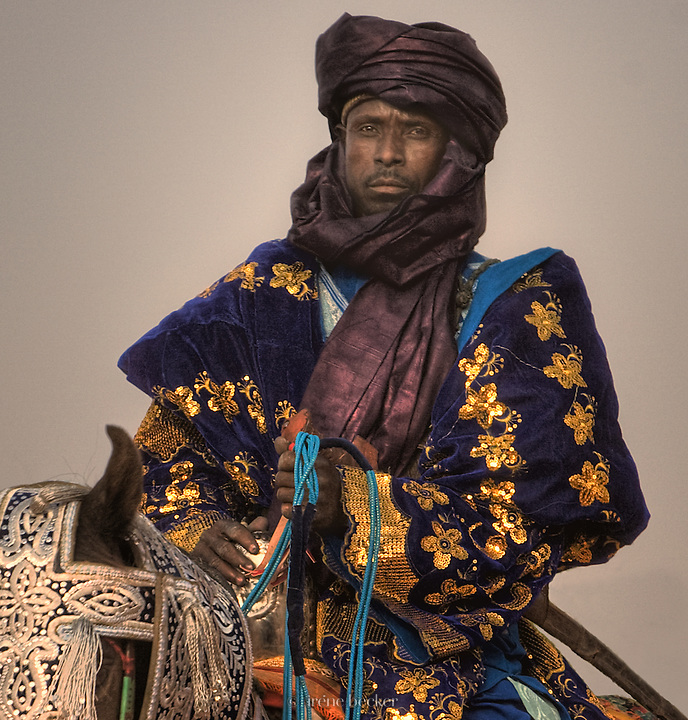
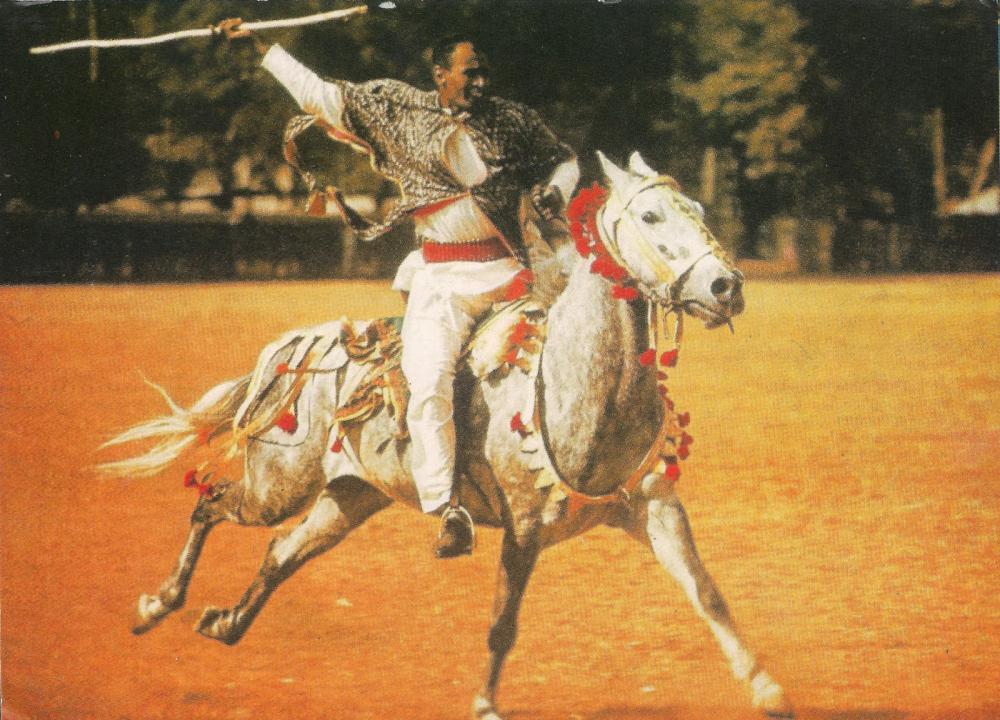
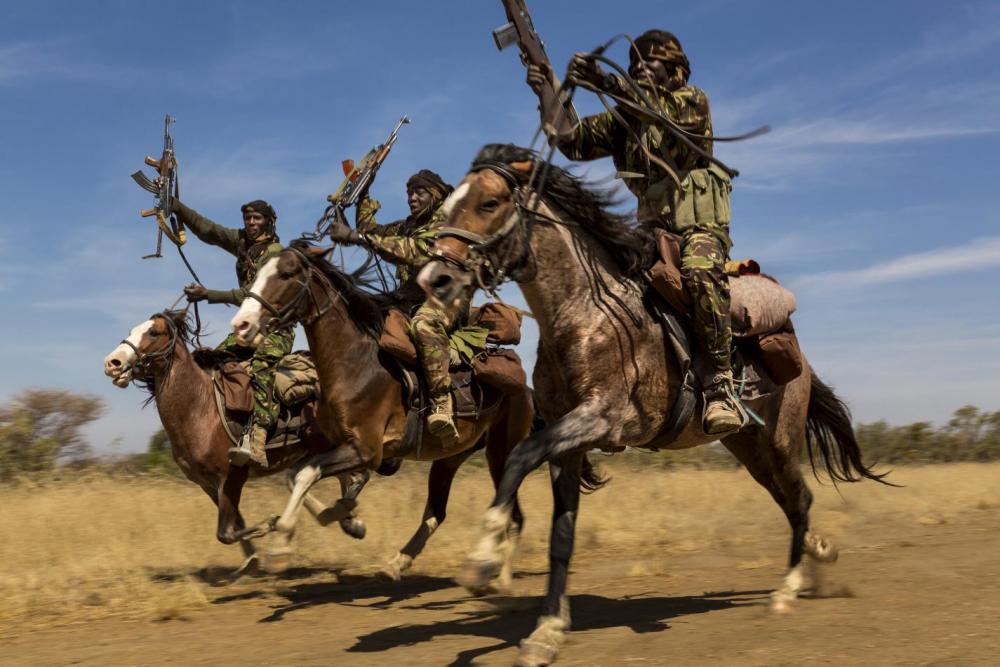
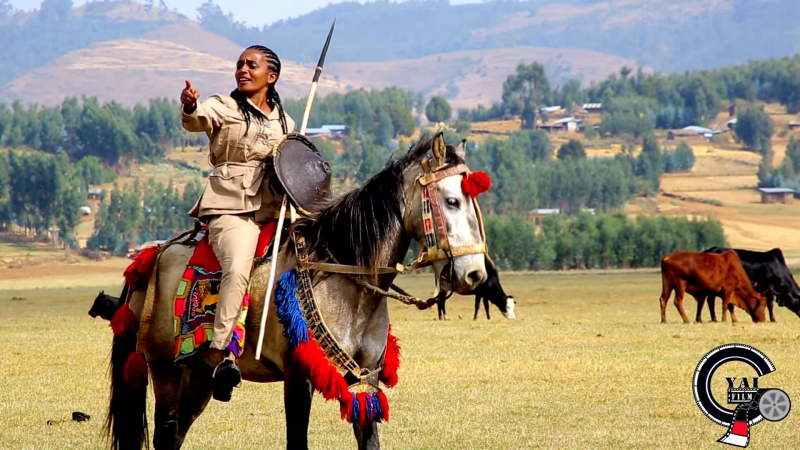
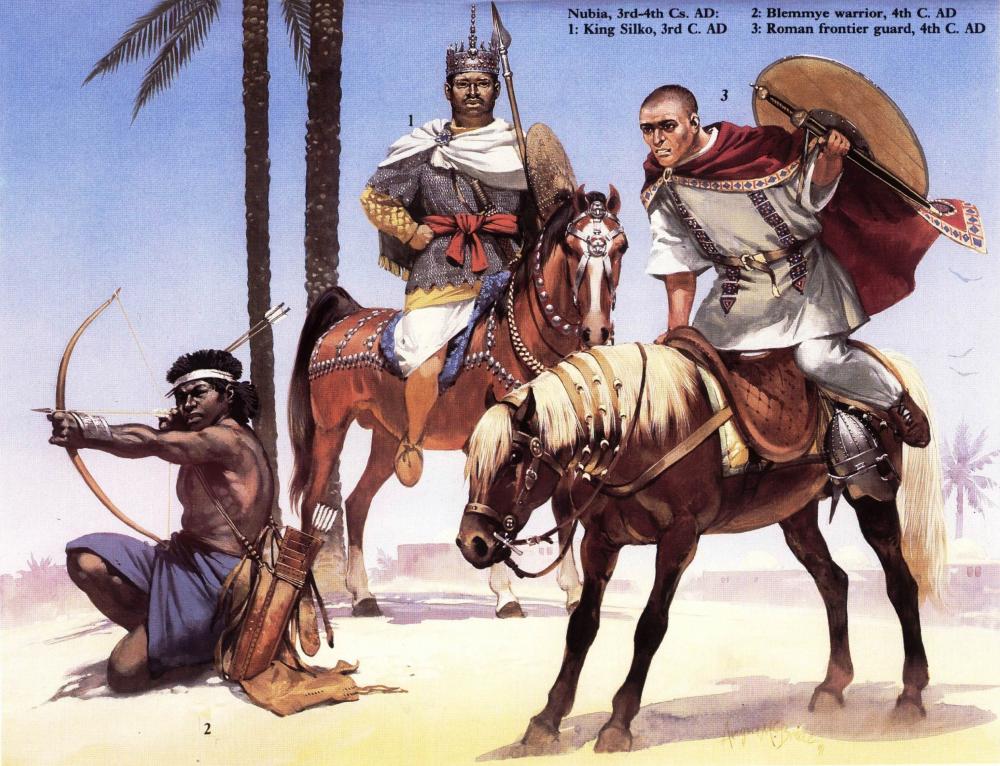
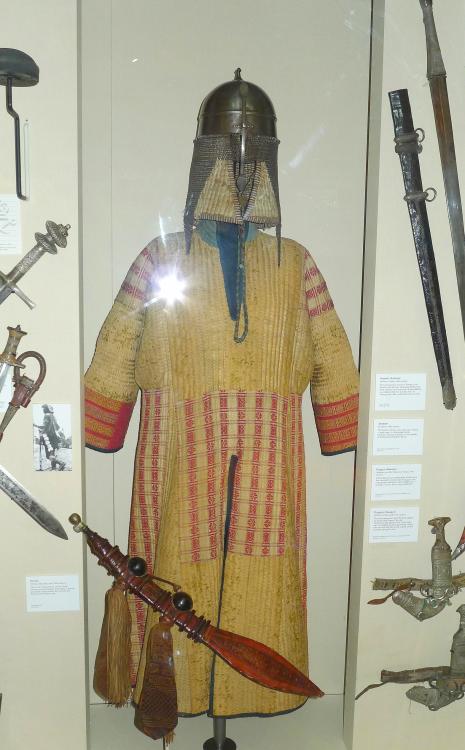
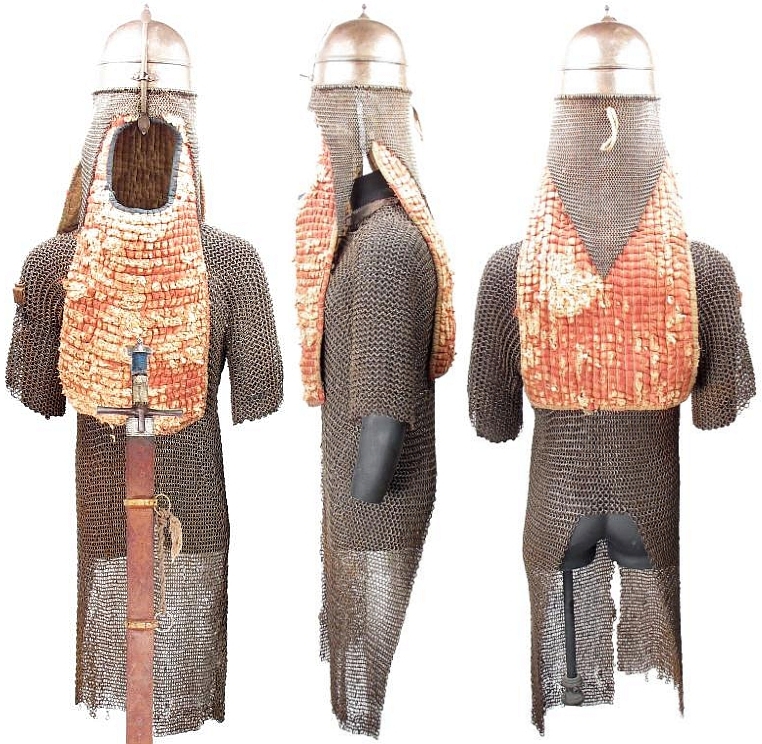
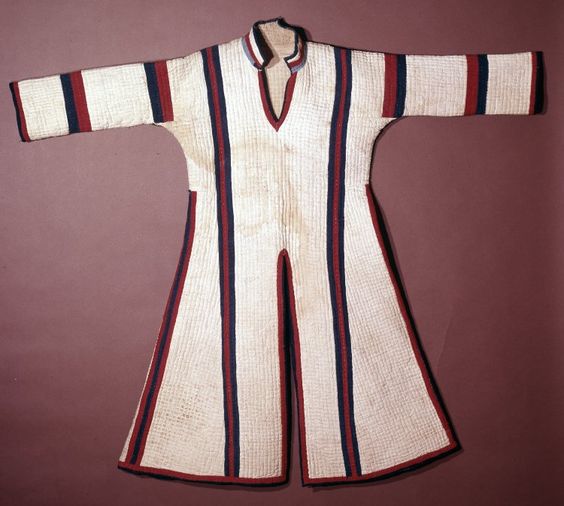
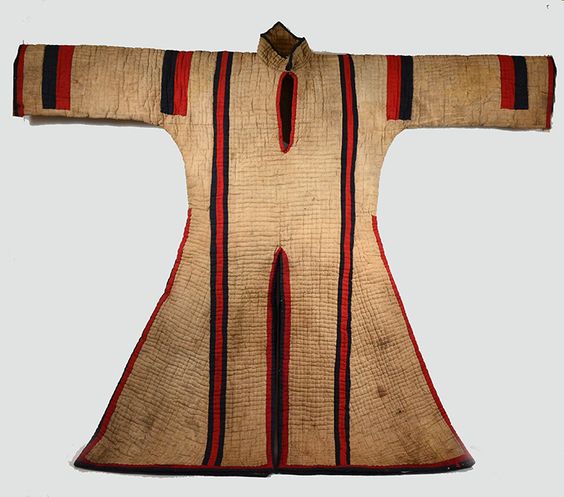
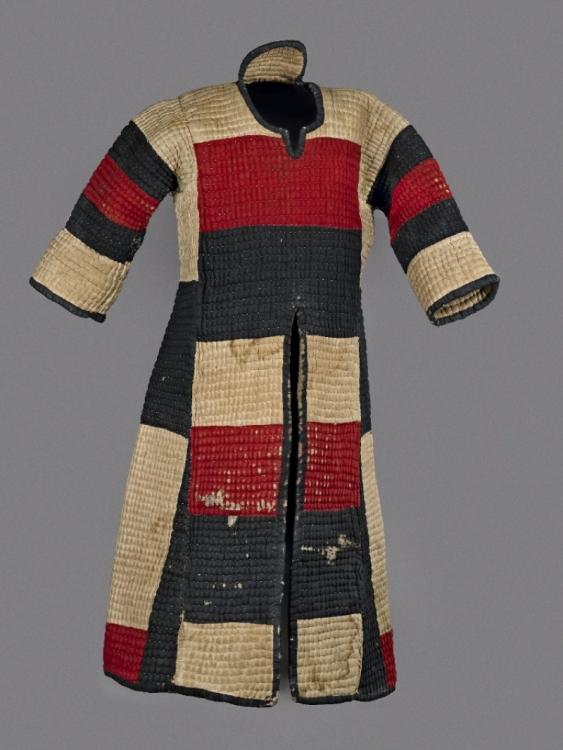
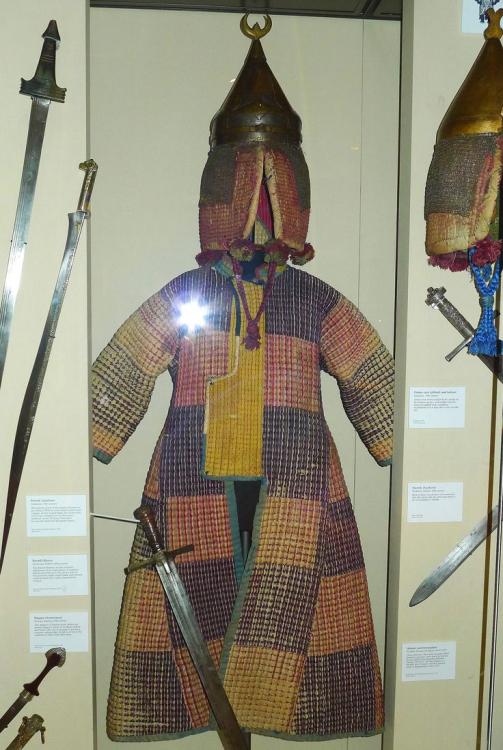
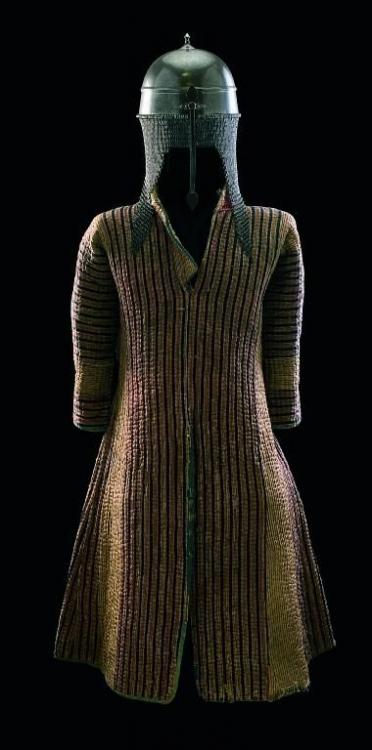
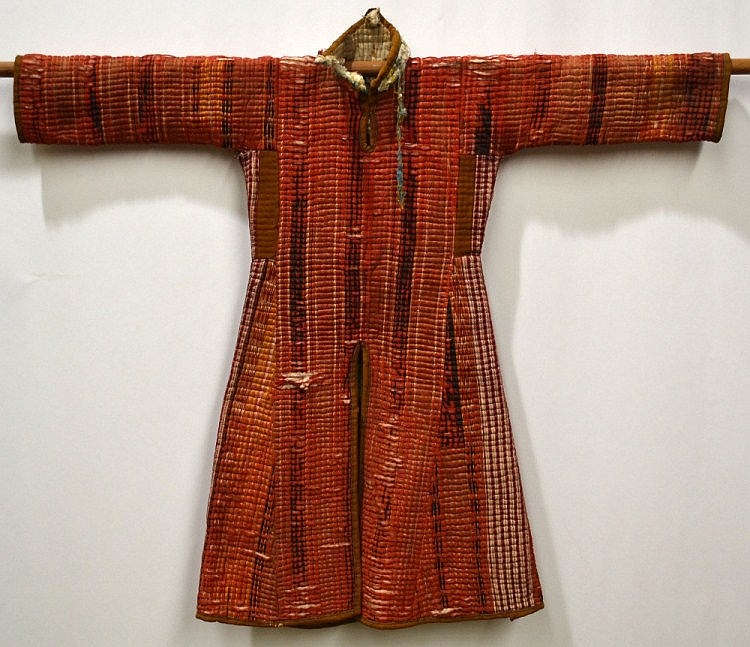
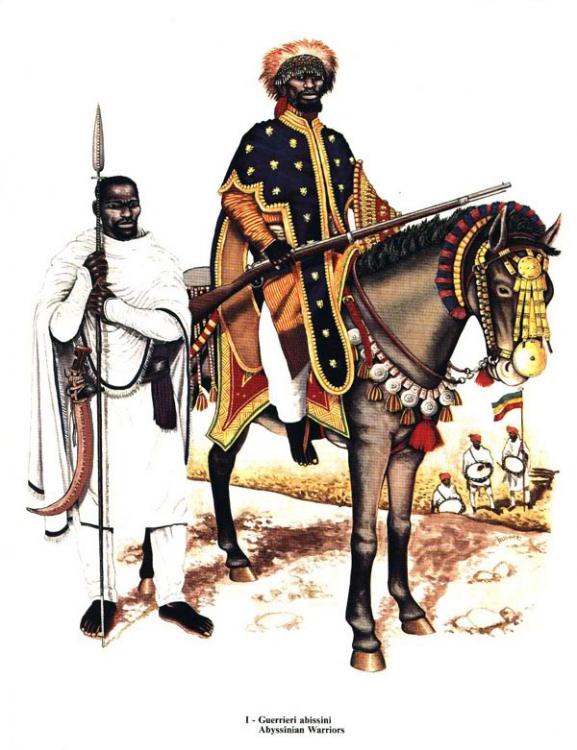
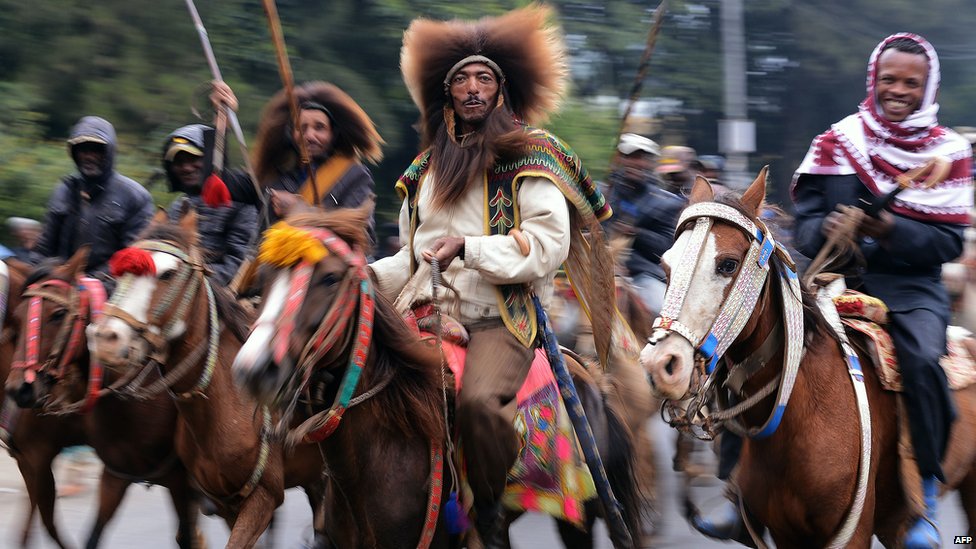
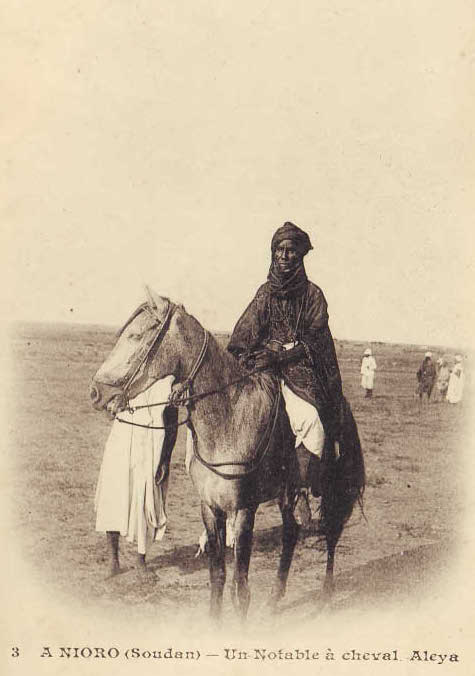
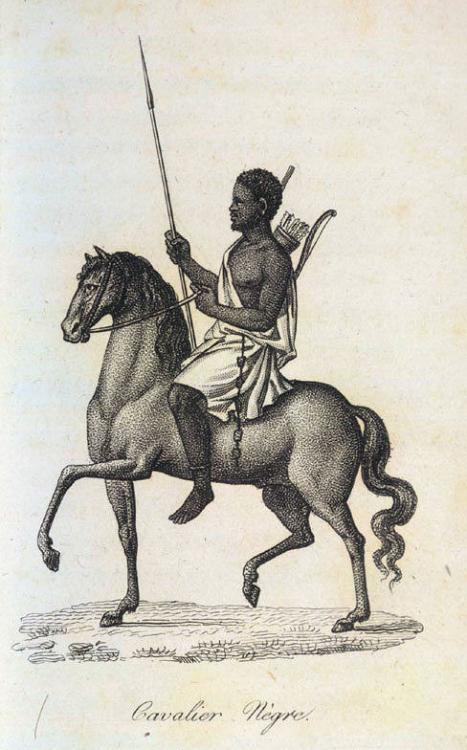
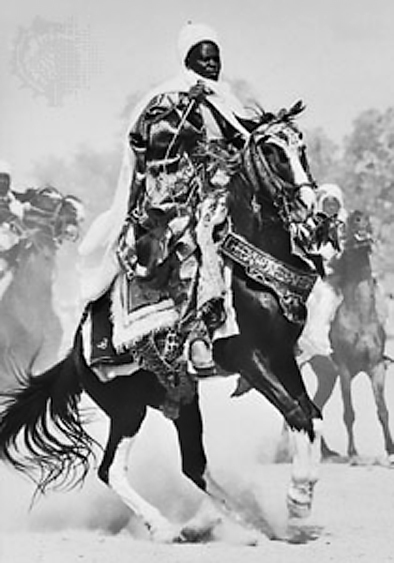
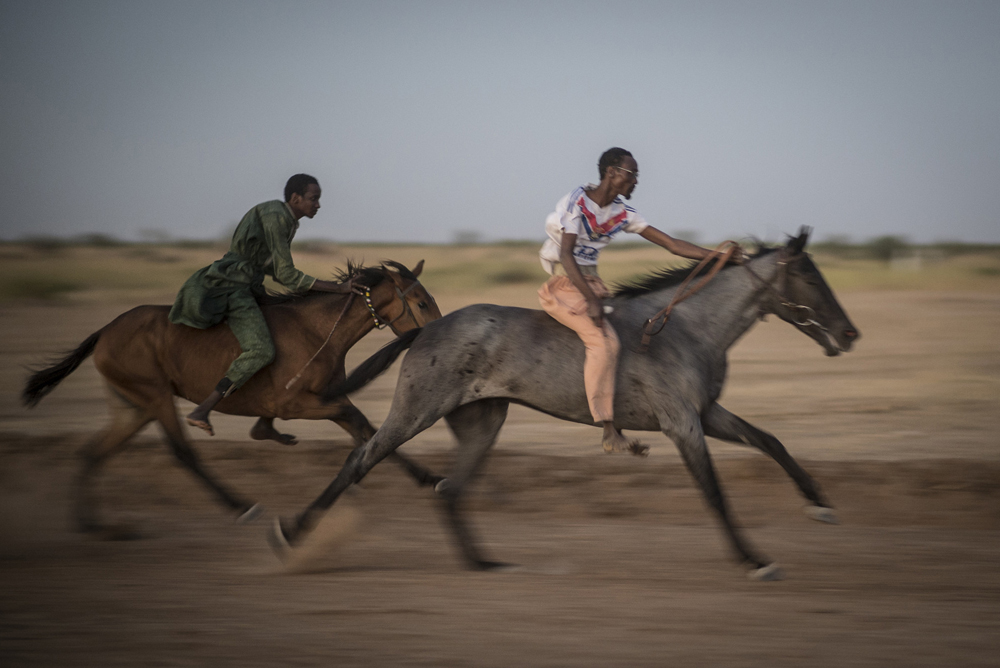
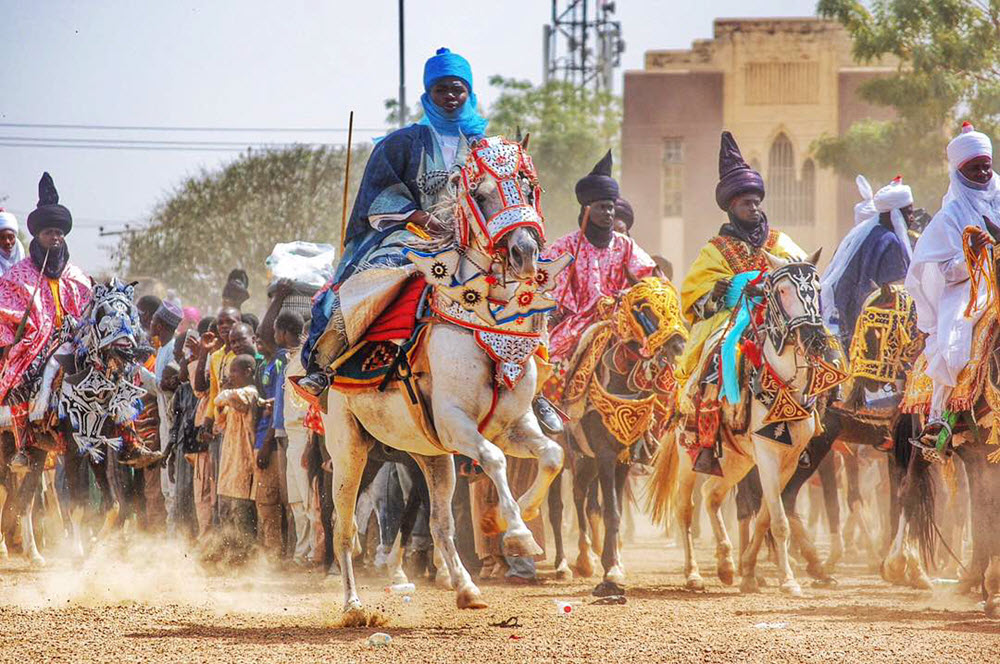
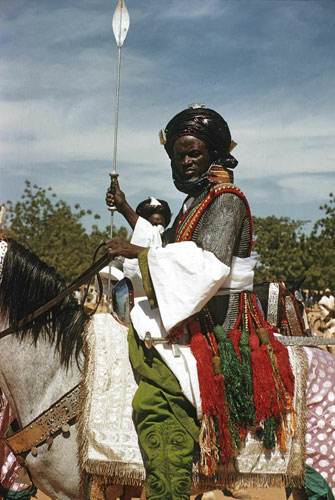
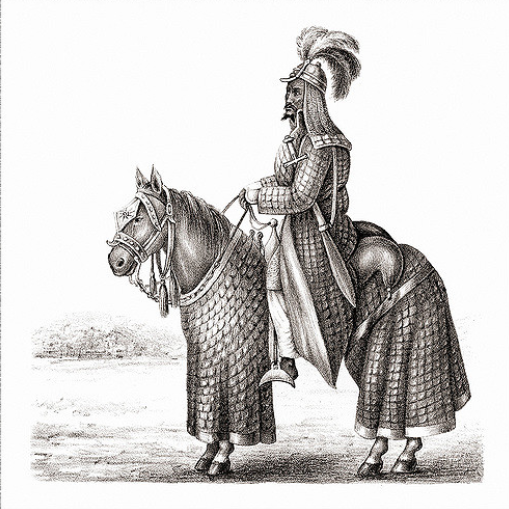
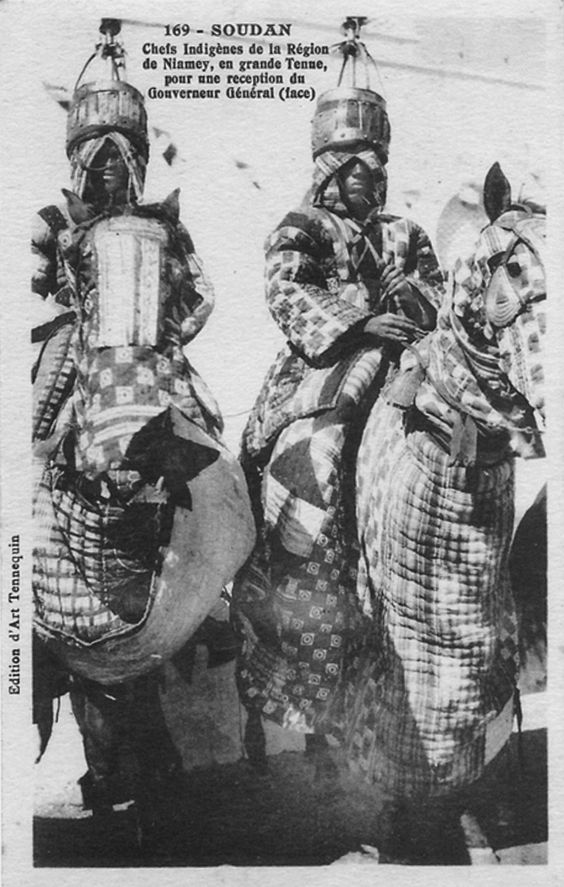
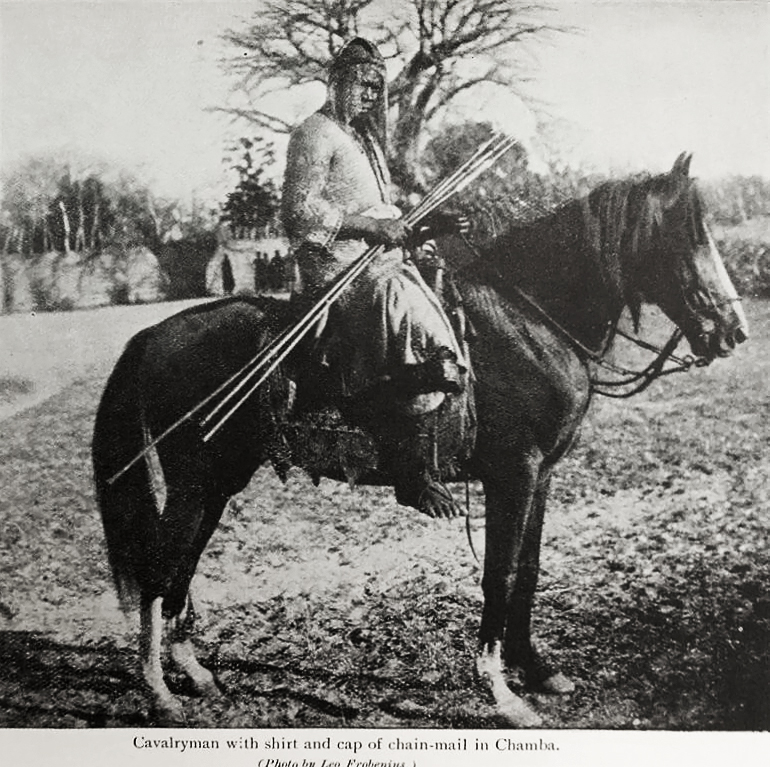
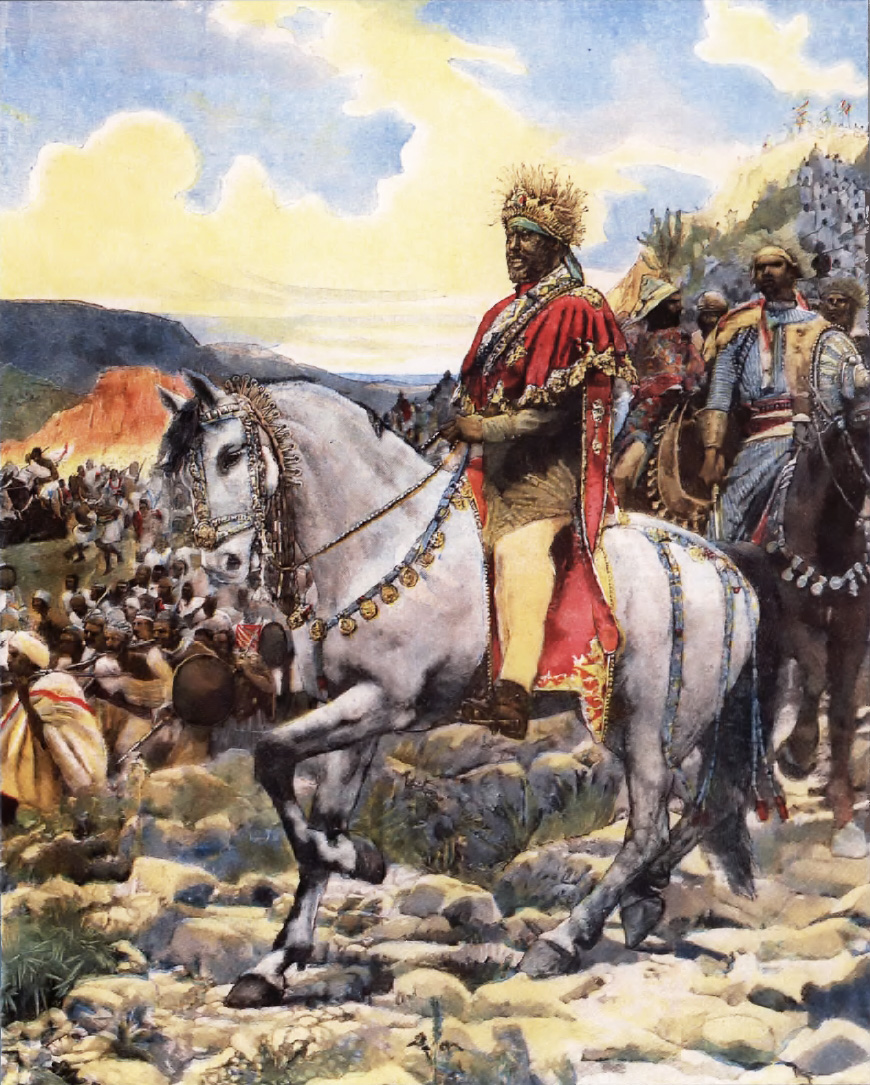
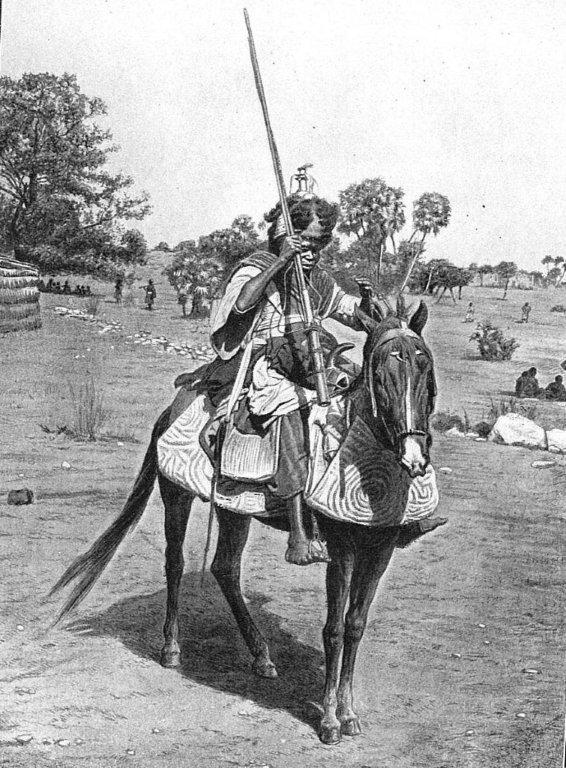
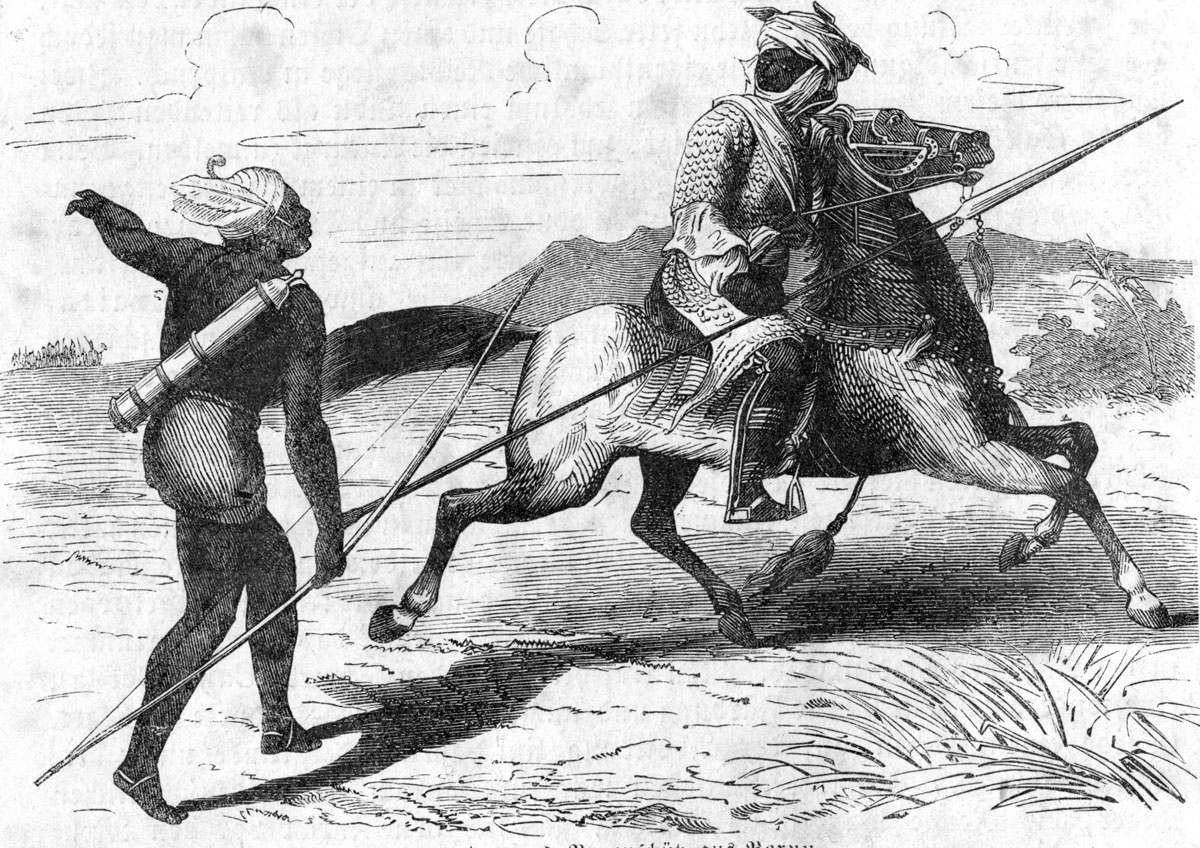
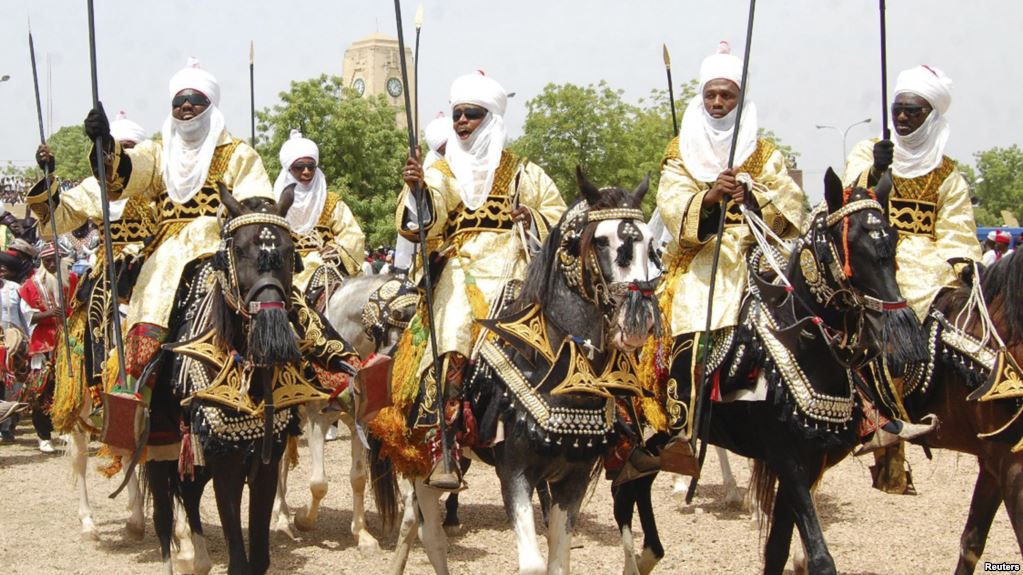
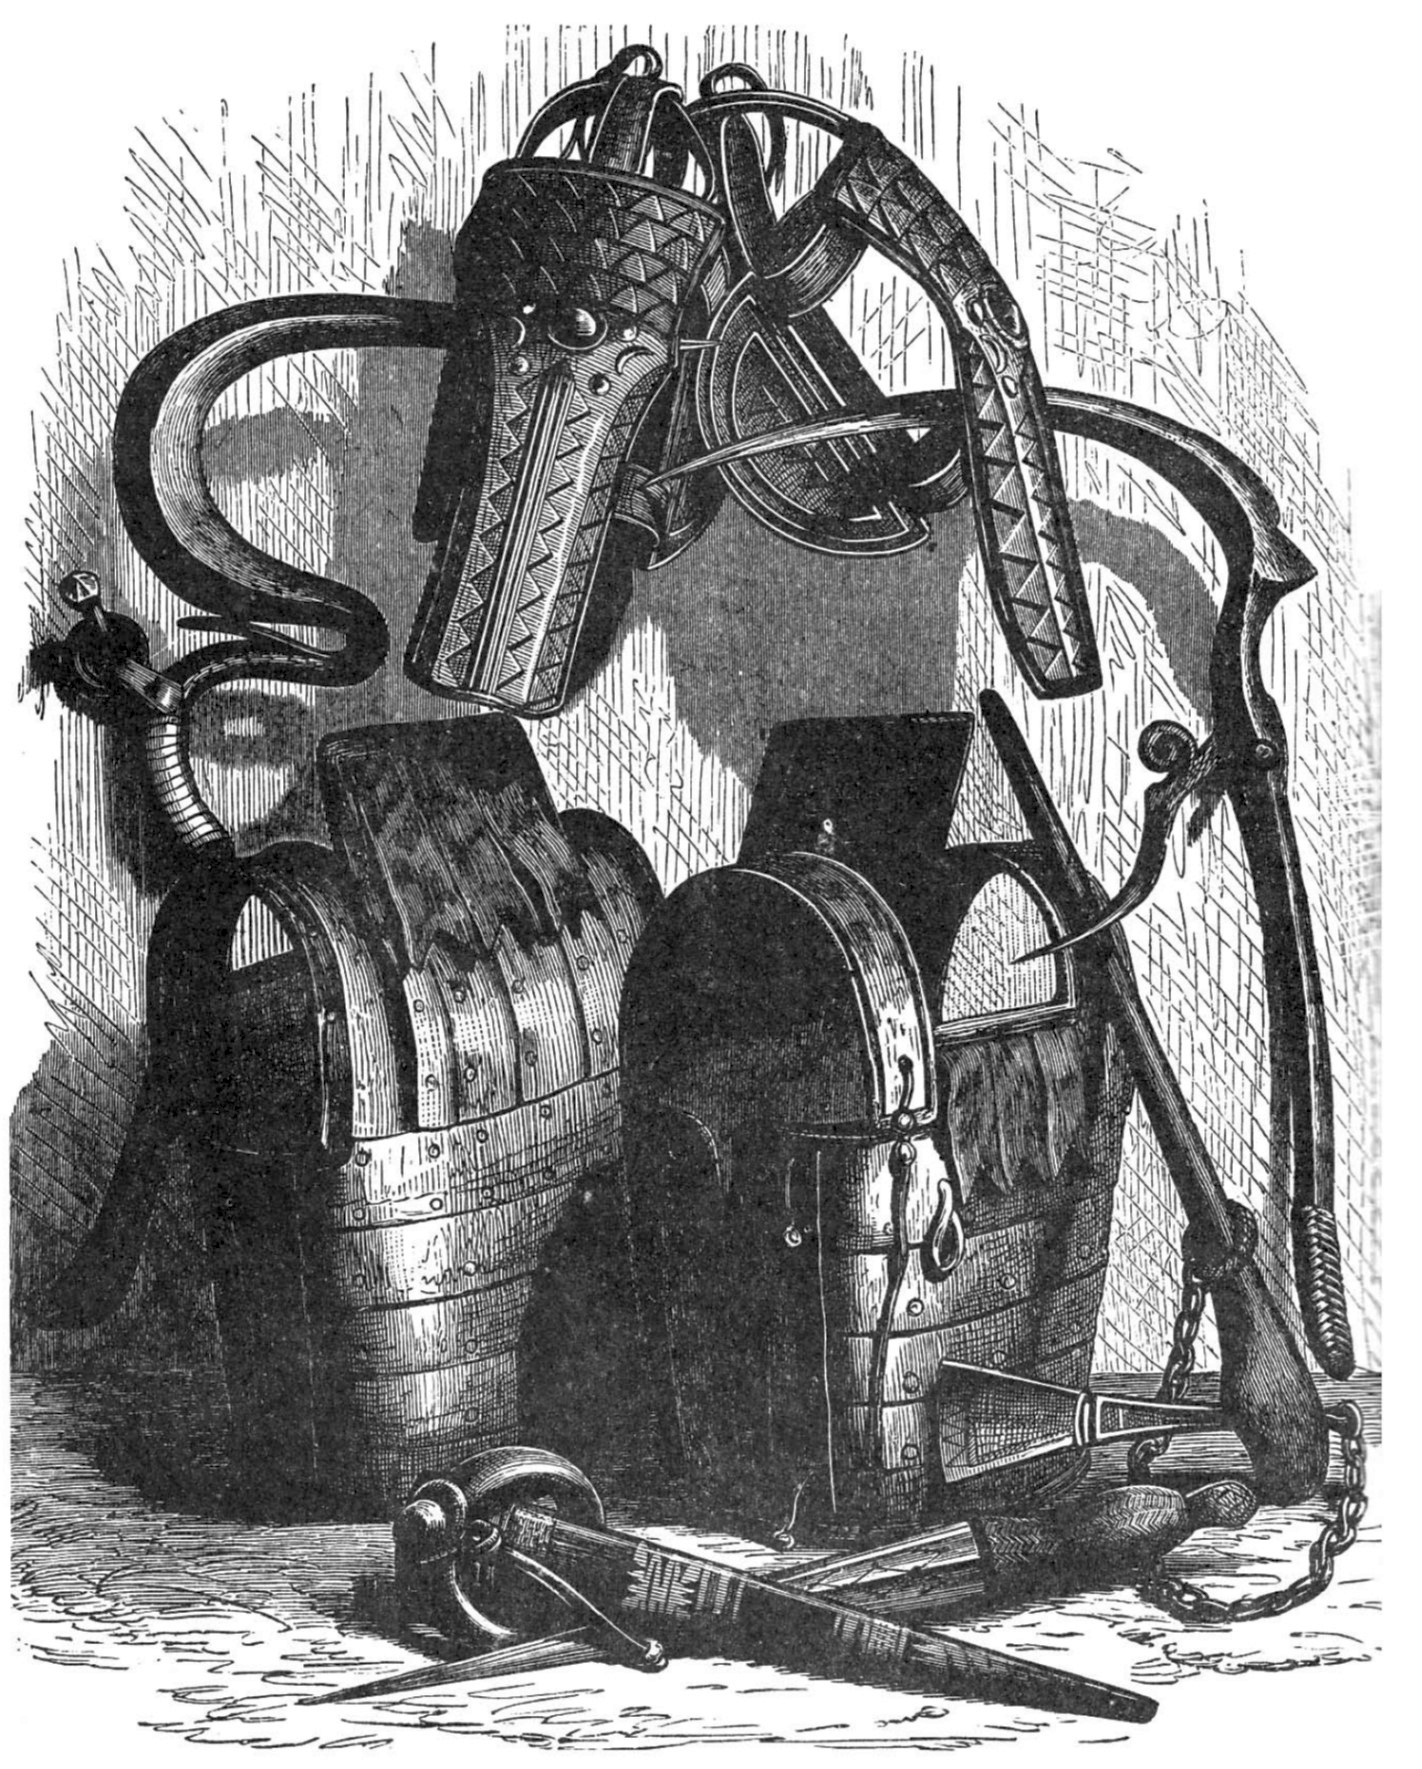
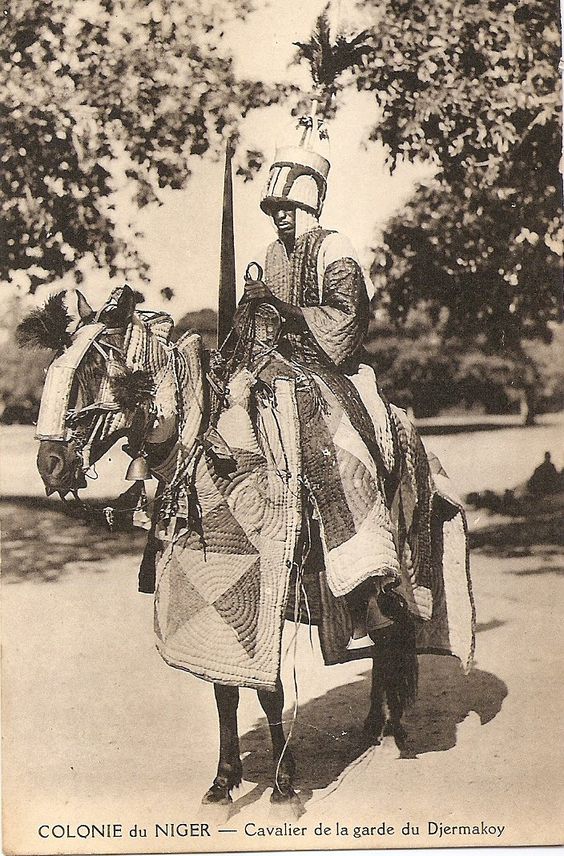
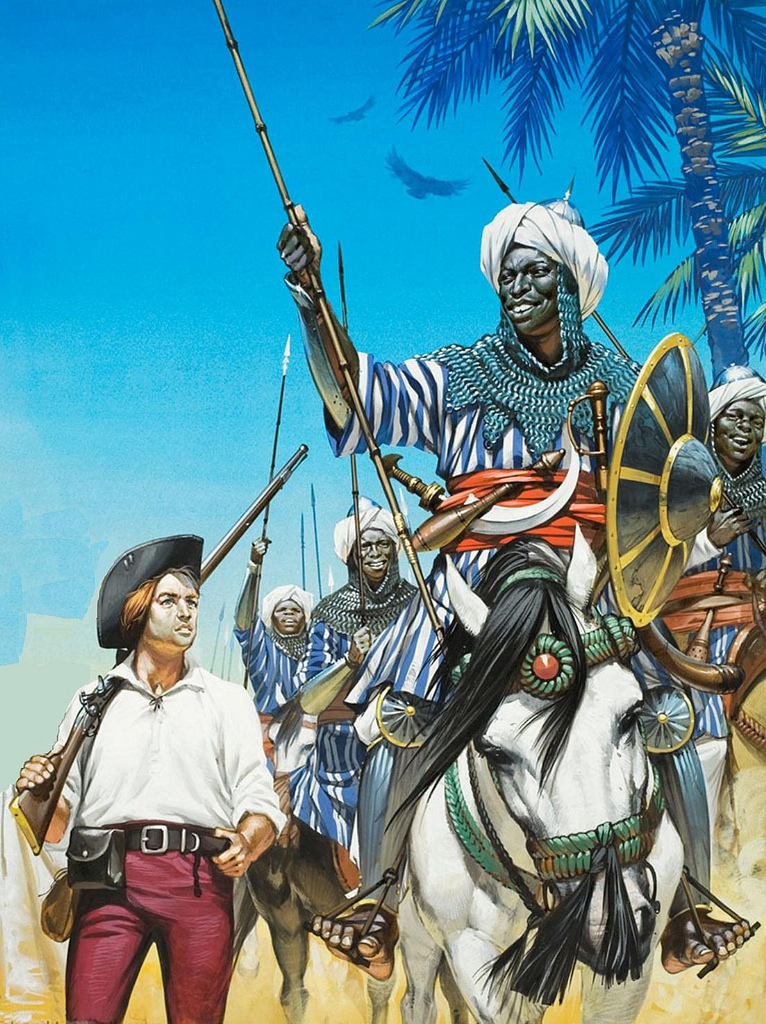
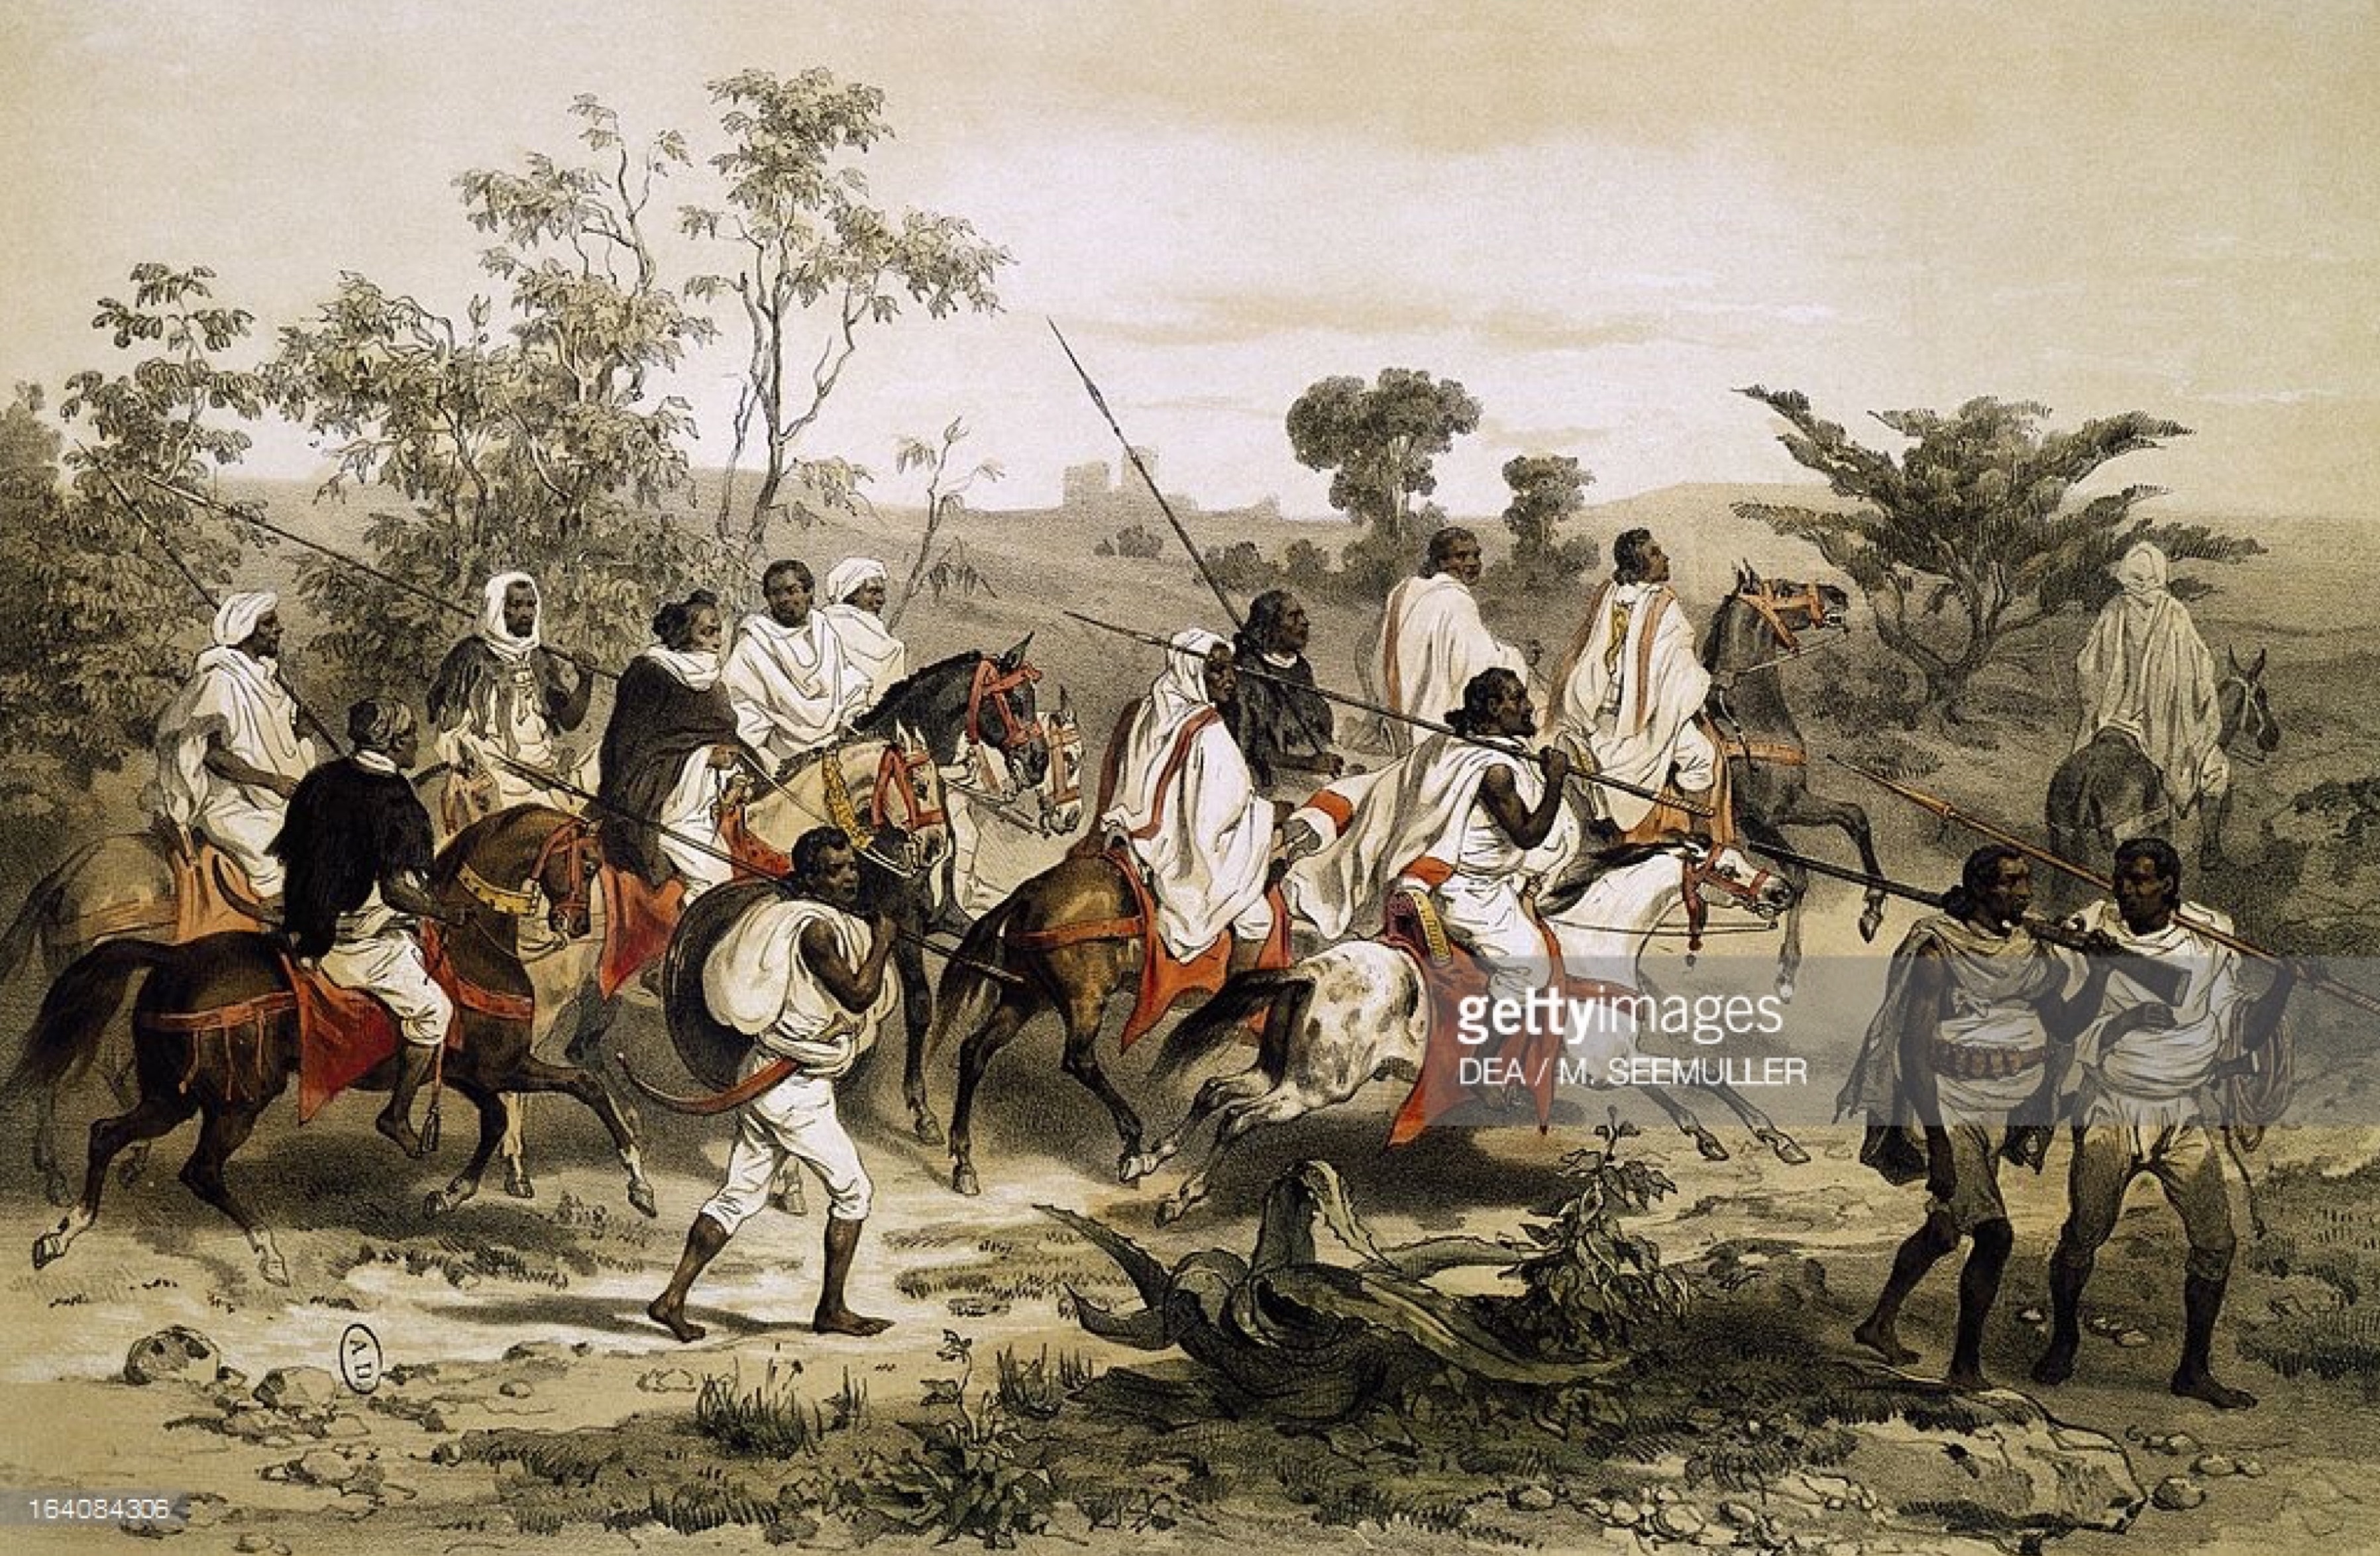
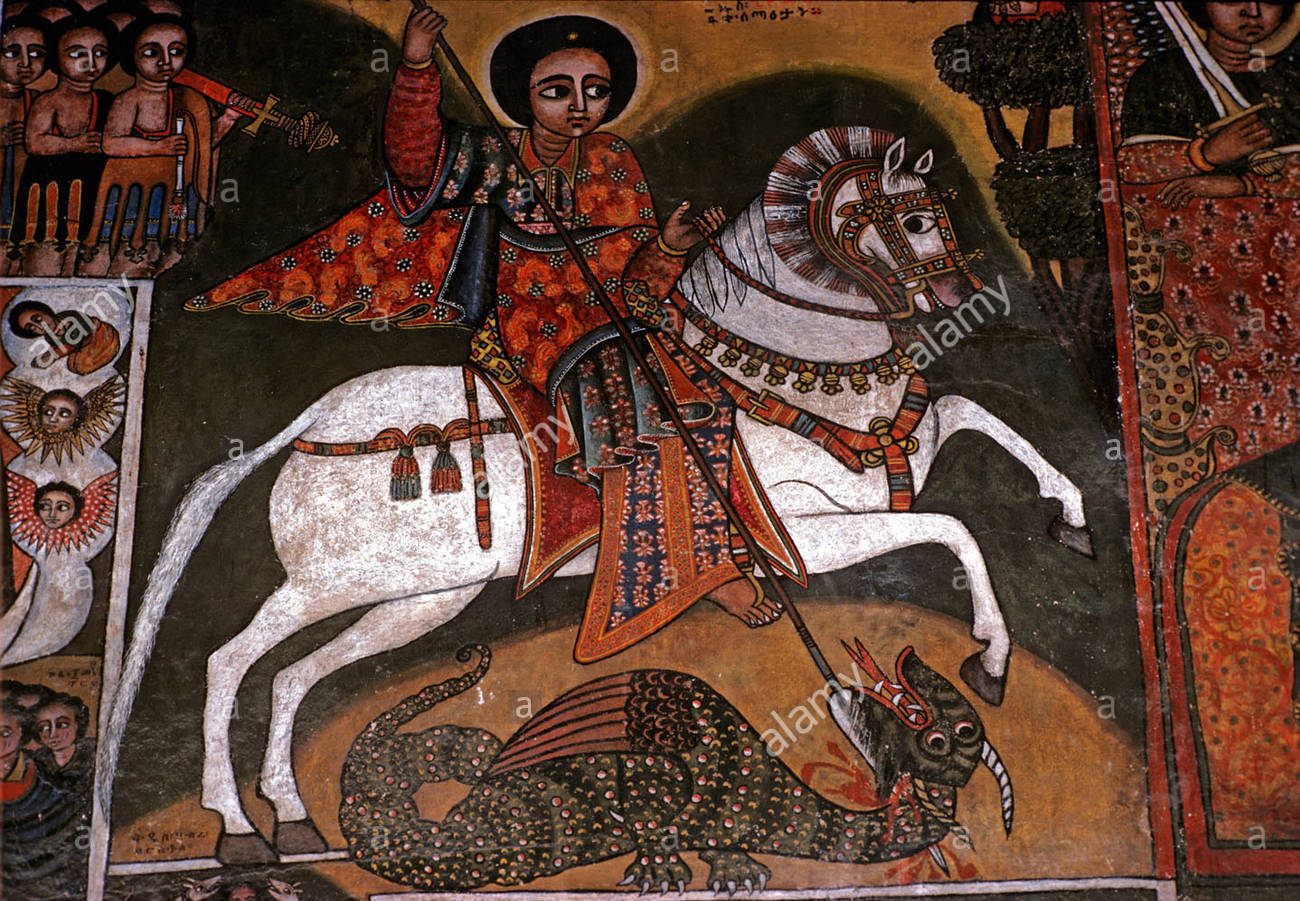
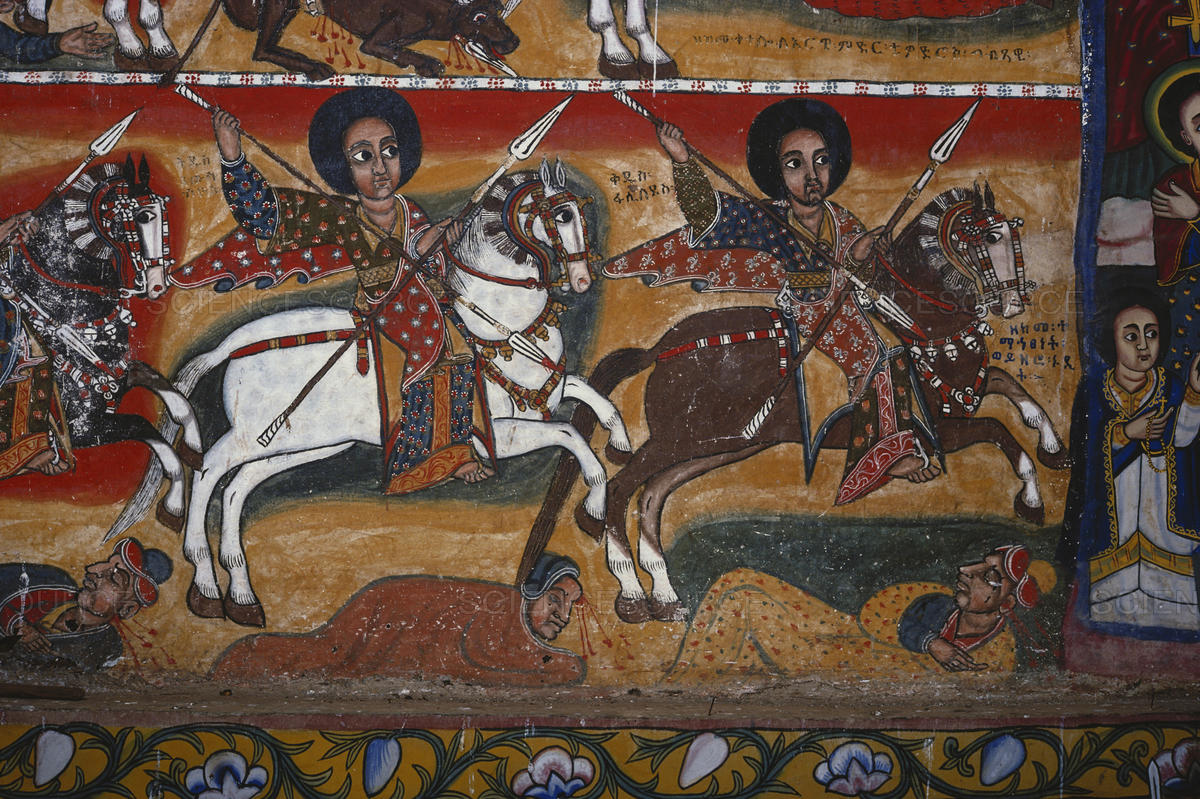
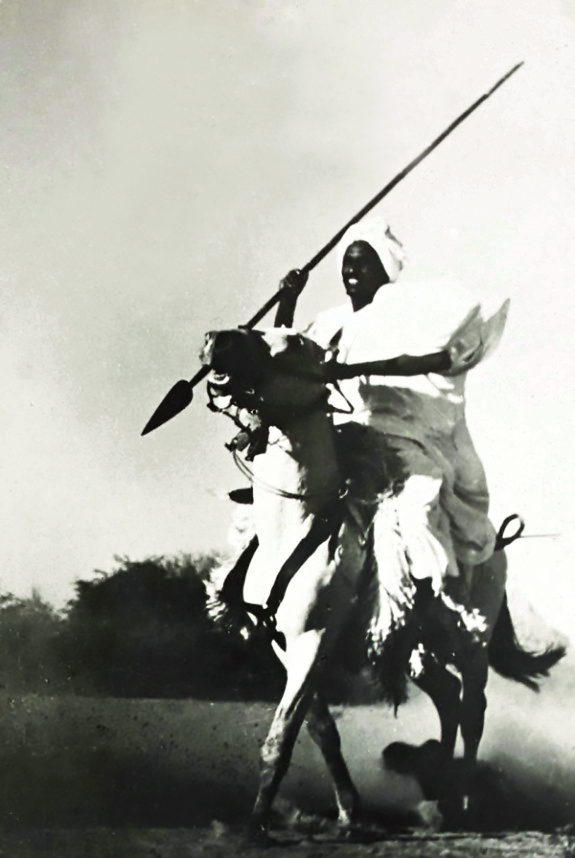
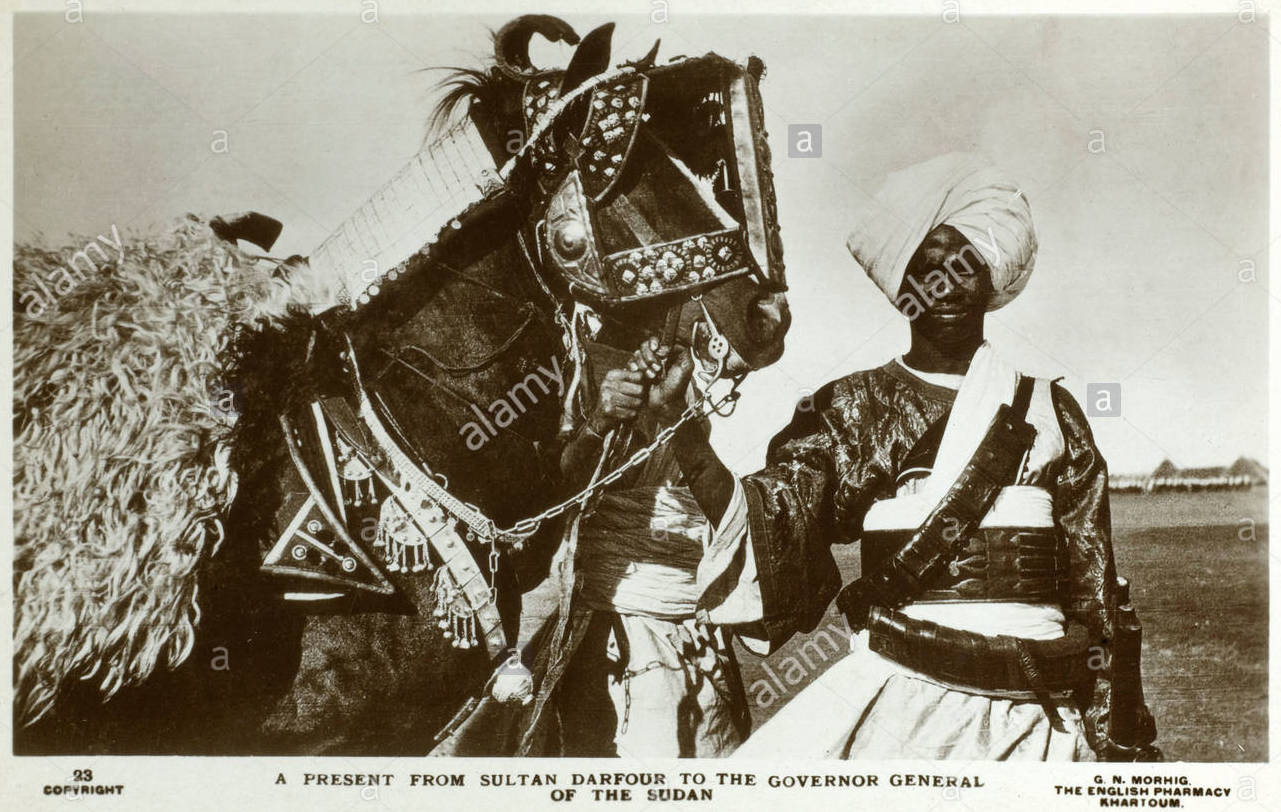
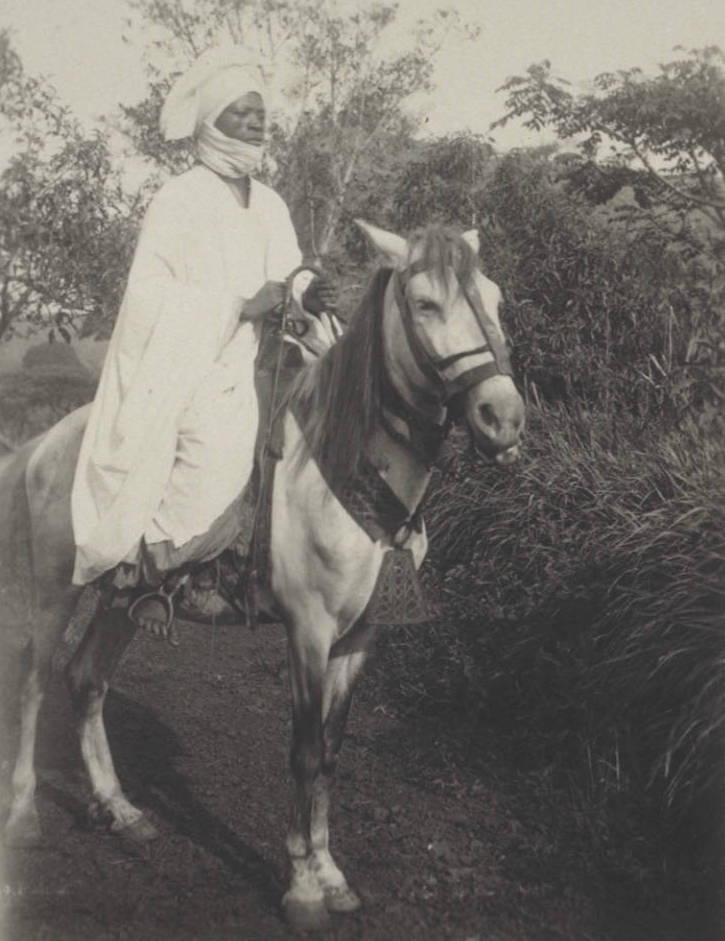
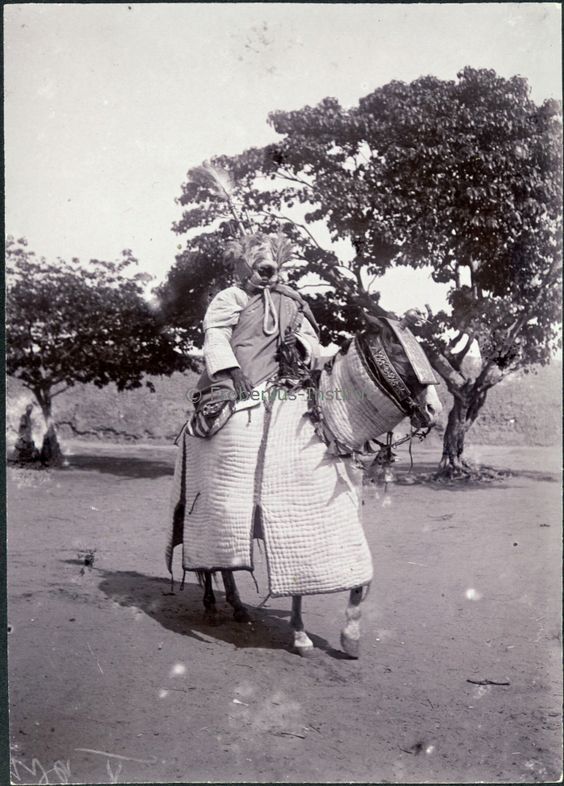
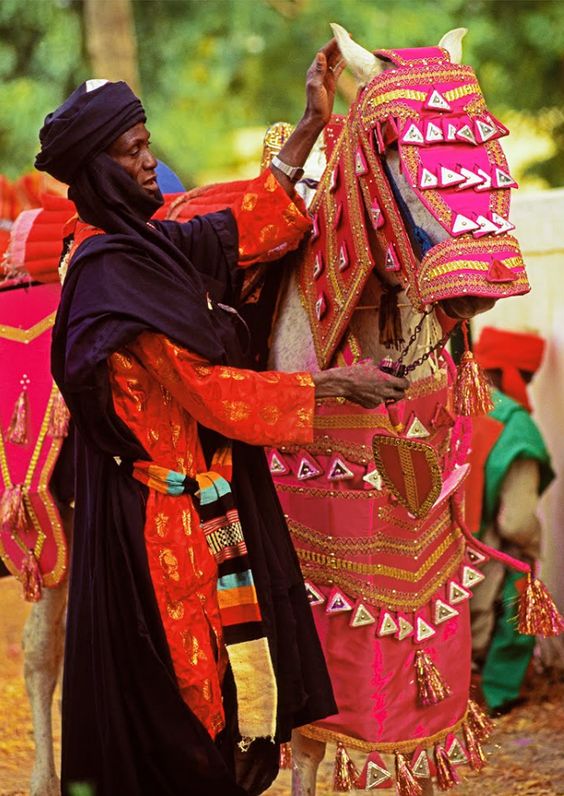
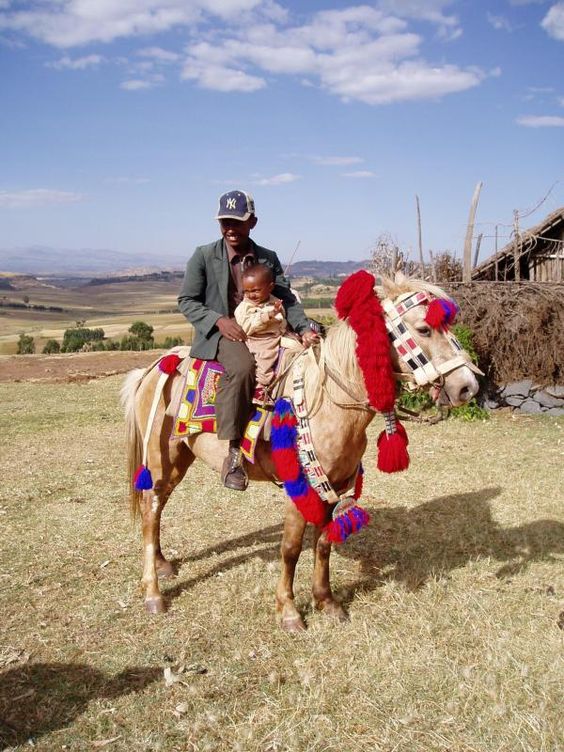
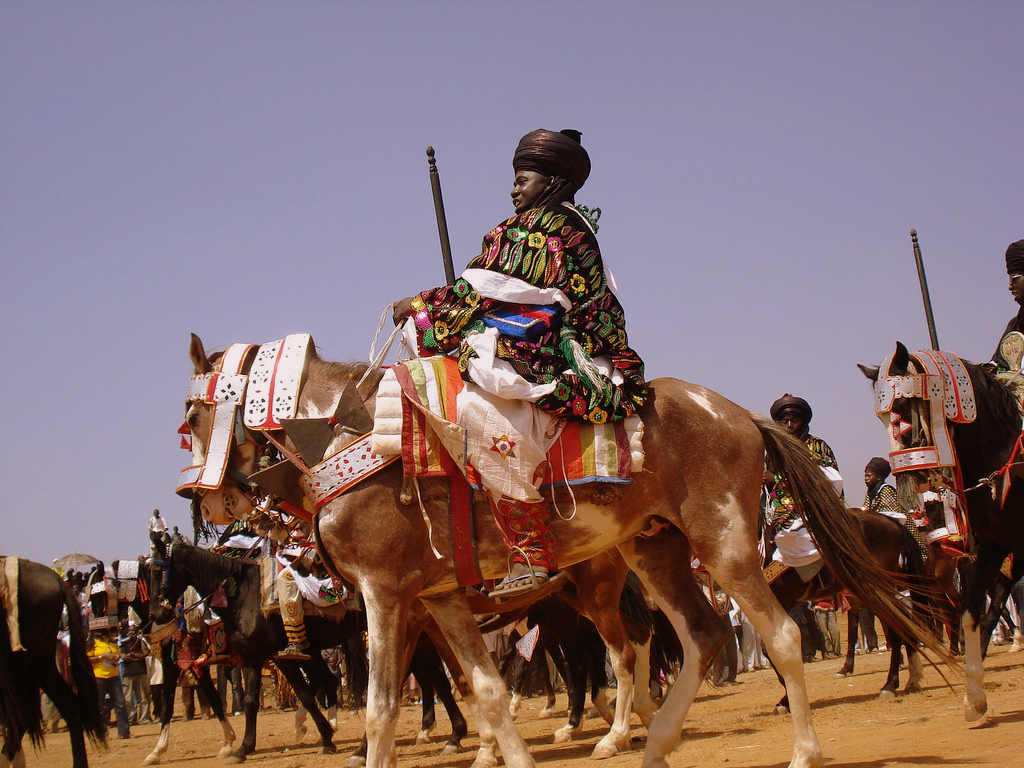
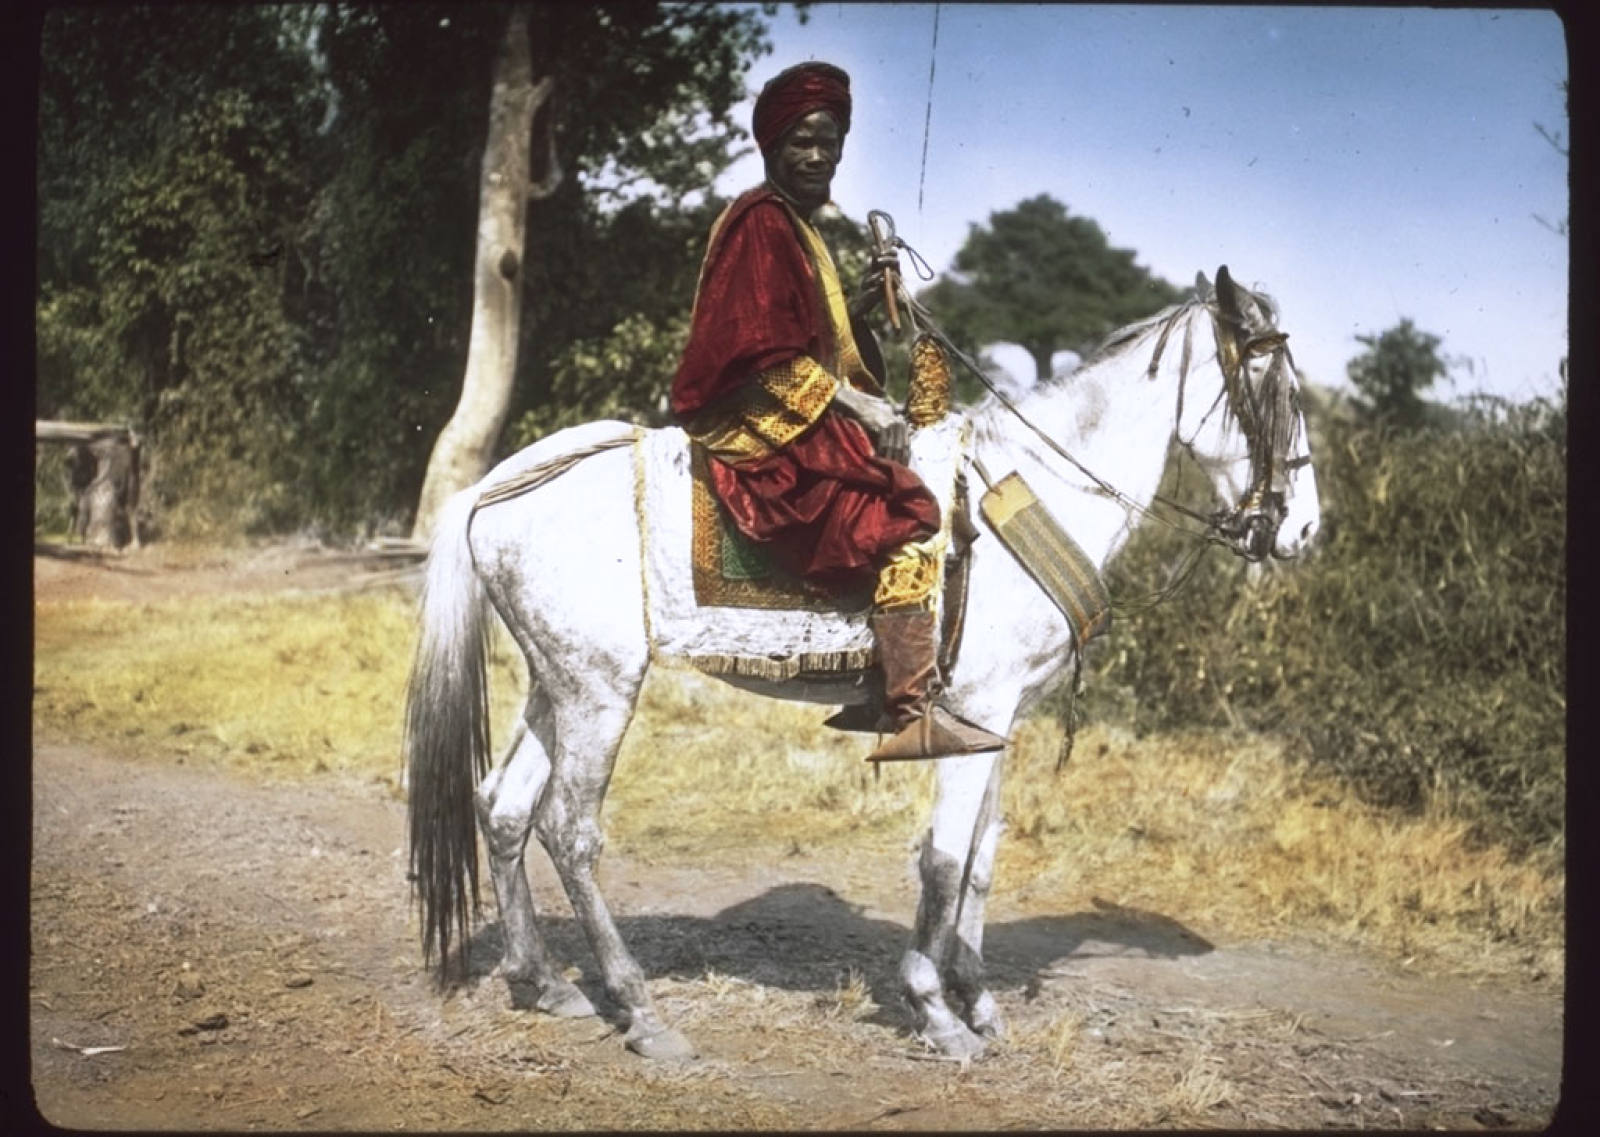
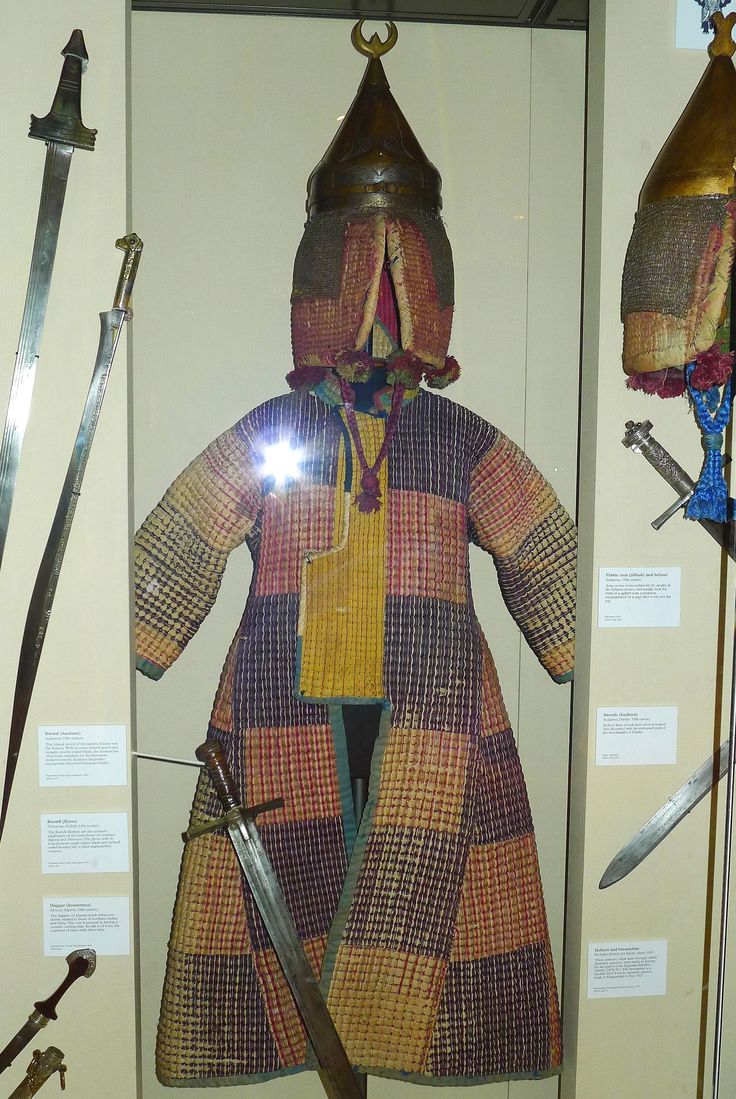
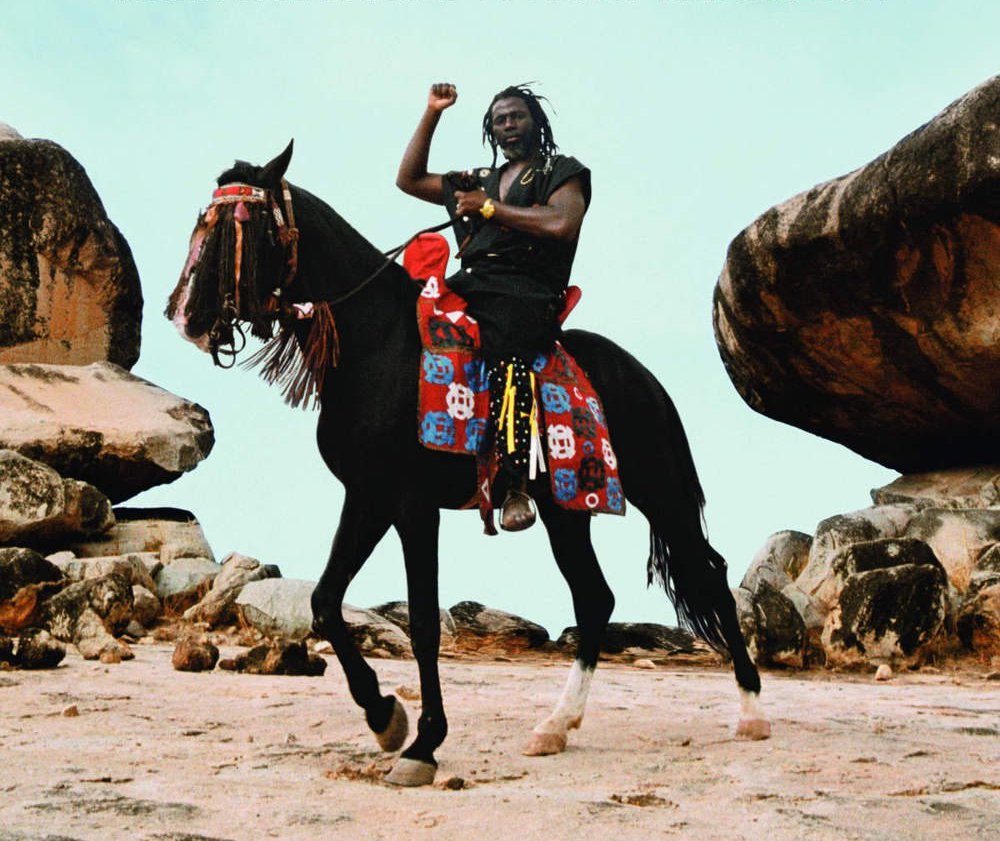
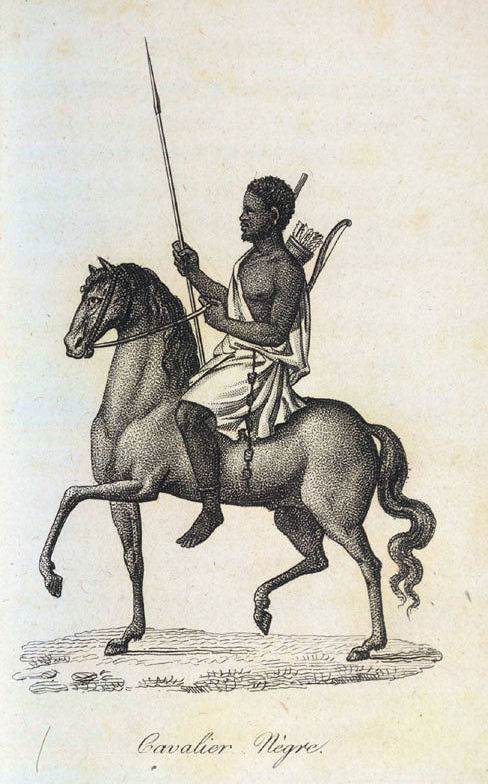
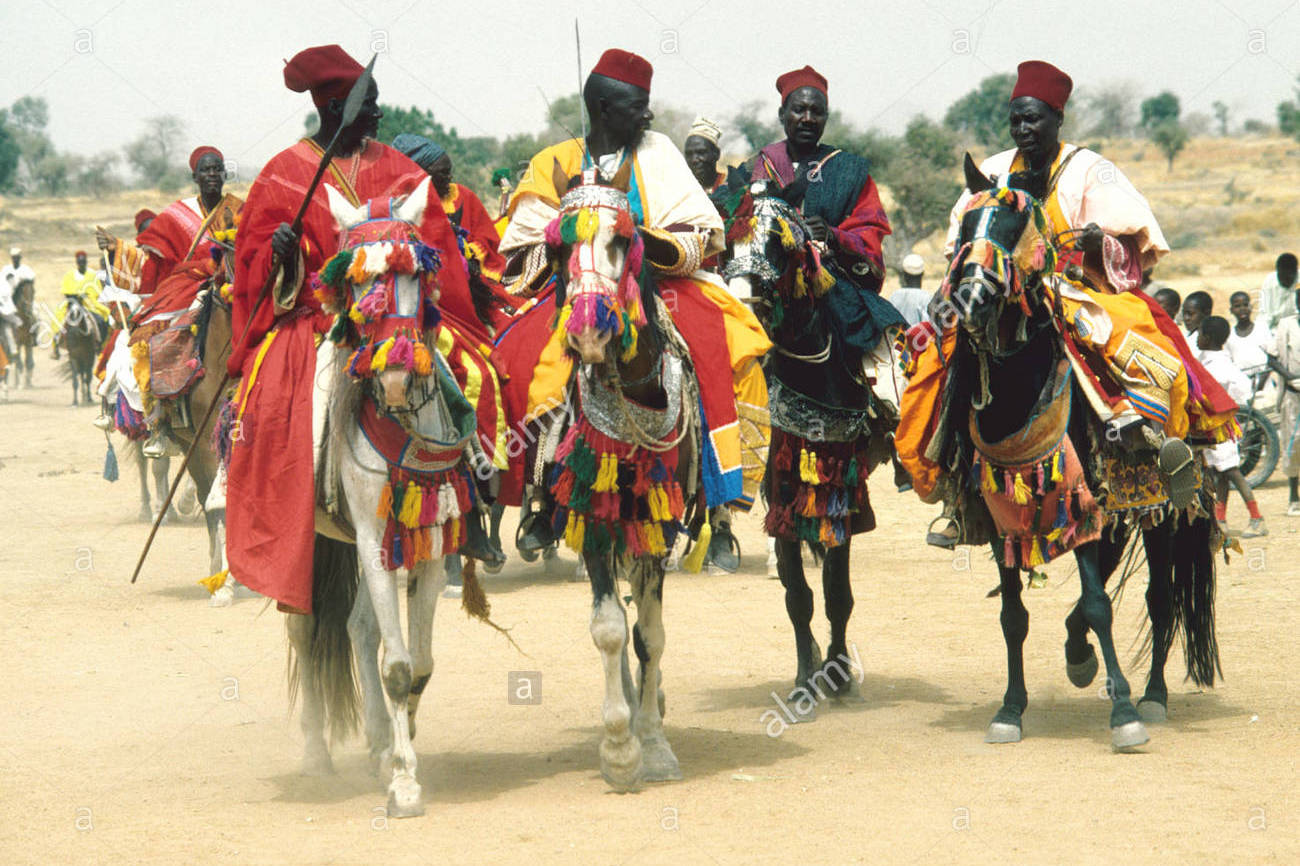
Pre-Colonial African Cavalry Traditions Super Illustrated When I was a lot younger, I came across 2 images of African pre-colonial heavy cavalry, which absolutely fascinated me. At the time I had never seen African cavalry, let alone heavy cavalry. In those early days of internet, it was very difficult to figure out where these images came from, or what exactly they were depicting. Luckily, times have changed, and we now know a lot more about these images, as well as the much broader context of ancient African cavalry traditions. Even more interesting for us, it has become apparent to me that the earliest diffusion of horses and cavalry culture into Central- and West-Africa came from none other than Kush and its periphery, which makes the study of African cavalry traditions all the more interesting from a Kushite perspective. Quilted cotton for horse and rider, seen on this cavalry man from the Kingdom of Baguirmi (Chad), once part of the great Kanem-Bornu Empire (neighbouring Sudan). The riders often wear a leather or iron/steel cuirass underneath the cotton armour. This 19th century rider is wearing a quilted cotton skullcap... This can not be unseen... Neither can his double tipped spear. These are the cataphracts of ancient Africa: Imagine my elation when I stumbled across this exact type of armour in a basement exhibition on African history in the British Museum, by chance... They're even more imposing in real life! Those metal cuirasses were impressive, and were said to be able stop the ball of a musket. Chainmail was also widespread. Mounted body guard of the Sheik of Bornu, in full chainmail. Underneath his turban, he has a leather reinforced cap, made up of thick bands tied together at the top with those rectangular leather bits. Also, that armour piercing spear seems unpleasant... Studying the similarities between ancient Kushite cavalry and later medieval cavalry traditions is made difficult because of the spread of Arab and Berber cavalry customs to the Sub-Saharan regions in later periods, which has totally overshadowed the earlier Sub-Saharan horse periods from an academic perspective. Most people including academics don't know that horses were being bred in Sudan as early 1500BC, which makes an accurate assessment of the origins of African cavalry traditions nearly impossible in the popular academic world. I hope that my research in this thread (including the reliefs and graffito depicting horses, written histories mentioning cavalry, and the burial of entire horses and their equipment in some of the royal tombs) goes some way to addressing this issue. Experts in the field have long written about the importance of horses, cavalry and chariotry in ancient Kush, but popular attitudes are sometimes hard to change. Following points are interesting: the existence of an ancient and large indigenous African horse-breed, known as the Dongolawi, which is markedly different from Arab or Barb horses, originated in Sudan and fits ancient descriptions. It predates the Arab and Barb horses in Africa, and was bred and exported widely on a large scale during antiquity. It is now found all across the Sudanic belt (from Sudan to Senegal), but has been interbred with foreign horse-breeds. Pure Dongolawi are rare, but still widespread. The widespread similarities in Sub-Saharan horse-acutrements, including decorated bands of leather and/or cloth and metal across the chest and backside, metal bells, saddle-types, types of halter and types of stirrups and even the use of raised chamfrons as well as the use of semi-cercular cheek-guards is noteworthy. Arab, Berber and Sub-Saharan cavalry traditions share certain commonalities, but are also very distinct from each other. Arabised African populations use Arab cavalry traditions. Berbers cavalry is part of the Numidian and even Roman heritage mixed in with Arab and Sub-Saharan influences. I believe Sub-Saharan cavalry traditions primarily come from a third "mystery" source: Kush... Especially along the Sudanic belt, a vast biotope stretching from the savannahs of Sudan to Senegal, culture, people, religions and technology moved relatively freely. Many similarities can be found among the otherwise very diverse people of this vast region, including similar cavalry traditions. It is no coincidence that some of Africa's largest empires were situated along this biotope, like the Mali Empire, the Songhai Empire, Kanem-Bornu, the Hausa city states and the Sokoto Caliphate. Quilted cotton armour, which is first recorded in the Nile Valley in antiquity, was used by Kushites to cover horse and rider. This is a quintessentially African type of armour that was used in Sudan during the BC-era, and spread to Central- and West-Africa where it is used to this very day (mostly ceremonial). This specific type of armour is so wide-spread, that an ancient point of dissemination is almost unquestionable. It is used in countries from Sudan to Mali, including Chad, Niger, Nigeria, Cameroon, Burkina Faso, Togo... Quilted cotton was later spread in the Middle East by the Arabs through Egyptian influence and even appears in medieval Europe. In the book "On the Erythraean Sea", the Greek historian Agatharchides, relating to Ptolemy II Nubian campaign, refers to a native type of felt armour for horse and rider that covers the whole body except for the eyes: For the war against the Aithiopians Ptolemy recruited 500 cavalrymen from Greece. To those who were to fight in the front ranks and to be the vanguard - they were a hundred in number - he assigned the following form of equipment. For he distributed to them and their horses garments of felt (stolas piletas), which those of that country (hoi kata ten choran; "the natives of the country" in Burstein) call kasas, that conceal the whole body except for the eyes. This is almost definitely Kushite quilted cotton. "that conceal the whole body except for the eyes"... I think I might know exactly what type of armour it was, and why it was so important. It was used by Kushites as an effective protection against arrows, which made it important for Ptolemies in their campaign against the archery heavy Kushite army. Here's an example of a 19th century Sudanese quilted cotton armour for horse and rider, covering the whole body except for the eyes, almost the same as the one used by the horsemen of Baguirmi and fitting ancient descriptions: An ancient Kushite example?: The iron cuirass worn underneath the quilted cotton armour of the riders of Baguirmi: Anyway, enough talk from me, enjoy this very large collection of Pre-Colonial African cavalry illustrations: Pre-Colonial African Cavalry in etchings and drawings: Pre-Colonial African Cavalry in Pictures: Contemporary African Cavalry Traditions: Mahdist armour for cavalry men, Sudan:


.thumb.jpg.c89751f7f34c25a1683d12fd7075ac2b.jpg)


 2 points
 -
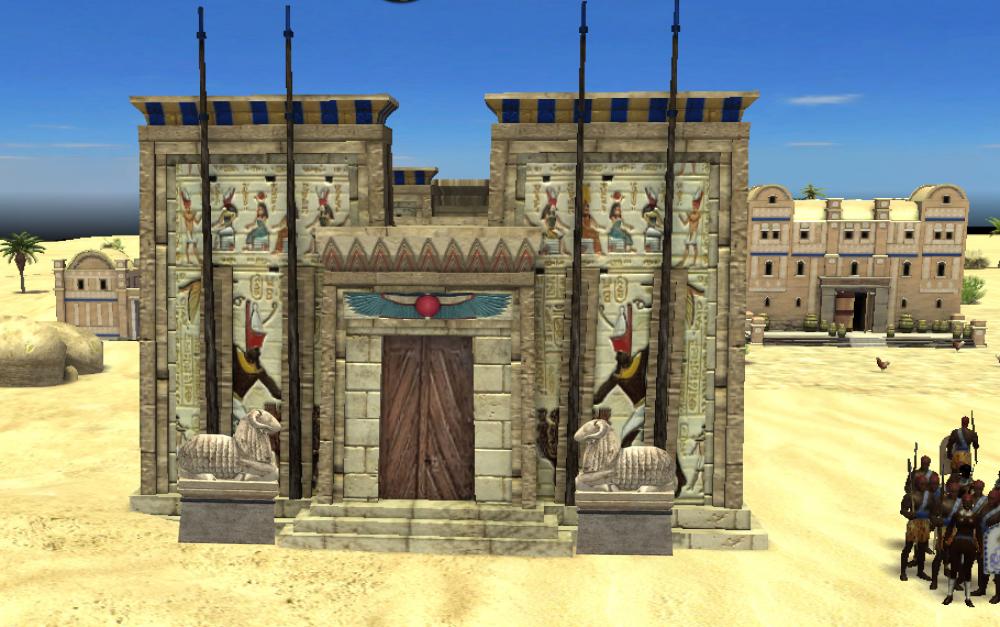
I don't think it would be a service to expand the footprint of the Amun temple any more. Depending on map tree distribution it will likely become difficult to place. Particularly on baobab heavy maps. Also obstruction boxes around the rams would be a particularly tedious task, best leave that to mapmakers.2 points
-
it was supposed to be brown but can't win one agains't cycles render. Arrows are prop points too, so you dind't had to make another "quiver_arrows" mesh.1 point
-
Yup they are ageless and pretty small. Here's some renders of them from the total war version: Their civ fits a Swarm/Ranged sort of theme. I'd probably liken them to Hobbits.1 point
-
free publicity . thanks Jarkendia.1 point
-
Athenian long walls can be built in neutral territory1 point
-
On Windows those files are in a hidden folder(M$ policy) check https://trac.wildfiregames.com/wiki/GameDataPaths for exactly where to look. Enjoy the Choice1 point
-
Can't argue with that... So you can just place them against the pylons, next to the protruding steps, within the current footprint of the temple? Like this:
 1 point
 -
In the videos I have seen a Idle Village button, IRC the . was used also for that in the original version, and you can reseed with right click, but no queues.1 point
-
Thanks for the hint. I would really love to be able to insert specific tags into the map-xml file, in order to affect just the specific item I want to manipulate. This would be much easier than to create a separate entity file for each modified enity class. Currenlty thhe xml can only store xy coordinates and orientation, right? You were just faster reading than me inserting all that stuff ;-)1 point
-
the issue with settings is that people will treat the standard rules as "basic" game, so this won't help for competitive multiplayer I fear. Unless you make a "tourney" mode or "competitive mode" that automatically sets up certain rules. In theory this might work - a "fun game" mode where you can play whatever you want (unranked) and a competitive game where you set up certain rules.1 point
-
@wowgetoffyourcellphone 110 but now i guess i can make one with a bith less, and a better texture.1 point
-
This is an expanded version of a21 multiplayer strategy guide for a22, updated by request. I've marked my recent a22 comments with "■". Don't fall into any of these early game traps: Farms go adjacent to your CC or farmstead, as close as they will go. I've seen many new players who put them a distance back. Don't do that. Don't use women for mining. Don't use men for food gathering. Use women or men for woodcutting. Cavalry are for hunting chickens or other animals. Only cavalry are good at this. Hunting is a very fast way to get food unless the animals are very far from the dropsite. If you have berries, build a farmstead right next to them and have some women harvest the berries. It's twice as fast as farming. Don't let your workers carry resources too far. Put the storehouse right adjacent to the trees when they chop wood. If your workers (except for hunting cavalry) are walking twice the width of a storehouse to return resources, they are walking too far. Don't make a barracks until towards the end of age I. A lot of new players make a barracks way too early, or even more than one. Your CC can produce enough soldiers by itself if you use batches. Don't make walls in age I either. Good players frequently agree not to use walls, anyway, and plus in age I it's just a waste of resources that the enemy can simply walk around. Sentry towers are good only if you are right next to enemy territory, to fight over the border and important resources there. Don't start mining anything until the end of age I. You don't need it. Don't use formations. Especially don't gather your army in age I and set it in formation outside your base to defend. That army is composed of workers, and should be harvesting resources at all times, unless you are using it to raid the enemy (an advanced technique). Corrals are an advanced technique because they require more micromanagement and there is a long delay before you get any net food from them (for a minute or two after you start building cavalry and corrals, they just cost you food and wood). Instead of corrals, use hunting, fields, or berries. Practice until you can have constant production of units from your CC (Civic Center) for the first 10+ minutes. That means: You need enough food income to produce women nonstop until population 50-70. You can produce soldiers after that. If you're planning on having a big economy, you can go up to 70 women, which does leave you more vulnerable to early attacks. You can use fewer women if you expect raids. Of course, if you're actually being raided, you need to make soldiers to defend (usually spearmen and cavalry). You need enough wood to make houses - and you need to make houses far enough ahead of time so that you don't get stopped by the population limit. Batch Production: like the previous step, learn to maintain constant production, but now with large batches (shift-click on the unit production icon several times to produce multiple at a time). Batch production by 5 is 38% faster than producing single units. Batch production by 10 is 57% faster. Batch production by 15 is 72% faster. It is absolutely worth it to make a batch of even 15 or 20, if you have the resources and population. You need more food to batch produce women this way. That means more on berries (like 10), more hunting, or earlier farms. You need to plan houses more in advance, too, so that you have enough population open when it's time to produce. A rule of thumb on houses is that (except for ptolemies) in the time it takes you to create 10 population worth of workers at your CC, one builder can build 10 population worth of houses. If you need a house faster than that, use several workers to build it. However, note that using more workers on the same house is less efficient, so build with just 1 worker if you don't need a house faster. However, note that it's inefficient to build more houses than you need. Don't be at 30 pop with 50 pop worth of houses; spend the wood on something else. Produce as large a batch as possible, but don't delay more than a few seconds to make a batch. It's better to just be producing 1 unit if you don't have enough houses or food for a batch. Don't queue up more than 1 batch of units from your CC at a time. Wait until the previous batch finishes, so your next batch can be as large as possible. Minimum batch size is configurable in the settings. Use a minimum batch size as small as you feel comfortable with - a minimum batch size of 1 is "optimal" because it lets you produce as large a batch as you have resources for, but it requires more clicks to produce a batch of a given size. borg-, who is the best player, uses a batch size of 2. Practice not harvesting resources you can't spend. If you're ever thinking "I have more food than I need - but I wish I had more wood" then you need to transfer some workers from food to wood, and figure out some way to spend the food. (Actually, you probably needed to transfer the workers two minutes ago, but late is better than never). If you have 1000 of any resource in age I-II, you have way too much. This can be counterintuitive to some new players, who think that because they have 5000 wood banked up that their economy is strong. A strong economy means you have a high income, not a high amount banked up. Resources you aren't spending aren't doing you any good. If you have extra wood, a good way to spend it is on economy upgrades. The highest priority upgrade is berry gathering, then woodcutting, then farming, then mining. You want economy upgrades as early as possible so you get the benefit for longer, except for the upgrades that are super expensive. Adjust your typical build order so that you avoid having too much of the resource. If, last game, you had way more wood than you could spend, then this game, don't put as many workers on wood so early. And so on. This is a true mark of skill in building your economy. You know you're doing it right when you have just enough of every resource you need, exactly when you need it, and little excess, and are producing in large batches. Watch replays of good players! A lot of people don't know where replays are. From the starting screen, they are under Tools/Options. Switch to that player's perspective in the replay and follow what they do - what they build, when they build it, how many farms they make, when they get upgrades. Then try to copy them in your next game. If you're spectating a game with good players, you can switch to the perspective of the best player and watch them as they play, instead of going to the replay. A list of good players in a21 can be found in this thread: multiplayer rankings . Ones near the top of the list, especially if they are also at the left margin, are good players. ■This list is a bit out of date, as there are many new good players in a22. Players rated above 1400 are usually good. ■ There are some caveats to some of the "early game traps" mentioned above: Mining with women: mostly not worth it, but one or two women on each mining patch will give the +10% gathering rate aura to the men who are mining, and are worth it. Also sometimes it may be worth it to mine with women in the late game if all your men are busy attacking. Mining in age I: if you're producing slingers in age I, you need to mine stone. If you're producing mercenaries that cost gold in age I, you need to mine metal. Formations: they do have a use sometimes if you know what you're doing. They can help gather up your units into a compact group prior to a fight. They can also help avoid a traffic jam when retreating from a fight. These are advanced techniques - leaving your units in formation as a habit will not be effective. Usually you want to disable the formation as soon as you're done with the specific situation you used it for. Practice using Shift to queue up actions. For instance, don't just tell your woodcutter to make a house - tell him to make a house, then shift-click back on the tree! That way he will go back to woodcutting when he's done building the house, and he won't be idle. I always do this whenever I build a structure. If you change your mind and want him to make a second house instead of going back to the trees, you should first select him, then click (without shift) on the house he's building to clear his work queue, then shift-click to build the new house. If you just shift clicked to build the second house, he would go back to the trees like you told him earlier after finishing his current house instead of building the second one. Work out exactly what you will do in the first minute, with low resources (the usual resource setting). This is a "build order." For every civ, you want to start by producing a batch of women from the CC ASAP, and put the cavalry on chickens, the starting women on berries, and the starting men on wood. You also generally want the first batch of 6 women produced from the CC to chop wood (depending a little on your minimum batch size), and the next 5 women from the CC to harvest berries, after which you will be at 20 population. The order in which you make a storehouse, a farmstead, get the berry upgrade, and make your first house can vary. Britons and Gauls can build a farmstead at the berries, build a storehouse at the wood, and research the berry upgrade. They will have plenty of time to get 75 wood and make their first house, because they get a population bonus from making the farmstead and storehouse. Most civs have houses that cost 150 wood and grant 10 population. With these you can't get the farmstead, the storehouse, and the berry upgrade all at once, and still have enough wood for your first house. Opinions on this vary, but I usually get the farmstead and the storehouse, and skip the berry upgrade. I batch 6 women and put them on wood, batch 2 women for berries, start to batch 2 more women for berries and at the same time start making the house with 4-5 woodcutters (I have woodcutters return wood prematurely to have 150 wood soon enough), make one last woman for berries, and now I'm at 20 pop and the house finishes just as the last woman is produced. Iberians and Mauryans occupy a middle ground since their houses cost 75 wood but they don't have the population bonuses of Britons/Gauls. ■Mauryans have an elephant, which can do the job of a storehouse or farmstead and help build houses, so they can get the berry upgrade. Iberians can get the berry upgrade if wood is close by, but if the men have to walk too far to make the storehouse then they would not get the first house in time. Ptolemies need less wood, ■but at least four workers building houses. The women build a farmstead, get the berry upgrade, and harvest berries, while the 4 starting men build houses. I'll often add 2 extra women making houses a bit later for a total of 6 builders. Ptolemies are convenient because you can shift-click rapidly to place the foundations for 10+ houses at the start and it doesn't cost you anything. It's best to have just one or two workers on each house. You can have each worker shift-clicked to build different houses so they don't all build the same house. Work out more of your typical build order. After you're at 20 population, additional women should go on wood. "Five fields as fast as possible" is a good rule of thumb - make sure that you are already building your next house, and then if you have 100 wood, make a field and put 5 women on it, until you have 5 fields with 25 women on them. You can transfer women from wood to farming if your CC doesn't have a batch ready when it's time for the next field. If you have extra berry patches, build farmsteads by them instead of making farms. You can figure that one berry patch with 5 women on it equals two farms. You will need to make farms later when the berries run out. Be aware that berries leave you more vulnerable to cavalry raids, but they're still usually worth it. If there's plenty of hunting, you can build some extra cavalry to hunt instead of women (usually, start hunting sometime after population 20). Shift-click your cavalry beyond the animal, and then shift-click on the animal, so that when the animal runs it will come back to your base. Don't make too many cavalry; make sure you're getting enough wood in proportion to your food income. Hunting gets you a lot of food. To transfer women from wood to farming, select the women, then shift-click on the storehouse so they drop off the wood, then shift-click to build the farm. This ensures they do not waste their last load of wood when they stop chopping. You can also go up to six, seven, or eight fields, and indeed you should if you are booming your economy. Use hotkeys for at least your production buildings, perhaps also other units. Select your CC and press Ctrl-1, and now you can select the CC again just by pressing 1. Your barracks can go on group 2. This helps you to keep production going smoothly even if your attention is elsewhere. ■I usually put my attacking army on group 3. If I want to send injured units back to heal, I'll put the injured ones on group 4, because that takes them out of group 3. ■You can actually put both the barracks and CC on group 1 usually. This works fine unless you want different units produced from the barracks that aren't available from the CC. Learn to use attack-walk. This is the hotkey "ctrl", combined with a right click. Units on attack-walk will attack enemy units in their way. If you don't want your soldiers to attack buildings automatically (usually you don't), you can use ctrl-q-click to have them target only units. I actually have edited my local.cfg file (see https://trac.wildfiregames.com/wiki/GameDataPaths ) so that ctrl-click targets only units. During a large melee combat, repeatedly select your units and ctrl-click. This makes them choose new targets close to them, and stops them from walking to targets far away. Doing this increases your army's DPS. ■Learn to use stances. Most military units start in aggressive stance, which means they will chase enemy units that attack them. You almost never want this, because it leads to units charging off alone to die, particularly common if they are building a structure while a tower is shooting at them. Whenever it becomes a problem you should set units to defensive stance. Sometimes you want archers to be on stand ground for better control. Learn the difference between attacking a structure or siege engine, and capturing it. Ctrl-click on the structure for your units to deal damage to the structure. Bear in mind that most units are pretty bad at damaging structures, the main exceptions being siege engines, and slingers and swordsmen to a lesser extent. Otherwise, a regular click will make your units try to capture the structure, which may be impossible if the structure is garrisoned, unless you've heavily damaged the structure first. Usually you want to kill the enemy army before attacking or capturing any structures ■with non-siege. Otherwise you will take large amounts of damage while attacking the structure. ■Cavalry rushes are extremely strong in a22 because of a buff to skirmisher cavalry. Prioritize hunting if it's available, since that lets you get out many cavalry faster. This will require some experimentation with build orders. You don't want too much food or too little wood, and you want to make sure you can transition to women-powered food production as the hunting runs out. Usually you want to send out at least 10 cavalry at a time to attack. If a lot of other players are making cavalry, you should make very large numbers (30 is good, or "more than he has"). You want to raid the enemy women, and kill the enemy cavalry. You want to walk your cavalry a bit past the enemy without attacking, and then ctrl-click to have them all start attacking at once. Skirmisher cavalry vs skirmisher cavalry fights are a game of positioning. If you can catch a few enemy cavalry away from the rest of them, you can snipe them while taking little damage. It's often better to run away than to take an even cavalry fight, especially if you're already in the enemy base: one of your cavalry in the enemy's base is worth more than one of his cavalry in his base. Also, if you're better at controlling cavalry than the opponent is, one of your cavalry is worth more than one of his anyway. Of course, you never want to take a fight where you're outnumbered. As mentioned before, you can sometimes use a formation to help run away faster. I've seen players achieve success by briefly activating the wedge formation as they run away. If you run and he chases, maybe his army becomes stretched out single-file while yours is more together. In this case, you can stop and snipe a few of his cavalry at the front, before continuing to flee. Dancing is a common tactic. To dance, you run one of your cavalry back and forth between your attacking line of cavalry and the enemy's line. You want the dancer to change direction every turn. The enemy cavalry will shoot at the dancer because he's closer, but if he changes direction before their shots land, they will miss. There is a secret form of dancing that makes the dancer impossible to hit with javelins. If the enemy is dancing, one option is to shift-click on each of his non-dancing units, so that you don't attack the dancer. Another option is to run your entire army forward so it's very close to the enemy - you will take damage as you do this but it will block the dancer from moving and, the enemy can't dance if your army is mixed with his. Both of these options have downsides. The most effective anti-dancing method is to have some melee units mixed in with your ranged ones. Note that dancing is not only a tactic for cavalry vs cavalry fights - it can be used against infantry archers or skirmishers as well, as long as the dancing unit is fast. If a few of your cavalry are too far forward, you can run them backwards behind the others. With luck and if the enemy is not paying attention, he will chase these cavalry, putting his army out of position and exposing it to the rest of your army. Archer cavalry (camels, chariots, dahae horse archers) en masse are more powerful than skirmisher cavalry en masse. Archer cavalry can also harass enemy workers without taking much damage. When the enemy infantry approaches, you select a few of your archer cavalry towards the front and run them away in some direction. Then select a few other cavalry at the front and run them away in a different direction. Keep doing this. There are three advantages to retreating in this manner: first, by only retreating a few of your cavalry at a time, the others can keep shooting. Second, if you run the cavalry in different directions, they will get in each other's way less, which means they can retreat faster. Third, the cavalry will become spread out, which means his infantry will have to walk more after killing one of them to kill the next. Spear cavalry (Macedonians and Romans in age I) are twice as good at raiding women. Because of their speed, spear cavalry are also good at getting a good position and taking out a few isolated enemy cavalry. If you have the enemy skirmisher cavalry substantially outnumbered, spear cavalry can also chase them all the way back home, using their greater speed to get some extra kills. Spear cavalry are not good at straight up large battles against skirmisher cavalry. More than skirmisher cavalry, spear cavalry should be used to hit and run. It's very hard to defend a 2v1 cavalry raid. If you can, coordinate with your allies to attack the same enemy base at once. ■If you are getting raided by too many cavalry to handle, first of all you should put your cavalry in your CC so it will shoot more arrows and your cavalry won't die. It's more important to keep your cavalry alive than your women. The women can garrison in houses with the town bell. Building a wall of houses around your fields can help a lot. Ask your allies for resources so you can make more cavalry so you can eventually fight back. Also ask them to send their army to defend you. It's not recommended to spend your resources remaking women you lost - they will only die again. Large numbers of pikemen are actually pretty good against a skirmisher cavalry raid. Unless the enemy is really good, he'll take damage every time he gets close to the pikes and you chase him. You can make towers as well. Large numbers of spearmen aren't terrible against skirmisher cavalry raids. When in long-term trouble from cavalry raids, it can make more sense to make spearmen and towers than try to match the amount of enemy cavalry. You can mix in some ranged units to attack from behind the spearmen. The plan is to grow your economy with infantry and eventually attack the enemy in age 3 with siege. I'm not an expert on this but have seen it work. It is not recommended if the enemy has archer cavalry. Just some basic control: hold down alt and drag over your woodcutters or miners to select only the soldiers, and not the women. After you've used some soldiers to chase after the raiders, you can click the "back to work" button with the soldiers selected (looks kind of like a brown wagon wheel or maybe a basket) and your workers will go back to chopping or mining. ■Due to the dominance of cavalry in a22, it has become popular to play "no-cavalry" games ("no cav"). In these games, you can use your starting cavalry, and you can make hero cavalry, but producing any other cavalry is forbidden. ■Skiritai have been nerfed a lot in a22, as they cost way more metal. The skiritai rush strategy I mentioned in the a21 guide no longer seems very effective, especially if the enemy has cavalry. Skiritai are still a solid core force in no-cavalry games, however. ■Towers in late game If you have a highly contested area such as the edge of your base near the enemy, you should build towers on it. You want the upgrade that gives +1 arrow count, and the one that gives +40% arrows per garrisoned unit. With 5 units in a tower it will shoot 9 arrows, which is decent. Also the range upgrade is nice. If the enemy attacks you with overwhelming force, retreat back past your towers. You don't want to actually fight him, just retreat so if he chases he will be under fire. Garrisoning units in an upgraded tower is better than putting them in a CC and similar to putting them in a fortress. Be careful you don't leave towers empty where he can capture them - at the same time, don't leave too many units in towers if there's nothing to shoot at and they could be doing better things. Most units deal less damage per second in towers or fortresses than outside of them. The purpose of having units in towers is to make the enemy take damage without dealing any himself as he walks around or chases your retreating units. If you want to actually fight his army with your army, you should generally ungarrison your units from your towers and fortress. This will increase your DPS and spread the enemy's DPS out among more of your units, which reduces your losses. An exception would be if most of his units aren't able to attack due to a traffic jam, and they would be able to attack if you ungarrisoned - in that case, remain garrisoned and let the traffic jam work for you. ■Basic late-game infantry composition: skirmishers and spearmen/swordsmen Many civilizations have skirmishers and spearmen or swordsmen as their basic infantry units. You will be most effective if you use a mix of all three units. The skirmishers can stay in the back and add DPS, while the spearmen or swordsmen go in front and soak up damage. It's good to mix spearmen and swordsmen because the swordsmen can go in front, and the spearmen just behind them, with both attacking at once. In no-cavalry games, small bands of skirmisher infantry can be used to raid the enemy base while his army is occupied elsewhere. You can dance skirmishers like you dance cavalry. Briton slinger spam This is a very powerful and common late-game strategy. Boom a bit with women in age I, then start making slingers and mining stone. Go to age II, continuing to boom. Here you can make some celtic cavalry to go raid the enemy or just keep booming. Switch to making spearmen later in age II so that you have enough stone to get to age III soon. When you're going III, make sure you mine enough stone for a fortress, from which you make Cunobelin. Then select Cunobelin and all your slingers and spearmen (alt-double click on a slinger to select all slingers, shift alt-double click on a spearmen to select all spearmen, and bind the whole army to a hotkey), and send them at the enemy. Make sure Cunobelin doesn't die, because his healing is very powerful. It's good to keep making celtic cavalry in age III to raid or to kill enemy archers. ■Slingers are no longer very good at killing buildings. You should make some rams. ■It's good to mix in a few healers, mostly for Cunobelin. ■Massed archers In late game, you can go for 100+ archers. Mostly for no-cav games, because cavalry, especially archer cavalry, will just overpower infantry archers. Archers have an advantage early in each fight due to their range. Once the enemy approaches, the archers can retreat. You can use the method of retreat I described for archer cavalry where you repeatedly select a few at the front and retreat those in a random direction. Have a bunch of towers to retreat past Archers are particularly good at supporting an ally who is using shorter-ranged units. The archers just add damage to the fight at no risk to your own units and without creating a traffic jam with your ally's units. Caution! You cannot kill rams with archers. It's best to keep around some swordsmen or have an ally who can kill rams for you. Elephants can kill rams, if you manage to maneuver them into the same place, which is sometimes tricky. ■Massed cavalry archers Maybe the most powerful late game unit composition that isn't champions If the enemy gets too close, just retreat. He can't catch you, and meanwhile you are filling him with arrows Seleucids can use massed Dahae Horse Archers, which become very tough with the Seleucid cavalry hero and the Seleucid bonus cavalry health upgrade. Persians have their chariots Ptolemies have camel archers When massing cavalry in the late game, it's helpful to use corrals in addition to farms, so your idle cavalry are benefiting you by producing food. ■Ptolemy mercenaries Get to age 3 fast at perhaps 10 minutes with only 90-100 pop, and immediately make the elephant hero that grants -50% mercenary cost. Start producing cheap mercenary skirmishers, archers, and swordsmen from many barracks and military colonies. You can also produce mercenary cavalry, but usually this strategy gets used in no-cavalry games. You get a flood of units, and even if you trade at below 1.0 kill/death ratio, you can still come out ahead. Not necessary stronger than Brit slingers ■Champions Champions are reserved for long games, especially naval maps or maps with a chokepoint. They aren't as useful on open maps because it takes so long to build them, while citizen-soldiers and siege are already pouring on the heat. There's no reason not to mix in a few champions with your primarily citizen-soldier army. Athens has champion archers which are basically the reason to play Athens. Athens can produce these archers from relatively cheap buildings, which makes it easier to mass large numbers of them. Use citizen-soldier spearmen to defend the archers against cavalry, and to tank damage when fighting enemy infantry. The downside is that Athens have no rams or elephants, only catapults which deal damage very slowly, so ideally you would have allies to send rams or elephants for you. ■Siege towers 5-6 siege towers is plenty. You need 10 units in each tower to get the full arrow count. Run them past the enemy units. Contrary to their name, siege towers are actually not very good at killing buildings. They are very hard to kill with ordinary units, however, and they do decent pierce damage. If the enemy units start chasing them, walk the siege towers away. They will still shoot as they walk. Siege towers are very slow. You cannot easily run back to defend your allies or your base. If a tower dies it takes minutes to replace it. I have had a good kill/death ratio when I have tried siege towers. However, I have lost the game a fair amount of the time due to not being able to get the towers to where the fight is. Also, compared to my also skilled teammates, I haven't had more kills with siege towers than a conventional army - just a good ratio. The best counter to siege towers, apart from sword cavalry, is rams. Siege towers are the same speed as rams, but the chasing unit has an advantage here; if the siege tower bumps into something such as another siege tower, it will stop, allowing the ram to catch and kill it. Three or four rams will force the siege towers to run away far across the map, giving the enemy a lot of breathing room and probably killing one or two of your towers. To counter rams you can perhaps keep some rams or elephants of your own in reserve. Elephants also can kill siege towers quickly. However, a siege tower kills an elephant significantly faster than it kills a ram. I have seen it work to use a combination of rams and infantry to kill a siege tower. The way it works is, infantry run past the siege tower to get in front of it and stop it, allowing the ram to catch up and kill. Possibly massed catapults can also counter siege towers. They do high crush damage and attack at range. I have not seen it tried. Some think that siege towers are overpowered. I don't agree. Rams can kill them, and the enemy can simply attack where the towers are not. And, of course, if sword cavalry are allowed, sword cavalry can kill them. ■Massed pikemen In age 3, maybe 70 pikemen is good. It's important they gather into a ball before the fight, at the edge of the enemy's territory, so they are all together. The enemy would have an easier time killing them if they came a few at a time. Put ranged units behind them, or have an ally who can supply the ranged units Bring siege or elephants as well, because it's not a raid. This is more of a hammer-blow attack. Large numbers of pikemen are very hard to kill. Meanwhile, the ranged support and the siege can destroy the enemy base and army. Trade In a long game, mines will start to run out. It's important in this case to start making lots of traders, to defend your traders, and to kill the enemy traders. 50 traders per player is a good number in a 200 population game. For both raiding and defending against raids, you want melee cavalry, and don't forget the walk speed upgrades at the corral. Having many fortresses and towers along the trade route helps as well, in part because you can garrison the traders in the fortresses/towers (also in houses or CCs). Long trade routes give more income, but are harder to defend. You want to set up the longest trade route that you can defend. Coordination with your allies ■At the start of the game, players call out their positions on the map. This is done like numbers on a clock. You would say "3" if you were on the east side of the map, for example. If you see everybody's number in time, this can help you place your storehouse - you want your first storehouse to be away from the enemy so he has a harder time killing your women. It also helps you know where to scout for the enemy. Try to attack 2v1 whenever possible. If you are getting attacked, or if you see a large enemy army on the move to one of your allies, or if you see enemy cavalry raiders, don't forget to tell your allies what's going on. A simple "purple attacks mid" when you see the purple player send an army through the center, can help your team a lot. ■If your allies don't have vision yet, be specific about what kind of attack is happening. For instance, you could say "help 2v1 cav at 3." Or you could say "help slinger rush" if you were attacked by slingers. This lets your allies know what kind of support they can provide, if any; if you're attacked by slingers they could send their infantry, but if you're attacked by cavalry they should usually not send infantry. If an ally is getting attacked and needs help, one option is to help defend him. Another option is to counterattack and kill the enemy's undefended base. Which you do should depend on how close your ally is to you, how fast your army is (a fast cavalry army can defend allies better), and whether you have an army that can kill buildings quickly (rams/elephants). During a large battle is also a good time to use your cavalry to raid his women and traders, because the enemy's attention is split and he may not react in time to your raiders. If you need resources, don't hesitate to ask. Once you've researched cartography at the market, you can mouse-over the resources and population icons to see what your allies have. If you have extra, give them to the ally who needs them most without waiting for him to ask. If you're at max pop it's best to give nearly *all* of your resources to an ally that is struggling, because you have a solid economy and can get them back, and he doesn't. Of course, you should donate more resources to allies that are more skilled, because they can make use of them better. In a 3v3 or 4v4, it's good to have at least one player on your team who commits to making tons of melee cavalry for raids and for assisting allies.1 point
-
I'm in the process of constructing an academic text (thesis) for school and I was thinking of utilizing 0ad/Pyrogenesis to help me with my paper. I'm planning on generating a mod which will help preserve our local history and culture and it will be used in an experiment to see if using video games to demonstrate Historical events help in boosting the academic performance of 3rd Millennium learners. Is it legal to use the game in my academic paper? What are the things that I should take into consideration if I will use the game in my Thesis? Thanks!0 points
-
While that is interesting and would be cool, I think it might introduce additional gameplay ramifications I'd rather not have to deal with. Forward building is already pretty dangerous, and this would make it even more dangerous. That's just one ramification off the top of my head.0 points


.jpg.e6c8ba5405116589ed3e3169a832b7f0.jpg)


.thumb.png.ce58cea22940c255f5b0a735d5abee36.png)