Leaderboard


Popular Content
Showing content with the highest reputation on 2013-12-29 in all areas
-
OK, thanks for the pointer, here are my two cents: I agree that some of the sounds are a little too modern (especially that high synth-bell-like sound). It can be nice to have one, easily recognizable melody for it, and just have it played on different instruments for the different civs. Personally, I like that you used a percussion swell before the melody, makes it stand out. Pausing the music may be a little intrusive in terms of continuity, but the music can certainly be dimmed for the duration of the sound, for emphasis. If you like, send me the percussion swell you made and I'll record a nice, uniform melody on it with the instruments I used in the score: The Spanish guitar for Iberia, the treble / bass tin whistles for Gaul / Celtica, the bouzouki for the Athenian factions, the mandolin for the Romans, the duduk for Carthage, the fretless guitar for the Mauryans, the oud for Egypt and the Saaz for Persia. Then for phase 2 reach I can orchestrate the melody, or add a second percussion swell on the end of the effect, or maybe record some other gratifying sound, like chimes or a harp glissando. On another note, I do agree with Michael - cheering would be a great addition to these SFX Omri EDIT: I just now saw that LAVS did send a message to me asking for my opinion, I just didn't get the notification and failed to notice it until now... Sorry.2 points
-
Perhaps we could start chipping away at the seleucid empire in the art development forum as we take a few more passes at the ptolemies2 points
-
I thought it might be helpful to step in here and mention that there isn't really any reason to setup your own lobby server besides having a private chatroom. The setup is rather complicated and was not intended to be done by an ordinary user.2 points
-
Hi team, I have the draft for 'phase_reach' sounds ready. I would like to have different sounds for each civilization (Iberos still missing). Please take a look and confirm if you like the idea. Focus your feedback bearing in mind that these sounds are still a draft. If everybody like it, I will be sharing the final version soon: http://goo.gl/tjjURE Look forward to your comments!2 points
-
Open http://localhost:5280/admin in your browser, login with the Username and the Password that you set as you set up your server. Goto "Virtual Host" and click on the Hostname you created. Then goto Users and tell me what you see. In your post #13 you tried to connect to your server with two diffrent commands: ./XpartaMuPP.py -l ubuntu --password 123456 --nickname WFGbotand ./XpartaMuPP.py --domain ubuntu --password 123456 --nickname WFGbotAs you see, they are different in one part: In the first, successful, Command you use "-l Ubuntu", in the second "--domain Ubuntu". with -l you specify the loginname, and with --domain, the place to find your server.2 points
-
It would be nice if we can include the translation work, even better in this early alpha16 phase, so that translators can easily try it from SVN and update translations according to game testing (blind translation without game testing leads to poor results, and merging and compiling by self the translation branch is not for everyone).2 points
-
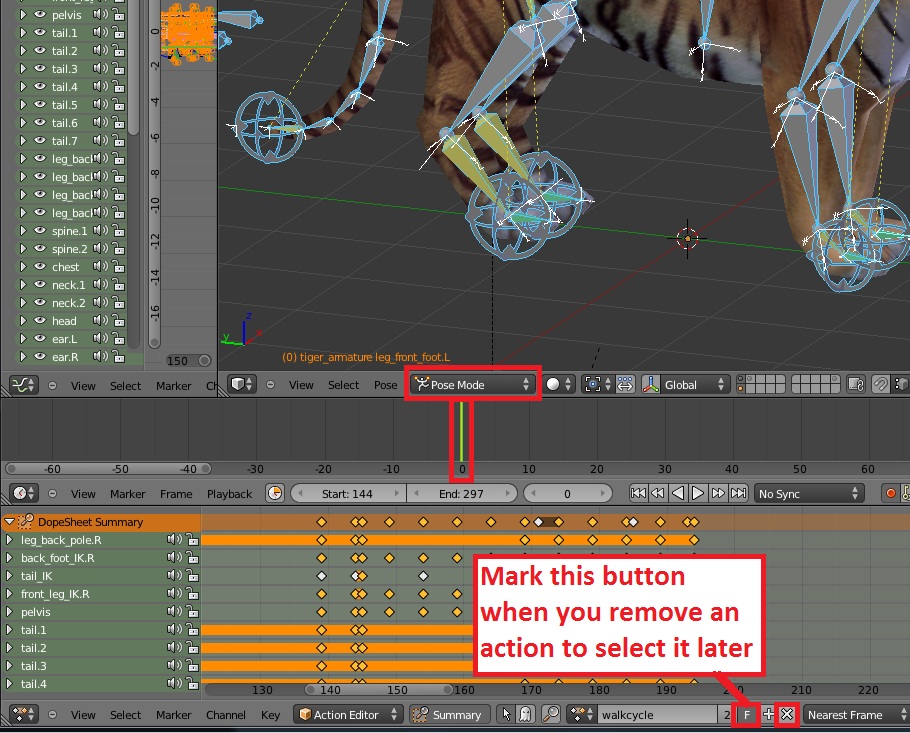
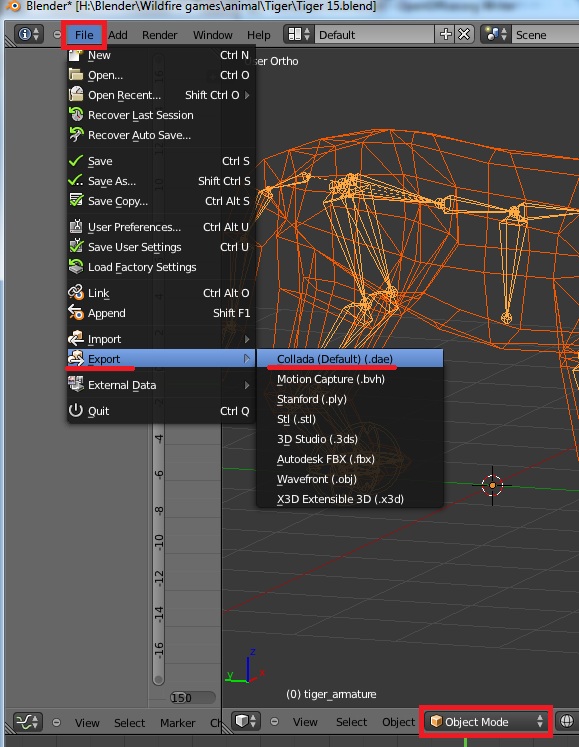
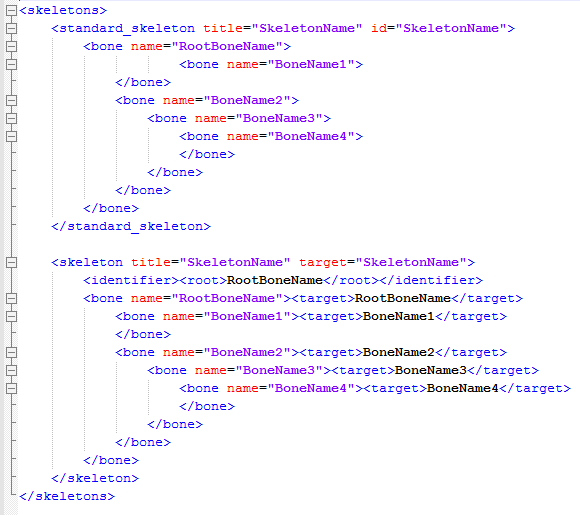
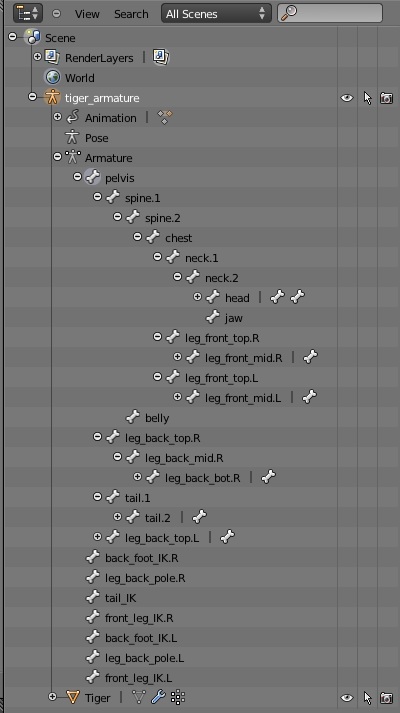
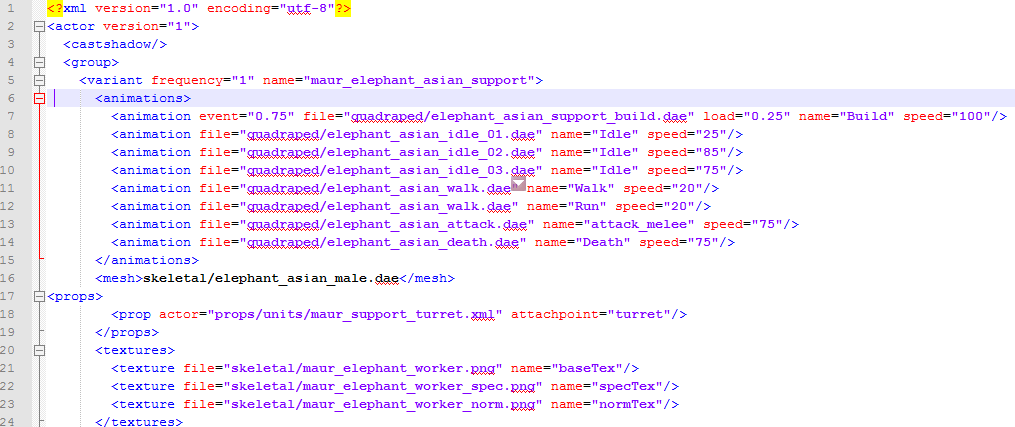
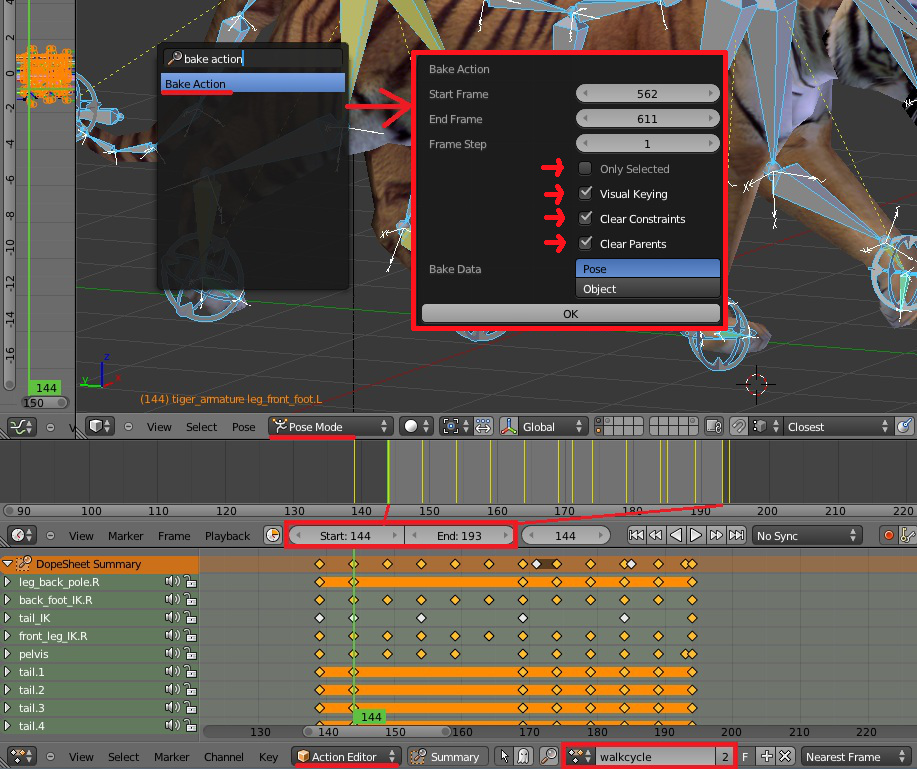
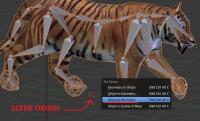
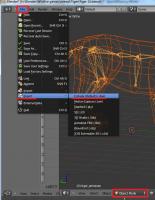
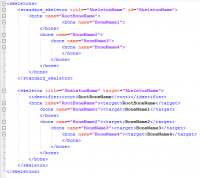
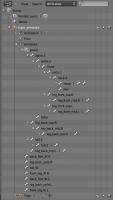
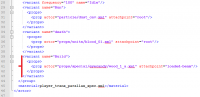
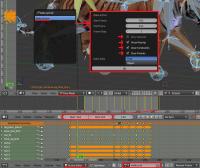
An updated version of this guide is available on the Wiki. Introduction This is a guide covering how to export and set up animation files from Blender3D into 0AD as well as some tips and general guidelines for get the animations working in 0AD. The Blender3D version used for this guide is 2.65a newer versions might have problems with the Collada exporter. Last blender version (2.69) works fine for exporting animations. Animations have three main requeriments in order to get them working in 0AD. These are: 1.- The file with the mesh and armature (COLLADA file) 2.- The file(s) with the different animations of the armature (COLLADA file(s)) 3.- The file XML defining the armature (called skeleton in 0AD) with its bones names and hierarchy. The last step is to specify the animations that the unit will have available on its different states in the XML actor file of the unit (i.e. Walk, run, death, idle...) Rig setup: When setting up the rig to animate your mesh, there are a lot of options to configure it to make the animator's life easier and achieve good results with less effort. Sadly, there are some limitations in how much animation and skeleton data the COLLADA format can export. Here are some points to keep in mind when configuring your rig to make animations for 0AD: -Avoid disabling "inherit rotation" in bones. While it's a very nice blender feature, when exporting your animation the bones that have their inherit rotation checkbox disabled end up inheriting their parent's rotation, plus the extra rotation you add in the animation resulting in weird and undesired behaviours. There's a tricky workaround for this, which is creating a helper bone which the bone that you don't want to rotate will copy its rotation. -Make sure the rig have the correct scale, and has its scale applied before start animating. Resizing your rig and/or mesh and applying its new scale before baking the animation may end up messing the animations you may already have, specially if you have any IK (Inverse Kinematics) setup in your rig. Here's a workaround that may or may not work: -Scale to the correct size the mesh+armature file and re-export it. -Export the baked animation(s) to dae with their incorrect size, but correct animation. -Import them back into blender, scale them correctly, and export them back without applying the scale one by one. -Mark the "Clear Constraints" checkbox when baking an action if you use any IK or constraint. Specially if you use constraints like "copy rotation" and "copy location". Once the action is baked without "Clear Constraints", it may appear in blender that it worked fine, but it will not when exported to collada format. -Save your .blend file before exporting. You will lose your rig constraints when baking the animation, plus importing collada animation files back to blender is not working propperly to date (11/24/2013). Because of this, if you want to tweak an animation, or use the same skeleton/rig to create a new one, the only way to do it right now is using the .blend file. In this guilde, we're going to set up the animations for a wild animal unit "Tiger" that will be controlled by the IA "Gaia". 1.- Export the .DAE file with the armature In this step, we're going to use Blender3D to create the first main file needed for the unit's animation. This file tells the engine the relationship between the bones and the mesh. Before this step, you should create in Blender3D the armature (skeleton from now on), and the mesh that is going to use it, apply the skeleton to the mesh and tweak the vertex wheights that each bone will move (this is not covered in this tutorial). Before exporting the mesh and the armature, you should make sure that both objects are centered in the origin point of the scene and both object's origin points locations match. To move the object's origin points to the scene origin point (coordinates 0,0,0) first use "SHIFT+C" this will make your 3D cursor to center into the scene origin, then select the mesh and the skeleton with rightclick and shift rightclick and use "CTRL+ALT+SHIFT+C", in the pop-up menu select "Origin to 3D cursor". Now make sure you remove from the "action editor" any action currently used by the skeleton (if any) and move the timeline back to the first frame if it isn't there. [1b – Optional image removing the action editor's action] Also make sure your skeleton is in the default pose (also called resting pose). To do this, select the skeleton, use "CTRL+TAB" to enter pose mode, hit "A" to select all bones and use "ALT+G", "ALT+R" and "ALT+S" to reset the bone's position, rotation and scale, this will put the armature in it's resting pose. Now we're ready to export the mesh and skeleton. Make sure there's nothing else in the blender scene other than the armature and mesh (remove lights, other meshes, helpers/empties...). In "Object Mode" select the mesh first with rightclick and then the armature with "shift+rightclick" (the order is important) then go to the menu in the top of the screen and use "File --> export -- > Collada (Default) (.dae)" Navigate to the folder where you want the file to be created, name the file and hit enter or click Export. *Note: These "mesh+armature" files are stored in \0AD\binaries\data\mods\public\art\meshes\skeletal\ 2.- Export the .DAE file animations In Blender3D, you have to use the "action editor" to create the different actions (or animations) that you want to export into 0AD to use them. These actions are usually: walk, run, idle, attack, and death, but you can make variations of each one or make more types of actions if desired. This tutorial do not cover how to animate in Blender3D but I'll give you links to animation tutorials and tips for the animations at the end of it. 2.1- Bake the action to keyframes In 3D animation software, you animate inserting keyframes or "posing" your skeleton along a timeline, and then the software computes the space between keyframes with intermediate poses which makes the movement motion. The closer one keyframed pose is to another, the quicker the motion will be from one pose to another, and the further the keyframed pose is to another, the slower the motion will be. To make an animation file readable for 0AD, you have to bake the action into keyframes in Blender. This is the process of creating a keyframe for each frame if a bone has changed its position from the previous frame. This is done automatically by Blender3D when baking the action. To bake an action into keyframes, first select the action to bake in the action editor, then adjust the "start frame" and "end frame" on the timeline to match the action length. After that, select the skeleton, enter in pose mode with "CTRL+TAB" and select all bones with "A". Once you have selected all bones, move the mouse cursor into the 3D viewport, hit "space" to bring the search option menu and type "bake action" then select "Bake Action" in the menu. A menu for the "Bake Action" option will emerge, uncheck "Only Selected" checkbox, !and check "Clear Constraints" checkbox (specially if you use IK and/or constraints) and click OK This will automatically insert keyframes between the poses you used to animate. 2.2- Export the animation .DAE file This is the same process as the first point. This will create the file containing the actual animation that will be played in 0AD's engine. Switch from pose mode to edit mode with "CTRL+TAB" select the mesh first with rightclick, then the armature with shift+rightclick, go to "File --> export -- > Collada (Default) (.dae)" Navigate to the folder where you want the file to be created, name the file and hit enter or click Export. *Note: These animation files are stored in \0AD\binaries\data\mods\public\art\animation\"unit type"\ **Note2!!: Units with different meshes but same skeletons can share these animation files and use it even if the animation files have been exported with different meshes. However, each unit needs to have its own "mesh+skeleton" .dae file that we have created in the first step. Repeat 2.1 and 2.2 for each animation of the unit and name them accordingly (i.e. tiger_walk, tiger_death, tiger_idle_01, etc...) 3.- Create the XML file defining the skeleton 0AD needs a .XML file to define the skeleton's name, bone hierarchy and bones' names. These skeleton .XML files are located in "\0AD\binaries\data\mods\public\art\skeletons\" You'll need one skeleton .XML file for each different skeleton you want to use in 0AD. The easiest way to set up one, is to open an existing file and modify it with the information of the new skeleton you want to add and save it as a new file. You can open .XML files with any text editor software. I recommend notepad++ to do so (personal preference). This is an example of the syntax that you need to use to setup the file correctly: Note how each child bone is defined under its parent bone line before closing the parent's bone definition with "</bone>" The RootBone is the bone in the armature that controls every other bone in it. Note: If you have any bone name in the skeleton containing a dot "." you have to use an underscore "_" in this file instead when writing the bone's name. To know the hierarchy of your skeleton, you can use the outliner window in Blender3D and expand the armature contents. There you can see which is your root bone, and the childs of each one of them. Once you have completed setting up the file, use "save as" and save the .xml file with an appropiate name in the folder specified at the beginning of this section. -Specifiying the animations for the unit in its actor Every unit (or entity) in 0AD has it's own .XML file which contains information that tells the engine different properties of that entity. These files are called actors. Some properties that contains these actor files are: -Mesh: the mesh that will be displayed in the engine for that entity or unit. -Prop(s): Actors can be used within other actors. They're called props. You need an empty/helper/bone with its name starting with "prop-" to specify where you want the actor to be shown. -Variants : These are possible variants of a unit (used for unit diversity) as well as states that a unit may have. -Texture(s): The texture or textures that the mesh will use. -Animation(s): Animations that the unit or entity can use and the variant/state associated with that animation. Animations in the actor files are normally specified just before the <mesh> tag in the following format: The <animation> tags in this example include the location and filename of the animation (created in section 2), the name of the variant/state that will use that animation specified by "name=", and the speed that the animation will play. The animation speed gives you control over the speed that the animation will play independiently of the speed it had when exported from Blender3D. Loading and hiding props during an animation: There's a special case for animations where you can load prop's actors and make them dissapear during the animation. The first animation specified in the example with the variant name "Build" uses this case. You specify with fractional numbers when the prop will show up with "load=" and when it will dissapear with "event=" during the animation. The number "0" means the start of the animation and "1" the end of it. The variants are normally specified after the textures in the actors. Here's the variant definition of "Build" from the previous example: In this example the actor "wood_1_a.xml" is going to be loaded at 25% of the duration of the build animation, and it will dissapear at 75%. You specify where the prop actor will be placed with "attachpoint=" . The attachpoint value needs to be the name of a bone, but it is mandatory that the bone name starts with "prop-". When you specify the prop-bone name you ommit the "prop-" part of the name, but if it's declared in a variant that is going to use "load=" and "event=" you have to start the name of the prop-bone with "loaded-" (in this example, the bone's where the actor is going to appear is "prop-beam". Note*: For static meshes without skeleton, you can use empties parented to the mesh with the name prefix of "prop-". You can later use this empty location to spawn an actor on it's place when defining the props between the <prop> tags right after the <mesh> definition in the actor file. 2015 Edit: - Blender collada export now works better and there's no need to bake the animations even if using IK setups. This reduces considerably the size of the animation collada file. - In order to get clean loops in pyrogenesis, you have to export including the first and last keyframe of the loop. In theory, it is the same keyframe and should be avoided, but the engine needs this duplicated keyframe. In resume: export the first and last keyframe in the animation loop to get a clean looping animation. - Blender now supports "clean channels" option when selecting keyframe channels and deletes the keyframes that do not add anything new to the animation. This reduces the size of the animation file without altering the animation at all. Just select all keyframes in the action editor, hit "X" and select "clean channels" Rigging Tutorials: http://vimeo.com/30073532 http://vimeo.com/30072564 http://vimeo.com/30078317 Animation Tutorials: http://www.cgmasters.net/free-tutorials/epic-looping-idles/ http://cgcookie.com/blender/2011/08/22/animating-a-character-picking-up-an-object/ Import/export 0AD assets and AO baking: http://www.wildfiregames.com/forum/index.php?showtopic=17542&p=273078


 1 point
 -
No, before we start working on part 2 we will go through first beta phase, and then have a final game, then we'll start working on the second part. If there's enough interest in the Thebans, perhaps they will be added, but apart from that it's very unlikely that there will be any new civs in part 1 apart from Seleucids.1 point
-
(Personally I would have preferred to have just one sound for reaching phase 1, and one for reaching phase 2, for all civs. Having one of each for each civilization makes it harder to actually know/recognize what they mean - you have to relearn it for each civilization. But the consensus previously seems to be that we should do things uniquely for the different civs as often as possible, so I'll not argue, just mention how I feel.) I see there are two sounds for each civ, are they meant to be one for each phase or just two alternatives and one would be used both for reaching phase 1 and 2? To me they aren't different enough to be one for each phase, so I'm assuming they're just different alternatives. In general I would say they are pretty good, and as far as I can tell fitting their civs reasonably well. I would like to hear Omri's opinion (I'll send him an email pointing him to this thread) as they are essentially music, so it would be nice to hear what he thinks.1 point
-
What we found is that the lobby appear to not be properly working when using gloox 1.0 (libgloox.so.8 - this is the standard version now in Debian/Ubuntu), while it works with 1.0.9 (libgloox.so.11 - this is in the Ubuntu 0ad PPA and possibly other distributions).1 point
-
Did you try in game too? Some options are disabled in Atlas.1 point
-
Maybe we should make the CC arrows stronger and the range bigger (but don't give (a lot of) extra arrows for garrisoned soldiers). This way, people could be working in the protection of the CC, and rushes should be countered easier.1 point
-
Hi Leonidas, we just started working on Alpha 16 so we don't know all the new things yet. Also we usually only choose a name towards the end of the development of an alpha version. We have announced that we want to release the Seleucid Empire and that will probably be the final faction in "0 A.D. - Empires Ascendant".1 point
-
Indeed, currently the CPU is the FPS limiter. If supported the advanced graphics should be enabled by default.1 point
-
(note for the saving settings, Santa has a patch for it on Trac)1 point
-
I agree. Along with a proper options setting that actually saves settings, this will make most users adopt fancy graphics (since that's mostly no the game's slow part).1 point
-
Well rushing is perfectly ok for some reasons (besides being annoying sometimes, for new players and people liking other playstyles more, myself included): People see it as a way to spend less time per match.Usually it can be countered without major loses unless the attacker is a clearly better player.It's just another possible playstyle, and it would be mean to people who like it to have it forbidden.1 point
-
Another thing that I would like to see in alpha16 is enabling by default, when possible, advanced graphics settings. This will require user testing on different hw, fixing rendering bugs when found, blacklisting other hw that cannot support it. This should also be done in the early phase of a planned release.1 point
-
I'd vote for adding the simple graphics options menu. IIRC there is already some ground work done. No idea how difficult is to implement it.1 point
-
Anything new regarding paid development? I fully understand that you are not ready for any announcement yet, but are you in talks with any developers? When can we expect news on this subject?1 point
-
I added a note about the new version on the wiki on the first post.1 point
-
Wiki-ed for your majesty. I've taken the liberty to change a few things here and there, add a few images, and fix a few typos.1 point
-
Heres a few very minor things. Workers search for resource after arriving at rally point. e.g. if a tree is set as the rally point and is gone by the time workers are created the workers will be idle at the rally point. Increases resource search for workers in general. Hunting and mining are ones I've noticed workers can't find another source as easily. Units change colour on mini map when selected.1 point
-
Probably means something like naming the one hoplite "Mike" and the other "Agathocles".1 point