Enrique
WFG Retired-
Posts
2.338 -
Joined
-
Last visited
-
Days Won
96
Everything posted by Enrique
-
Edited textures from building: how to apply?
Enrique replied to niektb's topic in Tutorials, references and art help
Too much black contrast IMO. BTW, by the looks of the first screenshots, it looks like you don't have enable normal/parallax/spec/ao maps. With them enabled, the lighting creates harder shadows depending on the light direction. -
===[TASK]=== WONDER: Britons: Stonehenge and White Horse
Enrique replied to Mythos_Ruler's topic in Official tasks
I'm affraid there's no such thing as celt ground textures...Keep in mind that Celts are going to be able to build it even on maps that are not celtic, so there will be always more likely that the hill texture is not going to match the actual ground texture (specially if the textures vary like grassy patches etc) so you might want to look for another solution. I guess there are two options: one is covering the hill where it intersects with the ground with "grass" props to hide the harsh transition (now that we can make props fit the height of the terrain) or making some kind of structural perimeter, like bricks or masonry, or even rocks. Is up to you, just my 2 cents -
Edited textures from building: how to apply?
Enrique replied to niektb's topic in Tutorials, references and art help
Yes, you have to specify it in the actor .xml file as I said above, just change the texture names by the ones you've created. -
Logos: 0 A.D. - Empires Ascendant, Pyrogenesis
Enrique replied to Mythos_Ruler's topic in Art Development
I have the .blend files of the WFG logo and 0AD logo that I made recently, so rendering those at high res it's very easy thing to do. Some questions before the renders... - WFG logo I made have a little white gloss. Do we need a "plain" version of it? - Do we need transparent backgrounds? - Which resolution do we need? should I go extreme and then make lower-res versions? -
Edited textures from building: how to apply?
Enrique replied to niektb's topic in Tutorials, references and art help
Hello niektb, Sadly, the texture you've chosen to edit is only used in a test building I made when I entered the team, and it is the same building as the roman temple (which now uses the rome struct textures) Each civilization has one or two textures that are shared by all the civ buildings to save texture memory. Romans already have normal, spec and AO maps that are applied to all buildings. You can enable this effects in the .cfg file. Here's a post explaining how to enable the effects: http://www.wildfireg...34 The textures to use are specified in the building/actor .xml between the <textures> labels. Here's an extract from the hellenic civ centre: <textures> <texture file="structural/hele_struct.dds" name="baseTex"/> <texture file="structural/hele_struct_norm.png" name="normTex"/> <texture file="structural/hele_struct_spec.png" name="specTex"/> <texture file="structural/ao/athen_civic_centre.png" name="aoTex"/> </textures> In the same .xml file, you have to make sure at the end of it that it has a material that uses the textures between the <material>, this is from the same hellenic civ centre (uses playercolor, normal/parallax, spec and ao) <material>player_trans_ao_parallax_spec.xml</material> -
===[TASK]=== Differentiating Britons and Gauls
Enrique replied to Mythos_Ruler's topic in Official tasks
Hey looking great LordGood! The top structure looks like it is not very stable though. Celts did not built with such standards as the romans or hellenes, but they made very robust structures. You can also try to make another variation just for the roof with wood planks making also a cone-shaped roof, but keep also this one, just rearrange the wooden posts where the roof is resting. -
===[TASK]=== Differentiating Britons and Gauls
Enrique replied to Mythos_Ruler's topic in Official tasks
I haven't seen yet the sceenshot yet because of its size... (connecting from my phone) We removed the max. Attachment size because we needed some quick file sharing here in the forums, but we'll appreciate if we you can avoid such file sizes for a single screenshot. Ontopic: I'm working on new gaul houses and market models. Feel free to give a try to another buildings if you are in the mood. (specially a different barracks would be good) -
===[TASK]=== Differentiating Britons and Gauls
Enrique replied to Mythos_Ruler's topic in Official tasks
Maybe use this as a base for the Gallic market as you suggested too: http://www.wildfireg...&attach_id=5842 I'd like to get into this ASAP so, suggestions about this task are really welcome. -
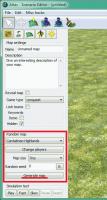
Yes you can,Here is a screen of the settings to make that happen. You can change the type of random map to generate in the drop-down list, the size of the map, and you have also the random seed there (typing a different number each time will generate a different map even with the same settings). Enjoy!
-
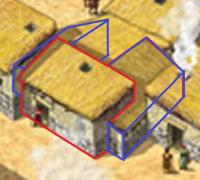
Yes, that's the direction we're looking for. I think the big building part (back part) could be wider, getting inside the wings a little more, and make the wings shorter. The door seems now a little off scale. You can try importing an existing building for scale reference, it helps get it right. Good work so far
-
===[TASK]=== WONDER: Persians: Apadana of Darius
Enrique replied to Mythos_Ruler's topic in Official tasks
I'd like to give a try with this one... By the looks of it it's possible to reuse a lot of persian assets... -
Loading Screen Tips.
Enrique replied to Mythos_Ruler's topic in Game Development & Technical Discussion
I probably haven't seen all tips and maybe the ones I'm suggesting are already implemented. This suggestions are based on mistakes I've seen in videos of people playing: - Farms: You can put up to 5 workers on each farm (lots of people use only one like AOE) - Selecting multiples with Shift and constructing multiples with shift is also missing in several gameplay videos - Cavalry is better at hunting, use you starting cav unit to hunt for starting food boost. - Double clicking an unit selects all units of that kind on-screen - Citizen soldiers can build more building types than females (military ones) - Docks can be used as a dropsite for any resource. - You can garrison units in rams and repair them too. - How to use batch training and its benefits -
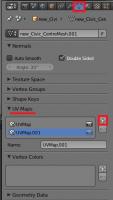
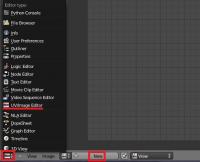
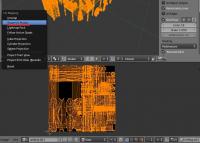
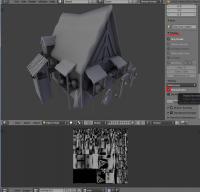
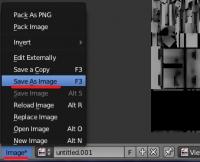
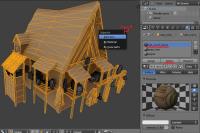
Introduction This is a guide covering how to import assets from the game to blender, create a second UV coordinates, bake the AO maps and export again. The game's buildings are usually divided in different .dae files (one per diffuse texture used) Usually, they consist in one main ".dae" file located in "meshes/structural" and one or more ".dae" children (props) that are attached to the main file, this "prop" daes are located in "meshes/props". (this is not always the case) In this example, we're going to bake the AO map for the celtic civil centre. 1.- Import the mesh into blender3D Inside blender, remove the starting cube, camera and point light. Go to file->import-> Collada (.dae) and select the .dae file to import. This building consists on three files: celt_civic3.dae, celt_civic3_props_1.dae and celt_civic3_props_new.dae If blender shows an error importing: *Note: The file may be imported rotated -90º in the X axis. To solve this, simply center the pivot point at the origin with SHIFT+C, select the cursor for your pivot point, select the asset and hit "R" for rotate, "X" for the axis, and then type "90" on the numpad and hit enter. Each time you import an asset, it is important that you create a new material with the name of the .dae or the texture that is going to use if you know it. This will let us separate the object again after we join all the meshes together. 2.- Set up a new UV coordinates. Select all your meshes and join them with CTRL+J Go to "object data" panel, scroll down to UV Maps menu and click the "+" sign to create a new UV coordinates. --Select the building, enter in edit mode with TAB. --Open a window with the UV/Image editor. Click in "new image" and "ok" in the pop-up menu. This creates a new 1024*1024 black image where we will bake the Ambient occlusion. --Now let's unwrap the model automatically. Go to object mode, select the model, use "CTRL+A" and select "apply scale" this will recalculate the scale of our building, so the polygons could be unwrapped nicely. --Enter "edit mode" with TAB. select all with "A" and hit "U" and select "Smart UV Project" in the pop-up menu. --In the next menu select the following settings: 3.- Baking the AO into our new generated black image. Preparing the AO settings: go to the "world" tab in the settings panel, mark the checkbox of Ambient occlusion and set it to "multiply". Scroll down to the "Gather" pannel and change the samples to something between 20-25 --We have the model ready to bake the AO map. Go to the render tab, scroll down to the "bake" panel (click on the "bake" pannel if it is closed) and use the following settings: --Then click "bake" and wait until the baking process is completed (this will take a while depending on your machine) --Once finished, you can hit "N" in the viewport to open a toolbar, go to the "display" menu, and click in the "texture solid" checkbox. This way you can see the AO map we have just generated on the model and check if it has been correctly generated. ------If you see black strange black faces where it shouldn't, the polygon normals are probably facing the wrong direction. This could be fixed selecting the black faces and then hit "W" and select in the pop-up menu "flip normals". ------If you find the problem where there are dotted black parts, it's probably because there are two or more polygons overlapping each other. You'll have to tweak the model sightly to fix this issue. --Once the bake is finished and you're happy with it, remember to save the image generated so it doesn't get lost. In the UV editor select Image->save image As... 4.- Separating the mesh by materials Now that we have our AO map, and the model has a second UV coordinates for the AO, we have to separate it's pieces again and export the parts one by one. To separate by materials, enter "edit mode". Make sure you don't have anything selected hitting "A" twice. Go to the materials tab, select the first material on the list, and click "select" button. This will select all the faces that have that material assigned. Once selected hit "P" and select "selection" in the pop-up menu. Repeat this step for each material (prop) you have imported. NOTE: Now that you only need to export the objects into .daes again, is a VERY NICE moment to save the .blend file in case the export process goes wrong. 5.- Exporting the meshes back to .dae files. This is the last part. You have to export the objects one by one. Make sure the following requirements are met: - There's nothing else on the scene except the mesh you want to export (even hid objects breaks the export) - You have to remove every material applied on the mesh. - There are no lights, armatures or other objects in the scene. - You have your object selected. Then you simply go to File->export-> Collada (.dae) and select the file to export or overwrite the old one. After that, reload the .blend file and repeat this step with the rest of the objects (or hit CTRL+Z a few times until you get back the other meshes and repeat the process with the next one) I hope it's somewhat understandable and useful .
-
Hey Jkolosovkis! The design looks cool, but we're looking for something more squarish (like the iberians built) and compact. I've attached a sketch of what we're going for. It's very basic, but you can get an idea The entrance of the building is not facing the camera from this shot. Here's a reference on the way they built: http://farm6.staticf...c82a5014f_b.jpg
-
Crop Diversification and Reseeding
Enrique replied to The Crooked Philosopher's topic in General Discussion
It could be done... thanks to sanderd's patch of prop-points conforming to the terrain. Hard to spot the workers though xD -
The possibility of having an angle where you can notice a "hole" on the mesh because the reflection in water is very rare. I normally model without deleting facing-down polygons, and I remove them if the polycount is really high. Keep in mind that this project started a long time ago and polygon budget was much more limited than it is now. I mean 9k tris in blender (if you work in quads, just halve the number ) I just mention the tris because before Normal maps are calculated in tangent space. You don't have to worry about them. It was. We have introduced the blacksmith building into the game design and that building design/layout was chosen for it, and a new barracks needs to be designed.Speaking from experience, I recommend not to detail the building a lot at first, just block/sketch it to give it the overall form. You may start detailing and working harder on a design and we may ask you to make heavy changes on the layout.
-
Hello Janis! welcome to the forums! Nice work examples. I like the texturing work you've done. I imagine you primary interest is working on hard-surface models. We currently need a new model for the iberian barracks. Would you like to give it a try and test your skills? We're looking for something following the layout of the carthaginian and greek barracks. You can import the carthaginian mesh into blender to have a reference for the scale here: http://svn.wildfireg...hes/structural/kart_barracks.dae (in blender File-> Import -> collada -> select kart_barracks.dae) You have to map the model to this texture: http://svn.wildfireg...ins/structural/kart_struct.dds Some notes to keep in mind: - The engine do not render double-sided polygons, so if you want a polygon to show both sides, you'll have to duplicate the poly and flip the normals. - The texture do not tile if you get the UV outside the texture space. (blender tiles the image, but the engine don't) so UV islands should be inside the texture space - The model should extend a little under the ground, so the building don't look floating when constructing on uneven terrain. - Ideally, the model should be under 9k tris. - The building will use an AO map mapped to a second UV coordinates but I'll explain this phase once you finish the model You can use this thread to post WIP images for review and critique. Please don't hesitate to use this thread also to make any question or look for feedback. Looking forward to see what you come up with!
-
I downloaded it and I like it a lot. Sounds very nice. My personal opinion would be to get rid of the second "clinck" hammer sound and stick with the first and last (the strong ones) and make it sound closer to each other. It will also make the effect a little bit shorter, which I think it's good for a selection sound. Overall really nice Looking forward to hear more from you Sorpico!
-
which assets are you trying to import into blender? any error message?
-
===[COMMITTED]=== Italiote Embassy re-map.
Enrique replied to Mythos_Ruler's topic in Completed Art Tasks
Done! -
===[TASK]=== WONDER: Britons: Stonehenge and White Horse
Enrique replied to Mythos_Ruler's topic in Official tasks
You can find the mauryan wonder on binaries/data/mods/public/art/meshes/structural/maur_big_stupa_struct.dae It also has the same footprint as the gardens, which I made following the great pyramid footprint, so you can use it as a reference. The gardens have a ludicrous amount of polys due to the amount of flora in it. I'll probably remove the interior and reduce triangles on the future. There are some Civic centres and big buildings that go around the 8k tris, so it's not so crazy the amount you have at the moment. They need UV map. If you have more elements in an array, first unwrap the "origin" mesh of the array, so when you apply the array, all the duplicates will be already unwrapped. Best results will be achieved by marking seams and unwrapping manually. You can try to do an "smart UV project" but that will produce noticeable seams in several blocks corners. Just remember you can overlap UV islands without any problem when mapping the texture, and you can hide the parts that you have already mapped, so they do not disturb you when working on the ones that still needs mapping. EDIT: The .dae files imported from the game to blender do not come with the textures, but you don't need them if you are just going to use it as a scale reference. -For the extension under the ground, I'd say just duplicate the vertical stones and get it under the ground, where the top touches the bottom of the "out of the ground" ones, I think that could do the trick. -You only need to worry about the model itself, the grass/soil etc it's a decal that is specified on the actor once it is exported into the game. EDIT2: A post with some unwrapping/mapping tips: http://www.wildfiregames.com/forum/index.php?showtopic=16654&st=20#entry253448 -
===[TASK]=== WONDER: Britons: Stonehenge and White Horse
Enrique replied to Mythos_Ruler's topic in Official tasks
I think you can model it without worrying too much since it's mostly cubes. I suggest to make a little irregular/bumpy stones but not too much. You can also try to use the bevel modifier so they do not look so perfectly cut. More tips: try to import a wonder from the game to get the correct scale/footprint. Model with all the detail you want, (without very dense meshes) and if once finished it's too heavy, you can use the decimate modifier to reduce polys or remove excessive details. Feel free to ask any questions. -
This is just a suggestion, but I think we should made it more squarish, like the rest of the wonders and drop the last bit of the temple. BTW I already did some time ago the pylon of the edfu temple and the back building. I shortened them into two buildings to make it easier to find room to place them. They are somewhere in the ptolemies thread I think. They are already mapped with the colorful textures I was working on for ptolemies.


