Enrique
WFG Retired-
Posts
2.338 -
Joined
-
Last visited
-
Days Won
96
Everything posted by Enrique
-
I meant thickness. I recall the lenghts were correct, but they were much more thicker than the rest of the other civs' walls. Specially the gates. You can celarly see it in your last screenshot. In other civs, the gates uses more or less the same thickness as the walltowers. I'd also suggest to use other civ walls as reference for scale, since carthaginian walls are meant to be thicker, bigger and stronger than other walls for historical reasons.
-
Could you point out which ones are you talking about?
-
Well, this is not true. This is a side effect of the name chosen, but it is not a reason why the game is named that way.
-
LOL love your little offtopic details. They look like solid concepts, I can't decide, I like both
-
Thank you guys, glad you like them Yes, that's true. I've barely done any animation work before other than some basic tests. I had knowledge about the basics which I've been improving lately since Zaggy became inactive... (we also needed someone in the team with animation experience to help newcomers and make some documentation so...) Hehe, yes. I've lived with cats for a very long time . I agree with you and GunChleoc, the portion of the yawn needs to be a little longer. Easy fix I hope these animations can be reused for the different big felines we want to have in the game (lion, lioness, cheetah...) Lions' meshes would be really nice to be updated, so, if Micket is reading this and is on the mood, you are invited to do more awesome animal models
-
Hello Arishia! Welcome to the forums. To get you up to date, the art team is currently working on Ptolemaic Egypt buildings and units, there is still plenty of work to do. You can see the unnassigned art tasks in the Art Dev.Task Tracking thread . You can choose a task from that list and start working on it when you want. You just start a new topic with the title "==[TASK]== Taskname" and you can post there your progress, WIPs, questions and such. I'd recommend that you work in some concept designs if you know how to draw and when you get the feel of the art direction of the project and a good concept for the building, jump to the modelling process. However, if you prefer to start directly with modelling and you don't mind that we ask you to change something (or several things) from it, you're welcome to do so. (It would also come in handy to have building concepts for every Ptolemaic building that isn't finished yet) We're looking for historical accuracy when possible. Gameplay usually comes first in the game concept, so things like 100% authentic building scale is sacrificed. I like to recommend to everyone that wants to start contributing with models and concepts to download the game and take some time to look at the different buildings already in-game for the different factions to get a feel of the proportions, building types and general art direction. For example, you can see that we're trying to have similar building layouts and sizes for each type of building but with the specific style of each civ. Since the Art developement has become open to the public, anyone can start working on a task, but work examples are very welcome to know the skill level and strengths of each artist to make better suggestions and critique about their work. I work enterely with Blender3D and have very little knowledge on the 3D software you use, but it's ok as long as you can export the models in COLLADA format (.dae) in order to get them in 0AD's engine. But there are people on the forums that use your software that I'm sure they can give you some help if you encounter any problem. I'll give you more specific model requirements when you're ready to start modelling I think that's all for now Welcome again!, looking forward to work with you.
-
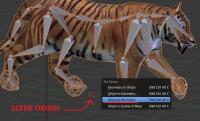
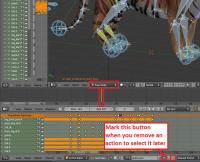
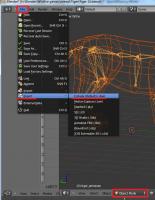
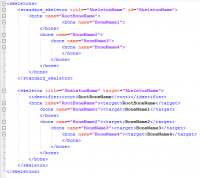
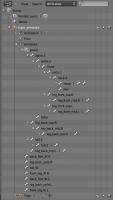
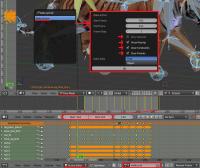
An updated version of this guide is available on the Wiki. Introduction This is a guide covering how to export and set up animation files from Blender3D into 0AD as well as some tips and general guidelines for get the animations working in 0AD. The Blender3D version used for this guide is 2.65a newer versions might have problems with the Collada exporter. Last blender version (2.69) works fine for exporting animations. Animations have three main requeriments in order to get them working in 0AD. These are: 1.- The file with the mesh and armature (COLLADA file) 2.- The file(s) with the different animations of the armature (COLLADA file(s)) 3.- The file XML defining the armature (called skeleton in 0AD) with its bones names and hierarchy. The last step is to specify the animations that the unit will have available on its different states in the XML actor file of the unit (i.e. Walk, run, death, idle...) Rig setup: When setting up the rig to animate your mesh, there are a lot of options to configure it to make the animator's life easier and achieve good results with less effort. Sadly, there are some limitations in how much animation and skeleton data the COLLADA format can export. Here are some points to keep in mind when configuring your rig to make animations for 0AD: -Avoid disabling "inherit rotation" in bones. While it's a very nice blender feature, when exporting your animation the bones that have their inherit rotation checkbox disabled end up inheriting their parent's rotation, plus the extra rotation you add in the animation resulting in weird and undesired behaviours. There's a tricky workaround for this, which is creating a helper bone which the bone that you don't want to rotate will copy its rotation. -Make sure the rig have the correct scale, and has its scale applied before start animating. Resizing your rig and/or mesh and applying its new scale before baking the animation may end up messing the animations you may already have, specially if you have any IK (Inverse Kinematics) setup in your rig. Here's a workaround that may or may not work: -Scale to the correct size the mesh+armature file and re-export it. -Export the baked animation(s) to dae with their incorrect size, but correct animation. -Import them back into blender, scale them correctly, and export them back without applying the scale one by one. -Mark the "Clear Constraints" checkbox when baking an action if you use any IK or constraint. Specially if you use constraints like "copy rotation" and "copy location". Once the action is baked without "Clear Constraints", it may appear in blender that it worked fine, but it will not when exported to collada format. -Save your .blend file before exporting. You will lose your rig constraints when baking the animation, plus importing collada animation files back to blender is not working propperly to date (11/24/2013). Because of this, if you want to tweak an animation, or use the same skeleton/rig to create a new one, the only way to do it right now is using the .blend file. In this guilde, we're going to set up the animations for a wild animal unit "Tiger" that will be controlled by the IA "Gaia". 1.- Export the .DAE file with the armature In this step, we're going to use Blender3D to create the first main file needed for the unit's animation. This file tells the engine the relationship between the bones and the mesh. Before this step, you should create in Blender3D the armature (skeleton from now on), and the mesh that is going to use it, apply the skeleton to the mesh and tweak the vertex wheights that each bone will move (this is not covered in this tutorial). Before exporting the mesh and the armature, you should make sure that both objects are centered in the origin point of the scene and both object's origin points locations match. To move the object's origin points to the scene origin point (coordinates 0,0,0) first use "SHIFT+C" this will make your 3D cursor to center into the scene origin, then select the mesh and the skeleton with rightclick and shift rightclick and use "CTRL+ALT+SHIFT+C", in the pop-up menu select "Origin to 3D cursor". Now make sure you remove from the "action editor" any action currently used by the skeleton (if any) and move the timeline back to the first frame if it isn't there. [1b – Optional image removing the action editor's action] Also make sure your skeleton is in the default pose (also called resting pose). To do this, select the skeleton, use "CTRL+TAB" to enter pose mode, hit "A" to select all bones and use "ALT+G", "ALT+R" and "ALT+S" to reset the bone's position, rotation and scale, this will put the armature in it's resting pose. Now we're ready to export the mesh and skeleton. Make sure there's nothing else in the blender scene other than the armature and mesh (remove lights, other meshes, helpers/empties...). In "Object Mode" select the mesh first with rightclick and then the armature with "shift+rightclick" (the order is important) then go to the menu in the top of the screen and use "File --> export -- > Collada (Default) (.dae)" Navigate to the folder where you want the file to be created, name the file and hit enter or click Export. *Note: These "mesh+armature" files are stored in \0AD\binaries\data\mods\public\art\meshes\skeletal\ 2.- Export the .DAE file animations In Blender3D, you have to use the "action editor" to create the different actions (or animations) that you want to export into 0AD to use them. These actions are usually: walk, run, idle, attack, and death, but you can make variations of each one or make more types of actions if desired. This tutorial do not cover how to animate in Blender3D but I'll give you links to animation tutorials and tips for the animations at the end of it. 2.1- Bake the action to keyframes In 3D animation software, you animate inserting keyframes or "posing" your skeleton along a timeline, and then the software computes the space between keyframes with intermediate poses which makes the movement motion. The closer one keyframed pose is to another, the quicker the motion will be from one pose to another, and the further the keyframed pose is to another, the slower the motion will be. To make an animation file readable for 0AD, you have to bake the action into keyframes in Blender. This is the process of creating a keyframe for each frame if a bone has changed its position from the previous frame. This is done automatically by Blender3D when baking the action. To bake an action into keyframes, first select the action to bake in the action editor, then adjust the "start frame" and "end frame" on the timeline to match the action length. After that, select the skeleton, enter in pose mode with "CTRL+TAB" and select all bones with "A". Once you have selected all bones, move the mouse cursor into the 3D viewport, hit "space" to bring the search option menu and type "bake action" then select "Bake Action" in the menu. A menu for the "Bake Action" option will emerge, uncheck "Only Selected" checkbox, !and check "Clear Constraints" checkbox (specially if you use IK and/or constraints) and click OK This will automatically insert keyframes between the poses you used to animate. 2.2- Export the animation .DAE file This is the same process as the first point. This will create the file containing the actual animation that will be played in 0AD's engine. Switch from pose mode to edit mode with "CTRL+TAB" select the mesh first with rightclick, then the armature with shift+rightclick, go to "File --> export -- > Collada (Default) (.dae)" Navigate to the folder where you want the file to be created, name the file and hit enter or click Export. *Note: These animation files are stored in \0AD\binaries\data\mods\public\art\animation\"unit type"\ **Note2!!: Units with different meshes but same skeletons can share these animation files and use it even if the animation files have been exported with different meshes. However, each unit needs to have its own "mesh+skeleton" .dae file that we have created in the first step. Repeat 2.1 and 2.2 for each animation of the unit and name them accordingly (i.e. tiger_walk, tiger_death, tiger_idle_01, etc...) 3.- Create the XML file defining the skeleton 0AD needs a .XML file to define the skeleton's name, bone hierarchy and bones' names. These skeleton .XML files are located in "\0AD\binaries\data\mods\public\art\skeletons\" You'll need one skeleton .XML file for each different skeleton you want to use in 0AD. The easiest way to set up one, is to open an existing file and modify it with the information of the new skeleton you want to add and save it as a new file. You can open .XML files with any text editor software. I recommend notepad++ to do so (personal preference). This is an example of the syntax that you need to use to setup the file correctly: Note how each child bone is defined under its parent bone line before closing the parent's bone definition with "</bone>" The RootBone is the bone in the armature that controls every other bone in it. Note: If you have any bone name in the skeleton containing a dot "." you have to use an underscore "_" in this file instead when writing the bone's name. To know the hierarchy of your skeleton, you can use the outliner window in Blender3D and expand the armature contents. There you can see which is your root bone, and the childs of each one of them. Once you have completed setting up the file, use "save as" and save the .xml file with an appropiate name in the folder specified at the beginning of this section. -Specifiying the animations for the unit in its actor Every unit (or entity) in 0AD has it's own .XML file which contains information that tells the engine different properties of that entity. These files are called actors. Some properties that contains these actor files are: -Mesh: the mesh that will be displayed in the engine for that entity or unit. -Prop(s): Actors can be used within other actors. They're called props. You need an empty/helper/bone with its name starting with "prop-" to specify where you want the actor to be shown. -Variants : These are possible variants of a unit (used for unit diversity) as well as states that a unit may have. -Texture(s): The texture or textures that the mesh will use. -Animation(s): Animations that the unit or entity can use and the variant/state associated with that animation. Animations in the actor files are normally specified just before the <mesh> tag in the following format: The <animation> tags in this example include the location and filename of the animation (created in section 2), the name of the variant/state that will use that animation specified by "name=", and the speed that the animation will play. The animation speed gives you control over the speed that the animation will play independiently of the speed it had when exported from Blender3D. Loading and hiding props during an animation: There's a special case for animations where you can load prop's actors and make them dissapear during the animation. The first animation specified in the example with the variant name "Build" uses this case. You specify with fractional numbers when the prop will show up with "load=" and when it will dissapear with "event=" during the animation. The number "0" means the start of the animation and "1" the end of it. The variants are normally specified after the textures in the actors. Here's the variant definition of "Build" from the previous example: In this example the actor "wood_1_a.xml" is going to be loaded at 25% of the duration of the build animation, and it will dissapear at 75%. You specify where the prop actor will be placed with "attachpoint=" . The attachpoint value needs to be the name of a bone, but it is mandatory that the bone name starts with "prop-". When you specify the prop-bone name you ommit the "prop-" part of the name, but if it's declared in a variant that is going to use "load=" and "event=" you have to start the name of the prop-bone with "loaded-" (in this example, the bone's where the actor is going to appear is "prop-beam". Note*: For static meshes without skeleton, you can use empties parented to the mesh with the name prefix of "prop-". You can later use this empty location to spawn an actor on it's place when defining the props between the <prop> tags right after the <mesh> definition in the actor file. 2015 Edit: - Blender collada export now works better and there's no need to bake the animations even if using IK setups. This reduces considerably the size of the animation collada file. - In order to get clean loops in pyrogenesis, you have to export including the first and last keyframe of the loop. In theory, it is the same keyframe and should be avoided, but the engine needs this duplicated keyframe. In resume: export the first and last keyframe in the animation loop to get a clean looping animation. - Blender now supports "clean channels" option when selecting keyframe channels and deletes the keyframes that do not add anything new to the animation. This reduces the size of the animation file without altering the animation at all. Just select all keyframes in the action editor, hit "X" and select "clean channels" Rigging Tutorials: http://vimeo.com/30073532 http://vimeo.com/30072564 http://vimeo.com/30078317 Animation Tutorials: http://www.cgmasters.net/free-tutorials/epic-looping-idles/ http://cgcookie.com/blender/2011/08/22/animating-a-character-picking-up-an-object/ Import/export 0AD assets and AO baking: http://www.wildfiregames.com/forum/index.php?showtopic=17542&p=273078
-
One more Idle animation to go. Texture flickering in some animations is due to the fact that the mesh is not converted into triangles yet. Animations speed can be modified on the actor .xml to fit our needs.
-
A designer is interested in contributing modelling buildings
Enrique replied to NoMolester's topic in General Discussion
Hi NoMolester, If she is interested, she can make sketch drawings/concept art for buildings for other modelers or for herself is she's going to model them, so the team can approve them or guide her in the art direction we're looking for. After that, she can model in any program she want, the only requeriment is the that the program must be able to export files to COLLADA format (.dae) for the game to use. For the textures she can use whatever program she want. Here in the forums the most popular programs are: for 3D modelling - Blender3D and for texturing/painting - GIMP &/or Photoshop. Another requirement is that she's ok with releasing all her contributions for the game under CC-BY-SA 3.0 license. Some pointers: - We're not looking for 100% accurate building dimensions. We have to stick to some restrictions for gameplay reasons (i.e. not oversized buildings) - The main direction of the current civilizations is already layed out (except seleucids) but if she's an expert we'll be happy to hear her input. - I'd like that everyone who wants to contribute to the game with art assets, downloads the game to get the feel of the game before starting to work. If she's interested, please invite her to join the forums and ask whatever questions she might have -
Thanks, I have updated the animation so there's a second paw swipe on the ground after the jump before going to the start position again. I'd like to keep the jump part, but I'm not sure how it will look if the tiger is killed mid-air, or after landing the jump: (away from the animation's origin point) and the death animation starts playing (which will play at the origin)
-
Here's a little test for an attack animation. Probably not going to be used, because it takes more time positioning than attacking. I think a simple paw swipe or a simpler motion may work better.
-
3D Modeling/Texturing/Environemnt Art-Ivan Zubak
Enrique replied to ivanzu's topic in Applications and Contributions
Hello ivanzu! Welcome! Since the Art dept is "open" to the public we usually start threads for everyone to help finding references, source information about the civ etc. The current civilization being worked is the ptolemaic kingdom, and there's already a thread for that full with references and information. If you want to start with seleucid buildings, I'm afraid that you'll have to start finding references for that. If you prefer start with something else, you can use the Art task tracking thread to choose one task that you want to start, and open a thread to show WIPs, ask questions, post more references... etc. It's up to you Looking forward to your contributions! -
The concept looks better, but the proportions are way off. The doors look tiny compared with the rest of the structure, or the structure is huge. We're not aiming for 100% realistic structure scale compared to units, (buildings would be too big for a RTS) but you should make some parts like the doors correspond with the unit sizes in the game. You should definitely try to import a dock or a building from the game in order to get better proportions. In the texturing side, you can see how small are the bricks in the big structure compared with the ones in the lighthouse. Or how the surrounding blocks in the square platform has much less texels than the other mapped textures. You should work on that too.
-
You're right, The zebu needs animations. That is a priority and will be worked next. I used Blender. Yes, Blender works for exporting animations in Collada format into the game. It is the Collada importing (into blender) what is broken. You can create new animations for the game creating a new rig and animations from scratch, but you can't import existing animations to upgrade or modify them unless you have the animation's source file.
-
Walkcycle WIP:
-
===[COMMITTED]=== Mauryan War Elephant (and hero elephant)
Enrique replied to Mythos_Ruler's topic in Completed Art Tasks
I worked on the walk cycle a little more. Now left and right feet are closer when in contact to the ground, back legs movements are more separated from the frontal ones and they do not bend when they push the wheight forward (as it should be), body wobble reduced. Added ear movements on the cycle. Added two auxiliar bones to help with the armor deformation when back legs are "pushing" the armor back. -
===[COMMITTED]=== Mauryan War Elephant (and hero elephant)
Enrique replied to Mythos_Ruler's topic in Completed Art Tasks
My bad. They work. I had "gpuskinning = false" on my local.cfg file. It needs to be activated for the normal maps to work on animated meshes. -
===[COMMITTED]=== Mauryan War Elephant (and hero elephant)
Enrique replied to Mythos_Ruler's topic in Completed Art Tasks
I'm quite sure that they aren't using the normal maps, only the specular maps. Here's a comparision of the same model, the only difference is that one .DAE was exported with the skeleton (left) and the other was exported without skeleton (right). No changes on the actor. Unless there's something that should be added in the actor to enable the normal maps in animated meshes, I'm afraid they're not supported. I also encountered this problem adding normal maps to the celtic wall gates: since they have a skeleton (just two bones for the doors) I couldn't make the normal maps to show. Now I understand why. -
===[COMMITTED]=== Mauryan War Elephant (and hero elephant)
Enrique replied to Mythos_Ruler's topic in Completed Art Tasks
I decided to redo the walkcycle since it looked a little static and unnatural to me. Even with my basic animation knowledge I think it looks better now (gif is a little bit slower than normal speed) I've succesfully exported a test animation into the game. It plays good (still need to find the adequate speed) but it seems that animated units can't use normal maps :( -
===[COMMITTED]=== Mauryan War Elephant (and hero elephant)
Enrique replied to Mythos_Ruler's topic in Completed Art Tasks
Oops! should be fixed now thanks! -
===[COMMITTED]=== Mauryan War Elephant (and hero elephant)
Enrique replied to Mythos_Ruler's topic in Completed Art Tasks
Soo.... I decided to animate these elephants, I worked a lot on them and it's a little sad to see them sliding around. So I took the african elephant skeleton and modified it, applied bone wheight in vertex groups to make the deforms look good. Once rigged I started from the african elephant animations and modified them for these asian models. The death animation was done from scratch. Sorry for the crappy presentation I hope to get these ingame soon. (some further tweaking needed) -
We decided to get rid of the walls to make the footprint smaller. It doesn't need to be Alexandria's, just a generic lighthouse.
-
What?
-
Hey Duke, It's true that we want to make each civilization look unique, but we also want to keep some consistency in the building layouts of the same type. Right now, the portal entrance and the squared house-like construction seems to have very inconsistent proportions between them. Also the whole structure seems to be too big for a dock... but is hard to tell. You should make the structures look like they have some purpose to be there, and they must look useful/needed for the whole composition. Here are some images for inspiration (not to make it like them, but to gather some ideas) http://ea.aoeonline.co/aom/egipto/edificios/puerto.jpg http://www.cornucopia3d.com/purchase.php?item_id=7352 http://oyster.ignimgs.com/mediawiki/apis.ign.com/age-of-mythology/7/73/Egyptian_Dock.JPG http://images.wikia.com/ageofempiresonline/images/7/7a/Egypt_Dock.png


