Leaderboard
Popular Content
Showing content with the highest reputation on 2014-06-22 in all areas
-
of course it's possible, it would just be a lot of work. The game is very friendly to modders, you should download a public SVN copy and try modifying it.4 points
-
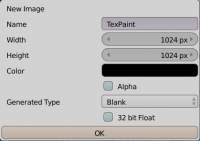
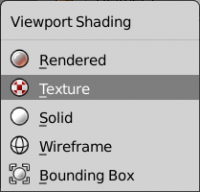
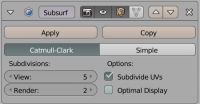
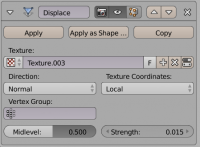
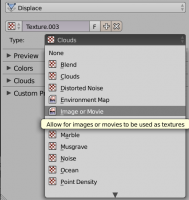
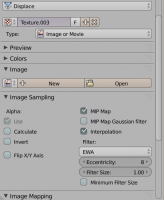
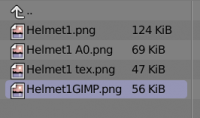
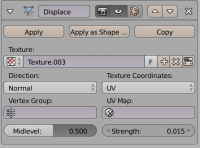
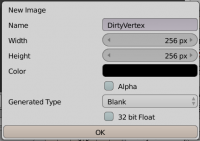
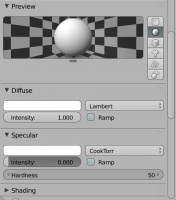
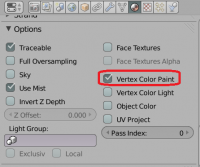
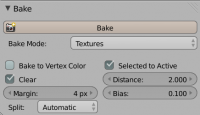
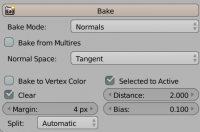
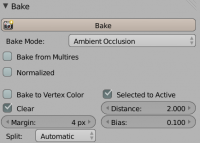
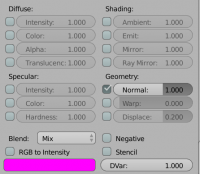
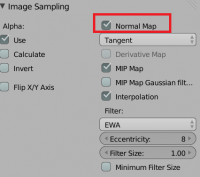
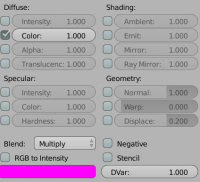
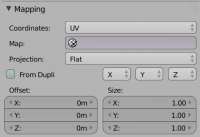
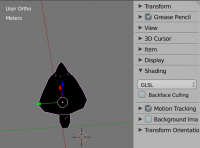
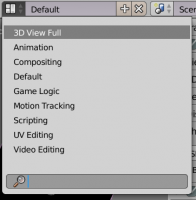
Disclaimer : This is not the only way to do them, there are faster ways. The tutorials I made is Enrique's workflow for generating textures with good detail level (there is always time to shrink the texture if desired). I tried to make this as much complete as possible, if you don't succeed at something, because you lack informations or because it isn't clear for you, ask me and I'll be glad to complete this tutorial. This was made for BLENDER users. TIP : To be a little more fast you can separate you window in two, to have the UV window, and the 3D view-port at the same time. First of all you need to make the helmets according to the reference they gave you. Then, create a scene in which you will import the reference models, to compare them with the size of the models. Scale them down to fit all the areas. Once it's fitted this is were the real part begins. First unwrap you model. Generally if you work with symmetry, tapping U, and selecting unwrap is enough. Make sure to use most of the space. You need to make a new texture to continue. Select you mesh, and enter "Edit Mode". Press the little cross on the bottom in the UV window, and enter the following parameters : NOTE : Remember your texture must always be power of two (e.g. : 128x128 256x256 512x512... ) You can also make something more rectangular (e.g. : 1024x256) But most of the time a square one will be better. Your model should be black now. If it is not, make sure to have deleted any material, and that you are in "Texture Viewport Shading" and not "Solid ViewportShading" : Switch to Texture Paint. Paint the edges of the helmet. What you are trying to do is to make the small details on the helmet, for instance if the helmet has a small cambered area on the top, that will help you to have it with the bump map without having to model it, and therefore saving some polygons and some time. When you're done export the vertex paint image you made into png format. Now duplicate the helmet. Why ? Because you will need an highly detailed helmet to apply the texture you created. You need to keep the older one to make the AO (Ambient Occlusion). NOTE : If you try to do vertex painting in low-poly objects, you'll get ultra-low resolution results due to the low density of the mesh: you need several vertices in order to use vertex painting with more detail. Like it is said in the video, the texture needs to be blurred in order to be cleaner and to have a triangular/rounded shape instead of a rectangular one. Open a program like GIMP or Photoshop, and start editing the texture. Since it can be hard to have a clean trail on the details you wanted to add, you can fix them in GIMP. NOTE : You can also make all from scratch there, and skip the Texture Paint step. To do that, go in the UV menu and select "Export UV Layout". Now you can use it as a layer, and paint over it. That can be faster and cleaner, but you will lose the immediate render you have in blender. Moreover, if the UV is not flat, and/or proportional, your texture might not be applied correctly. That's why we don't do it here. Once in your editing software, You can blur the texture , but that will make the modification you make less linked to the rest (You will have full lines in middle of blurred ones) Remember that if you want some parts not to be smooth you have to make sure they aren't blurred. Go back to Blender and return to object mode. Select the duplicated mesh. Apply the symmetry modifier, and add a "Subdivision Surface" modifier. Use those parameters : Now add a Displacement Modifier with those parameters (Usually 0.015 is fine, you can add a little more but starting at 0.030 it gets really weird). INFO : For a quick view on what you can do with a displacement modifier you can have a look here : If you don't have the texture in the list (that's generally the case) you will need to add it. Click on the that will open this submenu : Change the type to "Image or Movie" You have now those sub-menus : Click on open and select your GIMP Texture Paint modified Image : Go back the Modifier Tab And make sure the Texture Coordinates is set to UV and not local like this: So now you have a High Poly mesh with the displacement map. You can go back to the low poly model to edit the texture as much as you want since you kept it. Once you are happy with your result you can proceed to the next step. BAKING NOTE : It's better if your low-poly is triangulated for the next steps. TIP : To fast triangulate your mesh, go to edit mode (TAB), select all your faces, and press Ctrl + T. 1) Dirty Vertex Texture INFO : If you want to have some information about the dirty vertex feature you can check the link below. The second one is if you want to get even more in depth (Courtesy of Enrique) It's time to bake the textures ! Select the High Poly Mesh and then Shift + Select the Low-poly one. Make a new texture with the parameters below . NOTE : 1024x1024 is good but too much for such small pieces in the game. This texture will be used to bake the Dirty Vertex Texture. Apply all the modifiers on the High Poly Mesh. Switch to Vertex Paint mode then press space and type "Dirty Vertex Colors" without quotes. Click on the "face selection masking for painting" () icon if it is on since you have a high poly mesh you will hardly see anything. Go to the material tab and create a new one for both the High and Low Poly. Set the diffuse intensity to 1.000 and the specular intensity to 0.000. Scroll down and tick vertex colour paint. Switch back to object mode after that. Go to the render tab and make sure bake mode is "Textures", and that the following parameters are on : Make sure both are selected, and that the low poly is active. Then click on bake. INFO : If you don't remember or simply don't know what is an active or just selected object I suggest you read this : Finally apply the texture to the low-poly. Don't forget to save it somewhere you will need it . 2) Normal Map Texture Then make the bump (Change the textures drop box to Normal). Make sure you kept the same selection as the previous step (low-poly active and high poly selected) If the bump doesn't look good try to play around with the bias. NOTE : You can also make all from GIMP, using the normal map plugin that you can find on my other tutorial here (http://www.wildfiregames.com/forum/index.php?showtopic=18514). I really depends on how you want it to be. This is easier that way, but it can be sometimes really bad. You can also as it is mentionned there use software like Crazy Bump. If you choose that way, you'll have to do the Normal after the AO. INFO : For a better comprehension on bump maps I suggest you read that : 3) Ambient Occlusion Texture Then go to the world tab and tick the Ambient Occlusion Checkbox : Go back to the render Tab Hide the High Poly (Shortcut : H) and select only the Low-Poly, then click on bake : Save the AO texture. You the hardest part ! 4) Diffuse Texture So now you have two textures and a bump (but we won't use it here) you need a metal texture, and for that our friend Enrique made a really nice one ! So why do you need those textures you may ask ? Well you will need them to add the remaining details in the helmet. How ? 1) Open this File in Gimp 2) Open the AO as a layer, and use the multiply parameter 3) Repeat step 2) with the dirty vertex You will get something like this : It's not bad but it's too dark. TIP : Play with the levels Tool on the Dirty Vertex layer since it's the one that darkens everything. You'll eventually get something like this which is a bit overbright, but not that much. TIP : Hey but It's a bronze texture, how do i do If I need Iron ? Easy : Desaturate. And you'll get this : 5) Optional : Preview In Blender You can apply all those textures to see how it will look like in game. Import them all tint the AO to look like a metal texture, and since Blender is using GLSL to render you will have something close. Then go to the Texture tab add a new texture, select image or movie like you did for the Displacement Map, then add the Bump, You will have to set the following parameters : Finally add the AO With those params : Go to the 3D viewport and press N to make the side panel appear. Set Shading to GLSL. The helmet will turn black. Don't panic. Create two hemispheric lights, (Shift + A) and your helmet will shine ! Now set the layout to 3D View Full, take a screenshot, then crop it and upload it to the forums !2 points
-
Doing crazy stat changes is actually more complicated than just switching a few units around in the tech tree; in terms of coding it would probably be a boring and tedious task but not a difficult one. If you increase skirmcav cost or decrease their stats you're basically doing a band-aid solution where you're trying to fix a major design flaw with strange stats. Nerfing skirm cav so they aren't a problem in age 1 would mean making them useless in later ages or something. It would just create more problems while not solving the core issue. The issue is that skirmcav are both ranged and mobile in age 1. Melee cav & spear infantry for every civ is better than every civ having a broken unit which limits open build orders to skirmcav rush. Units in 0 AD can be compared to Aoe3 but it's definitely not the same thing. I wouldn't hesistate to send 5 melee cav against 20 ranged infantry in aoe3, because that's a very cost-effective fight for me. Counters are much harder in aoe3 than they are in 0 AD. However sending 5 swordcav in this game vs 20 archers will likely have your swordcav die in vain. Counters in 0 AD give units an advantage in a fight but numbers count more in 0 AD than they do in aoe3. That's why melee cav for all civ wouldn't be broken. 10 melee cav in 0 AD aren't going to beat 10 ranged units cost-efficiently if those ranged units can get a few volleys off before the melee cav engage. Use the CC to cover the RI and you could probably hold against melee cav very easily. E: also worth mentioning is that all units are going to be reworked by the way. can't go into details because i don't know them myself, but basically the way fights work will be dictacted as much as the formations/position you use as they will by actual unit stats. i think counters in this game will get a nerf and units will be reworked in consquence. think the phalanx bug, but fixed2 points
-
2 points
-
Yeah All about quality video here I may have found Hypercam's Achilles heel Audio/video syncing!2 points
-
No It was a joint decision to keep only the Han in Rise of The East. Rise of The East is an Iron Age extension for 0AD. All other ages like Medieval (Millennium) & Bronze Age (Aristeia) include eastern civs.O 0AD has no plans to include Han China thus Rise of The East was necessary. The other possibility would be to pack all Eastern civs of all epochs in Rise of The East. Though the general opinion was against this and thus RoTE only contains 1 civ: Han China.1 point
-
Okay back to topic: have created a bronze_age texture for the pharao, it's all a bit delayed now but perhaps I still can commit the Pharao tonight. Then I'll focus on the remaining Egyptian + Han buildings. After that the Assyrians get their units. Then their buildings. Then I leave Bronze Age and finish the early medieval Japanese in a rush. Then back to Bronze Age Hittites. At this point we'll have three full civs in Bronze Age and are ready for A17. Millennium will have the Japanese as new civ and is ready for A17 too. The Iron Age will be completely finished for A17, i.e. we'll finish the Han Chinese + the Lusitanians. Then it's all getting easier as only Bronze Age + Medieval remain and especially Medieval is what I'm really looking forward to.1 point
-
There is nothing about this mod that is not just awesome. Congratulations.1 point
-
Thanks for the input comrade. it was planned as such but it evolved that enabledMods need to have a certain order (i.e. dependencies have to be loaded first). That's why enabled mods have their own list now and mods can be moved back and forth and enabled and deactivated like desired (+ saved in the the configuration). I still have no working line-break but I've starting making that column a scrollbar-column (though that somehow failed). No idea why I created a dummy link, we can change it in the millennium github's mod info file (currently called milleniumad.json, later probably just mod.json). The names are unique IDs for mods. Usually folder names are redundant but those could easily change and thus break dependencies (that's why we require that unique ID: the mod's name). Preview images are planned but it will only work with binary data as base64 encoded string. (due to the mod folders not yet being mounted, no filesystem image can be referenced/loaded). Of course, as for the command line -mod=mod parameters, all can be combined in a pitched battle. Edit: Preview images will be shown when hovering a mod row (but preview images are not yet working, I 'll probably look into it once I get green light from Sander + leper as especially for maps it's important).1 point
-
Well I think that Romans and Iberians should also get spear men in age 1, if it becomes necessary. Perhaps it would be best that every civ should get a ranged infantry, a spear infantry and a melee cav in age 1. This should, very roughly, complete the counter-circle, which is RI > SI > MC > RI. However it's worth noting that defender's advantage is pretty big early game, if you go for a melee cav rush you're setting yourself behind in eco. The CC can't cover your wood but that doesn't mean you can't retreat your units back into the range of CC ranged attack temporarily. Melee cav will be forced to take CC fire if they get in too close, the problem with skirmcav is that they could attack most units inside the protection of the CC without taking CC fire themselves. So going broke for eco with your melee cav rush means you have to do real damage or you will be behind. Dealing that damage is much more difficult with melee cav than ranged cav. Also worth noting is that ranged infantry will be able to fire at melee cav from the safety of your CC as well.1 point
-
Lordgood what happens if Starcraft meets you pony mod? Ponycraft war of ponies in space. Great work1 point
-
Okay I've committed the fix, I'd like someone to try and run build-osx-bundle, it should work. I might have forgotten something since I haven't run a complete recompilation of all libraries (too long) but I don't think I did. Against SVN, this will work. A16 requires a few more stuffs, but I'll do that by hand for the bundle. I'm now going to try and do a proper bundle. Edit: OK I have a 600Mb RC. It's not perfect (atlas doesn't load up, so you end up being stuck in nothingness if you click on it) and I disabled uPnP but it should work otherwise.1 point
-
probably because of the bigger buildings, the AI tends to place them close together leaving tight spaces for the pathfinder to squeeze units through. Not much I can do about it1 point
-
CC is a good defend for your farms. wood spot are not defended by CC arrows... wood spot have to be defend by units, especially sprearmen and i think that's worther than ranged cav unit problem, because, if you rush skirm cav, your opponent can do the same. with the solution you have, romans and iberians cant hold on.1 point
-
Not sure but iNcog pointed out that the civic center is good protection against melee cav. Thus it's at least not nearly as bad as ranged cavalry.1 point
-
Just to add some reason why cav skirms are the current tier 1 cav unit: The reason the Cav Skirm is a tier 1 (village phase) unit is for hunting purposes. Since hunting has largely, but not completely, been fixed for melee units, there is no gameplay reason to keep cav skirms the tier 1 civic center cavalry unit, because melee cav can hunt now too when they couldn't before because of annoying pathfinding issues. The pathfinding issues have been circumvented for now until a more comprehensive solution is found, so In fact, it now makes sense to make the tier 1 "civic center" cav unit a melee cav unit. This creates a simple paper rock scissors dynamic in village phase (melee cav >ranged infantry> melee infantry), allowing things to get more complicated in town phase (tier 2, unlocked at the barracks) with ranged cav and all the other additional unit types. So, in conclusion, I would go with incog's simplest solution of moving the cav skirm to tier 2 and a melee cav unit to tier 1. Back to lurking.1 point
-
For every attack type (pierce, hack and crush) AttackValue * (0.9 ^ ArmourValue) The percentage you find in the gui is the precalculated (0.9 ^ ArmourValue). So it's literally the percentage of the attack that comes through. And it's summed for all attack types.1 point
-
For a very basic build order that works* for every civ, I have this: Start: 4 vills > build a farmstead near berries, get basket upgrade 4 infantry > chop wood Cav > gather chickens Queue 5 villagers, rally CC to wood. As soon as you have 150 wood, make a house. As soon as you have 100 wood, make a storehouse near closest forest. When the cav runs out of chickens, scout the map for hunts (gazelles, deer, ox, camels, etc) and then gather food from those hunts. Continue training 5 villagers, all rallied to wood. As soon as you have the wood, make second house. As soon as you have the wood, make your third house. With this set up, you should be approaching 800 food / 800 wood which should allow you to age. You only need 4 villagers on berries and 1 cav hunting to get the necessary food. Every villager you train from the CC goes straight to wood. Generally speaking: When you age, you can throw up a barracks with all 4 infantry units you have and you'll age before the barracks is finished. While you age up, get the wheelbarrow upgrade. While you age up, build 3 farms with 5 villagers on each farm. As soon as you age, get the farm upgrade at the farmstead. Farming is really slow so you really need this upgrade. Allocate your remaining villagers between wood, stone and metal, keep at least some on wood so that you can build houses. Otherwise there aren't really strategies yet, unless we're talking about skirmcav rush (check my youtube for build order if you want to see it, it's not worth a post), or Roman swordsman rush (idk how that works), but those are very basic builds anyway. It's mostly age, build stuff, train units and see what happens. *this doesn't work a skirmcav rush; lul. only thing you can do vs a skirmcav rush is a better skirmcav rush.1 point
-
Hephaestion->"Though I see the embassy would be very attractive to be attacked by the enemy as all your buildings in ally territory would decay quickly thereafter"Sure, but thats the same for CC ... A,d dont forget the embassy shoud be build in your ally territory, and, your ally have at least a CC close to it. so there's still defense. Lion.Kanzen->ok, so wait and see1 point
-
lolz Love they pushing ponies always hoped for real push animations for siege engine,s1 point
-
We saw it coming and some of us would have been disappointed if you hadn't So congrates on getting it in the can. Enjoy the Choice1 point
-
1 point








.thumb.png.ce58cea22940c255f5b0a735d5abee36.png)


