Search the Community
Showing results for tags 'animation'.
Found 7 results
-
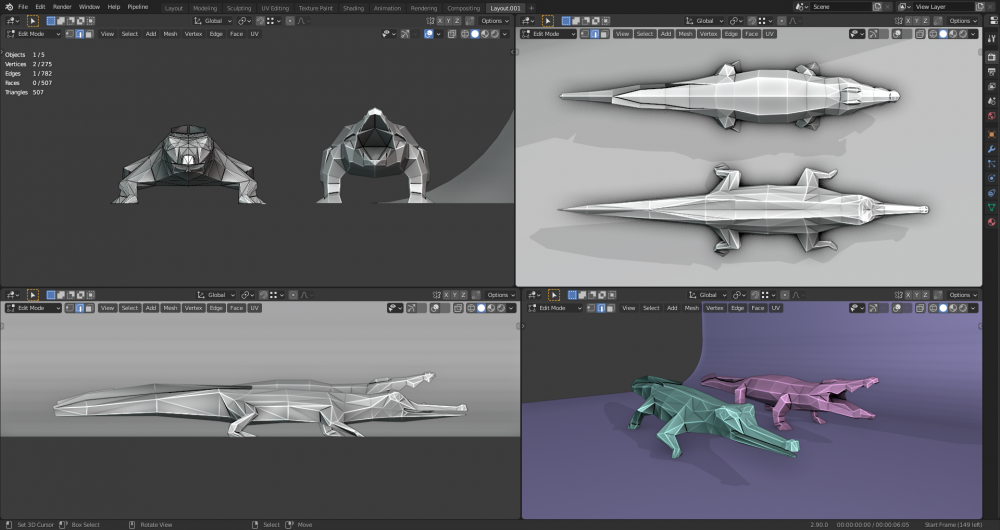
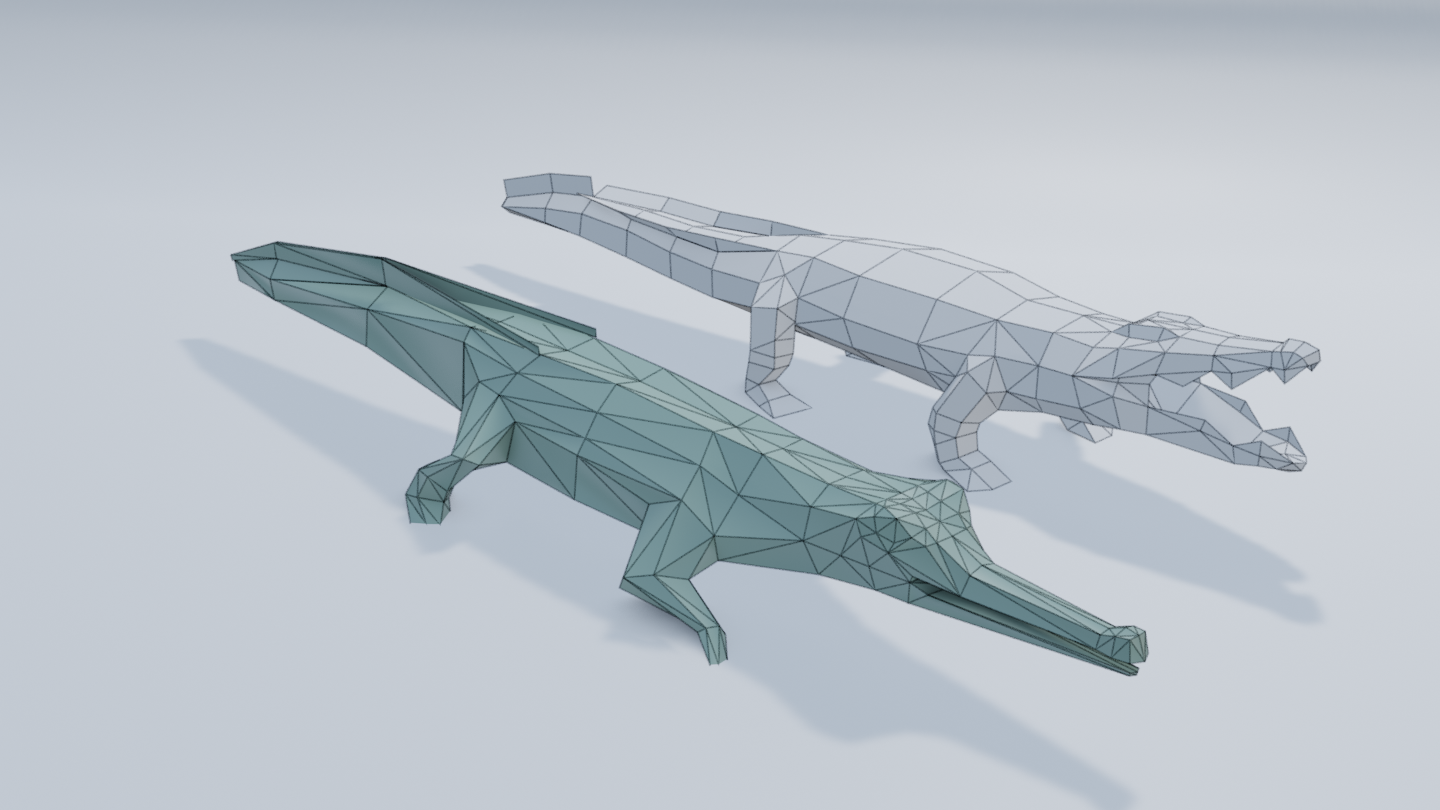
Hey folks, Per the #1997 ticket , starting a thread for the gharial. ---------------------------------------------- Model The crocodile as in source blend as a comparaison. Triangle count of 507. Waiting approval. ---------------------------------------------- Texturing: Not being able for now to procedural texture the animals given the need for high detail on low poly, I decal photo texture into the lp model. So I prefer to wait for model approval to have as little as possible deformation in the texture. Question: I found some nice images on a website called pixabay.com . Create an account and the texture are said to be under their #pixabay licence which looks like a creative commons, sort of. Link to their terms: pixabay licence I guess that allows us to use them to texture cc0 models? Anyway, here is my list of textures that I will use, probably not all but well. I have a list for me, but I figure that if someone wants to take the mantle for whatever reason, better documents and threads are good to have. Pixabay or wikimedia commons for the deposit source. ---------------------------------------------- Rigging done by reusing the crocodile .blend in the source ---------------------------------------------- Animation Crocodile animation do not cleanly translate to the new model. I need to some clean up of the swim animation. For the walking, I learned that the gharial doesn't have the musculature to walk. He gliddes by dragging is body on the ground. Animation should reflect that, but then is it possible to code the behavior for it to not go to far from shores. I mean, it would be great to see a giant reptile glidding through the map but well not really realistic. XD

-
Hi everybody, A bit of a follow up of an old question about how to resize an unit. I'm trying to rescale an existing animation file but every time I end up with weird results. I open it in maya, resize it all, export dae, then re-import in blender to apply the change and re-export in a 0ad readable format. But the end result is all stretched out, even though the animation itself looks fine in blender (though if I try to reimport it once more, it's all weird. Even though it still looks fine in Maya). Anybody got a methodology to reisze animations ? I'm pretty sure this is possible because I managed it once with a previous work, but impossible to remember how. Thank you in advance
-
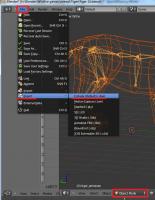
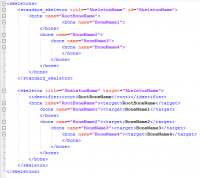
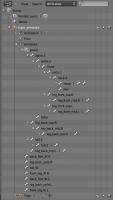
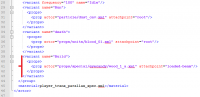
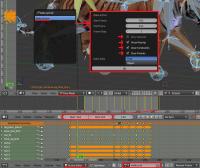
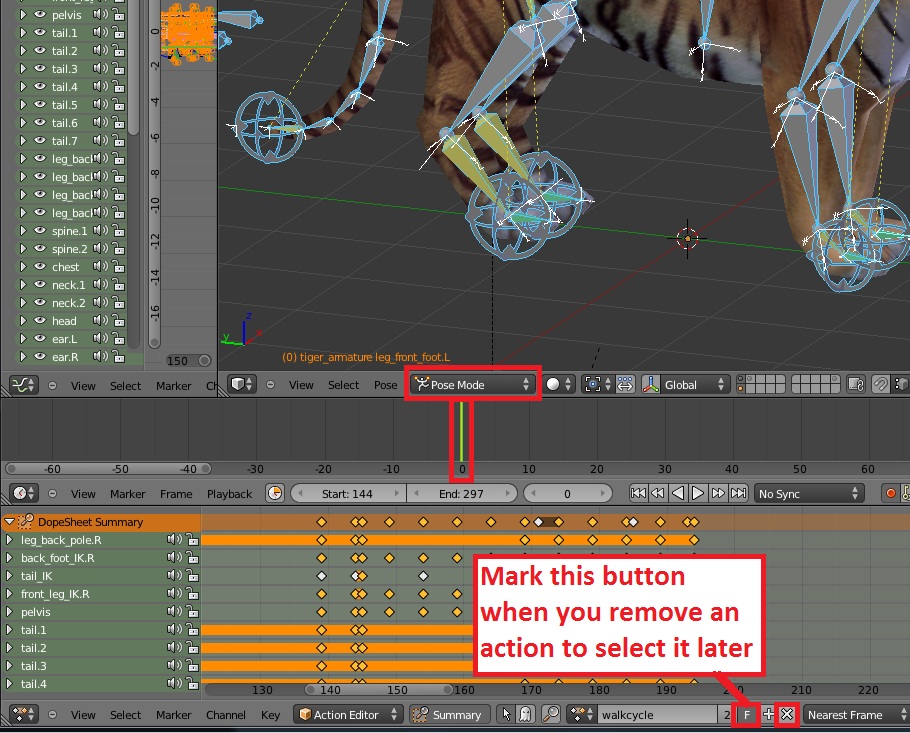
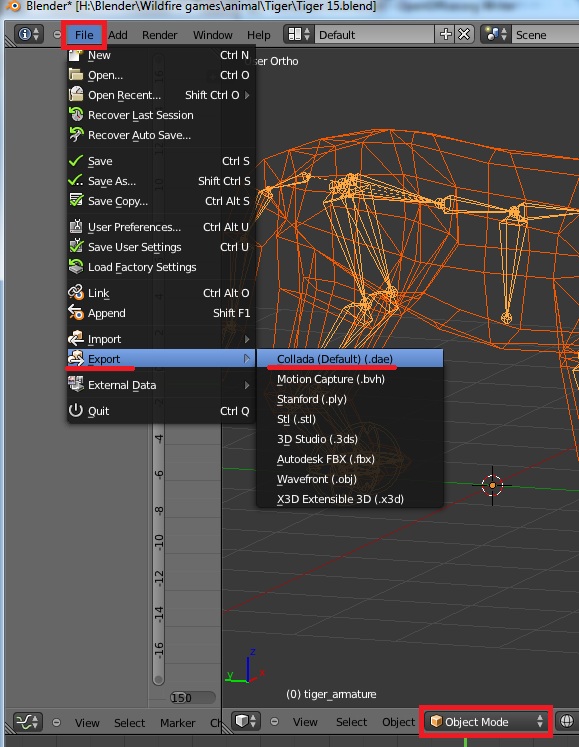
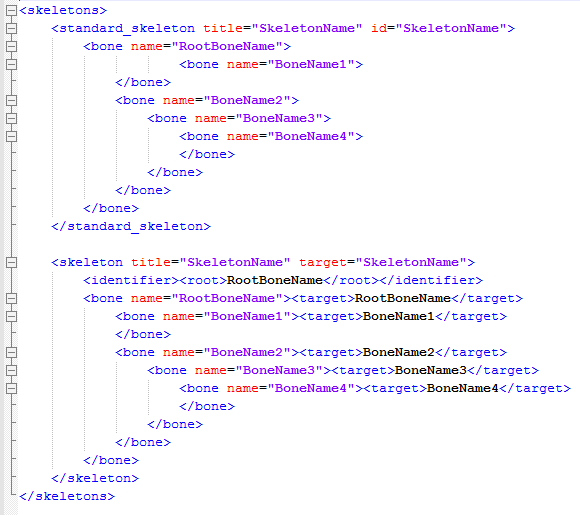
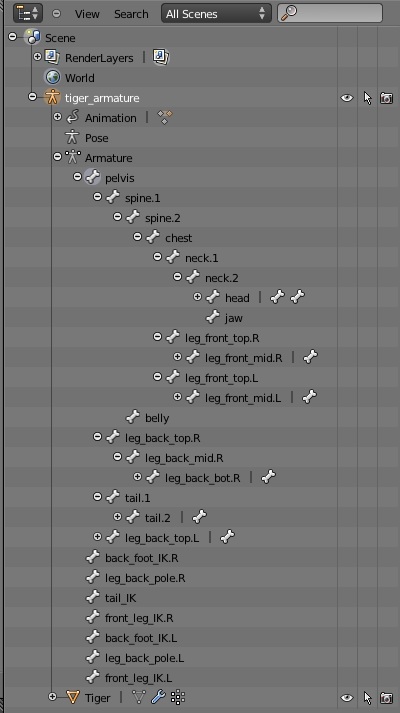
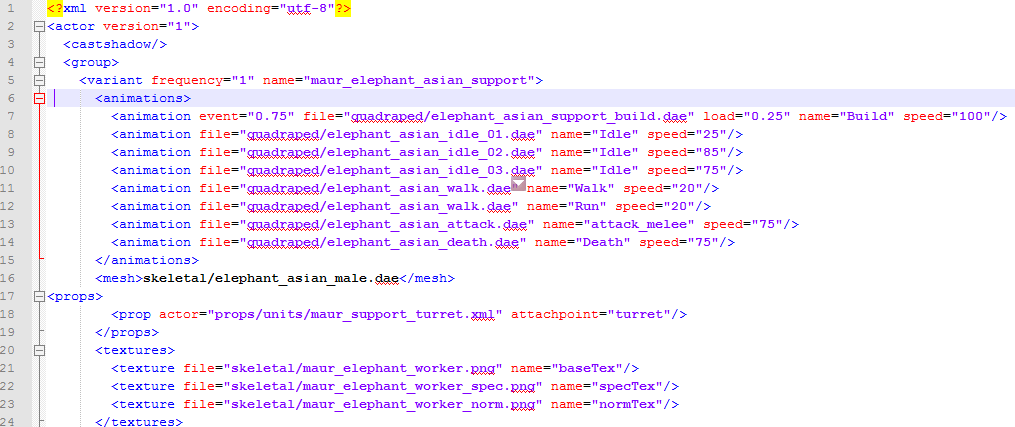
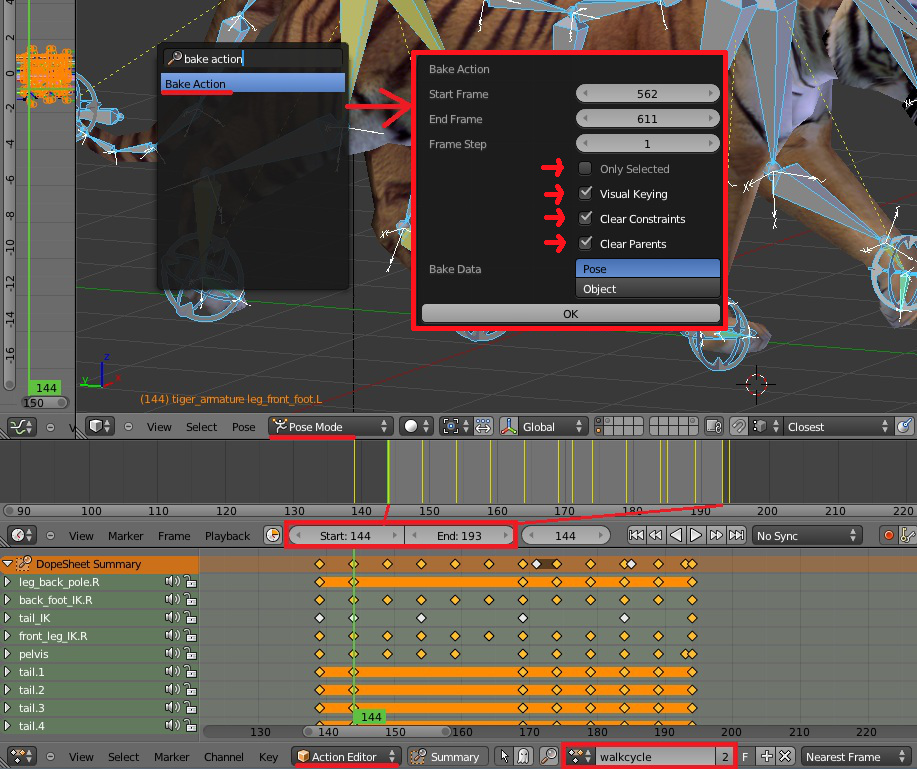
 An updated version of this guide is available on the Wiki. Introduction This is a guide covering how to export and set up animation files from Blender3D into 0AD as well as some tips and general guidelines for get the animations working in 0AD. The Blender3D version used for this guide is 2.65a newer versions might have problems with the Collada exporter. Last blender version (2.69) works fine for exporting animations. Animations have three main requeriments in order to get them working in 0AD. These are: 1.- The file with the mesh and armature (COLLADA file) 2.- The file(s) with the different animations of the armature (COLLADA file(s)) 3.- The file XML defining the armature (called skeleton in 0AD) with its bones names and hierarchy. The last step is to specify the animations that the unit will have available on its different states in the XML actor file of the unit (i.e. Walk, run, death, idle...) Rig setup: When setting up the rig to animate your mesh, there are a lot of options to configure it to make the animator's life easier and achieve good results with less effort. Sadly, there are some limitations in how much animation and skeleton data the COLLADA format can export. Here are some points to keep in mind when configuring your rig to make animations for 0AD: -Avoid disabling "inherit rotation" in bones. While it's a very nice blender feature, when exporting your animation the bones that have their inherit rotation checkbox disabled end up inheriting their parent's rotation, plus the extra rotation you add in the animation resulting in weird and undesired behaviours. There's a tricky workaround for this, which is creating a helper bone which the bone that you don't want to rotate will copy its rotation. -Make sure the rig have the correct scale, and has its scale applied before start animating. Resizing your rig and/or mesh and applying its new scale before baking the animation may end up messing the animations you may already have, specially if you have any IK (Inverse Kinematics) setup in your rig. Here's a workaround that may or may not work: -Scale to the correct size the mesh+armature file and re-export it. -Export the baked animation(s) to dae with their incorrect size, but correct animation. -Import them back into blender, scale them correctly, and export them back without applying the scale one by one. -Mark the "Clear Constraints" checkbox when baking an action if you use any IK or constraint. Specially if you use constraints like "copy rotation" and "copy location". Once the action is baked without "Clear Constraints", it may appear in blender that it worked fine, but it will not when exported to collada format. -Save your .blend file before exporting. You will lose your rig constraints when baking the animation, plus importing collada animation files back to blender is not working propperly to date (11/24/2013). Because of this, if you want to tweak an animation, or use the same skeleton/rig to create a new one, the only way to do it right now is using the .blend file. In this guilde, we're going to set up the animations for a wild animal unit "Tiger" that will be controlled by the IA "Gaia". 1.- Export the .DAE file with the armature In this step, we're going to use Blender3D to create the first main file needed for the unit's animation. This file tells the engine the relationship between the bones and the mesh. Before this step, you should create in Blender3D the armature (skeleton from now on), and the mesh that is going to use it, apply the skeleton to the mesh and tweak the vertex wheights that each bone will move (this is not covered in this tutorial). Before exporting the mesh and the armature, you should make sure that both objects are centered in the origin point of the scene and both object's origin points locations match. To move the object's origin points to the scene origin point (coordinates 0,0,0) first use "SHIFT+C" this will make your 3D cursor to center into the scene origin, then select the mesh and the skeleton with rightclick and shift rightclick and use "CTRL+ALT+SHIFT+C", in the pop-up menu select "Origin to 3D cursor". Now make sure you remove from the "action editor" any action currently used by the skeleton (if any) and move the timeline back to the first frame if it isn't there. [1b – Optional image removing the action editor's action] Also make sure your skeleton is in the default pose (also called resting pose). To do this, select the skeleton, use "CTRL+TAB" to enter pose mode, hit "A" to select all bones and use "ALT+G", "ALT+R" and "ALT+S" to reset the bone's position, rotation and scale, this will put the armature in it's resting pose. Now we're ready to export the mesh and skeleton. Make sure there's nothing else in the blender scene other than the armature and mesh (remove lights, other meshes, helpers/empties...). In "Object Mode" select the mesh first with rightclick and then the armature with "shift+rightclick" (the order is important) then go to the menu in the top of the screen and use "File --> export -- > Collada (Default) (.dae)" Navigate to the folder where you want the file to be created, name the file and hit enter or click Export. *Note: These "mesh+armature" files are stored in \0AD\binaries\data\mods\public\art\meshes\skeletal\ 2.- Export the .DAE file animations In Blender3D, you have to use the "action editor" to create the different actions (or animations) that you want to export into 0AD to use them. These actions are usually: walk, run, idle, attack, and death, but you can make variations of each one or make more types of actions if desired. This tutorial do not cover how to animate in Blender3D but I'll give you links to animation tutorials and tips for the animations at the end of it. 2.1- Bake the action to keyframes In 3D animation software, you animate inserting keyframes or "posing" your skeleton along a timeline, and then the software computes the space between keyframes with intermediate poses which makes the movement motion. The closer one keyframed pose is to another, the quicker the motion will be from one pose to another, and the further the keyframed pose is to another, the slower the motion will be. To make an animation file readable for 0AD, you have to bake the action into keyframes in Blender. This is the process of creating a keyframe for each frame if a bone has changed its position from the previous frame. This is done automatically by Blender3D when baking the action. To bake an action into keyframes, first select the action to bake in the action editor, then adjust the "start frame" and "end frame" on the timeline to match the action length. After that, select the skeleton, enter in pose mode with "CTRL+TAB" and select all bones with "A". Once you have selected all bones, move the mouse cursor into the 3D viewport, hit "space" to bring the search option menu and type "bake action" then select "Bake Action" in the menu. A menu for the "Bake Action" option will emerge, uncheck "Only Selected" checkbox, !and check "Clear Constraints" checkbox (specially if you use IK and/or constraints) and click OK This will automatically insert keyframes between the poses you used to animate. 2.2- Export the animation .DAE file This is the same process as the first point. This will create the file containing the actual animation that will be played in 0AD's engine. Switch from pose mode to edit mode with "CTRL+TAB" select the mesh first with rightclick, then the armature with shift+rightclick, go to "File --> export -- > Collada (Default) (.dae)" Navigate to the folder where you want the file to be created, name the file and hit enter or click Export. *Note: These animation files are stored in \0AD\binaries\data\mods\public\art\animation\"unit type"\ **Note2!!: Units with different meshes but same skeletons can share these animation files and use it even if the animation files have been exported with different meshes. However, each unit needs to have its own "mesh+skeleton" .dae file that we have created in the first step. Repeat 2.1 and 2.2 for each animation of the unit and name them accordingly (i.e. tiger_walk, tiger_death, tiger_idle_01, etc...) 3.- Create the XML file defining the skeleton 0AD needs a .XML file to define the skeleton's name, bone hierarchy and bones' names. These skeleton .XML files are located in "\0AD\binaries\data\mods\public\art\skeletons\" You'll need one skeleton .XML file for each different skeleton you want to use in 0AD. The easiest way to set up one, is to open an existing file and modify it with the information of the new skeleton you want to add and save it as a new file. You can open .XML files with any text editor software. I recommend notepad++ to do so (personal preference). This is an example of the syntax that you need to use to setup the file correctly: Note how each child bone is defined under its parent bone line before closing the parent's bone definition with "</bone>" The RootBone is the bone in the armature that controls every other bone in it. Note: If you have any bone name in the skeleton containing a dot "." you have to use an underscore "_" in this file instead when writing the bone's name. To know the hierarchy of your skeleton, you can use the outliner window in Blender3D and expand the armature contents. There you can see which is your root bone, and the childs of each one of them. Once you have completed setting up the file, use "save as" and save the .xml file with an appropiate name in the folder specified at the beginning of this section. -Specifiying the animations for the unit in its actor Every unit (or entity) in 0AD has it's own .XML file which contains information that tells the engine different properties of that entity. These files are called actors. Some properties that contains these actor files are: -Mesh: the mesh that will be displayed in the engine for that entity or unit. -Prop(s): Actors can be used within other actors. They're called props. You need an empty/helper/bone with its name starting with "prop-" to specify where you want the actor to be shown. -Variants : These are possible variants of a unit (used for unit diversity) as well as states that a unit may have. -Texture(s): The texture or textures that the mesh will use. -Animation(s): Animations that the unit or entity can use and the variant/state associated with that animation. Animations in the actor files are normally specified just before the <mesh> tag in the following format: The <animation> tags in this example include the location and filename of the animation (created in section 2), the name of the variant/state that will use that animation specified by "name=", and the speed that the animation will play. The animation speed gives you control over the speed that the animation will play independiently of the speed it had when exported from Blender3D. Loading and hiding props during an animation: There's a special case for animations where you can load prop's actors and make them dissapear during the animation. The first animation specified in the example with the variant name "Build" uses this case. You specify with fractional numbers when the prop will show up with "load=" and when it will dissapear with "event=" during the animation. The number "0" means the start of the animation and "1" the end of it. The variants are normally specified after the textures in the actors. Here's the variant definition of "Build" from the previous example: In this example the actor "wood_1_a.xml" is going to be loaded at 25% of the duration of the build animation, and it will dissapear at 75%. You specify where the prop actor will be placed with "attachpoint=" . The attachpoint value needs to be the name of a bone, but it is mandatory that the bone name starts with "prop-". When you specify the prop-bone name you ommit the "prop-" part of the name, but if it's declared in a variant that is going to use "load=" and "event=" you have to start the name of the prop-bone with "loaded-" (in this example, the bone's where the actor is going to appear is "prop-beam". Note*: For static meshes without skeleton, you can use empties parented to the mesh with the name prefix of "prop-". You can later use this empty location to spawn an actor on it's place when defining the props between the <prop> tags right after the <mesh> definition in the actor file. 2015 Edit: - Blender collada export now works better and there's no need to bake the animations even if using IK setups. This reduces considerably the size of the animation collada file. - In order to get clean loops in pyrogenesis, you have to export including the first and last keyframe of the loop. In theory, it is the same keyframe and should be avoided, but the engine needs this duplicated keyframe. In resume: export the first and last keyframe in the animation loop to get a clean looping animation. - Blender now supports "clean channels" option when selecting keyframe channels and deletes the keyframes that do not add anything new to the animation. This reduces the size of the animation file without altering the animation at all. Just select all keyframes in the action editor, hit "X" and select "clean channels" Rigging Tutorials: http://vimeo.com/30073532 http://vimeo.com/30072564 http://vimeo.com/30078317 Animation Tutorials: http://www.cgmasters.net/free-tutorials/epic-looping-idles/ http://cgcookie.com/blender/2011/08/22/animating-a-character-picking-up-an-object/ Import/export 0AD assets and AO baking: http://www.wildfiregames.com/forum/index.php?showtopic=17542&p=273078
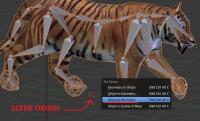


-
Facebook now allows to add short videos instead of a static image in the banner. Example: https://www.facebook.com/exorstudios/ From what I have read (I am not 100% sure of these details), it can be 20-90 seconds long and should be at least 820x312 pixels (but maybe Facebook resizes the video to fit the banner dimensions). I just think that you could also add a nice battle video on your https://www.facebook.com/play0ad/ page. PS: avatars can also be (7 seconds) animated GIFs.
-
I suggest d this the first time a test the game, but now borg- have reason.
-
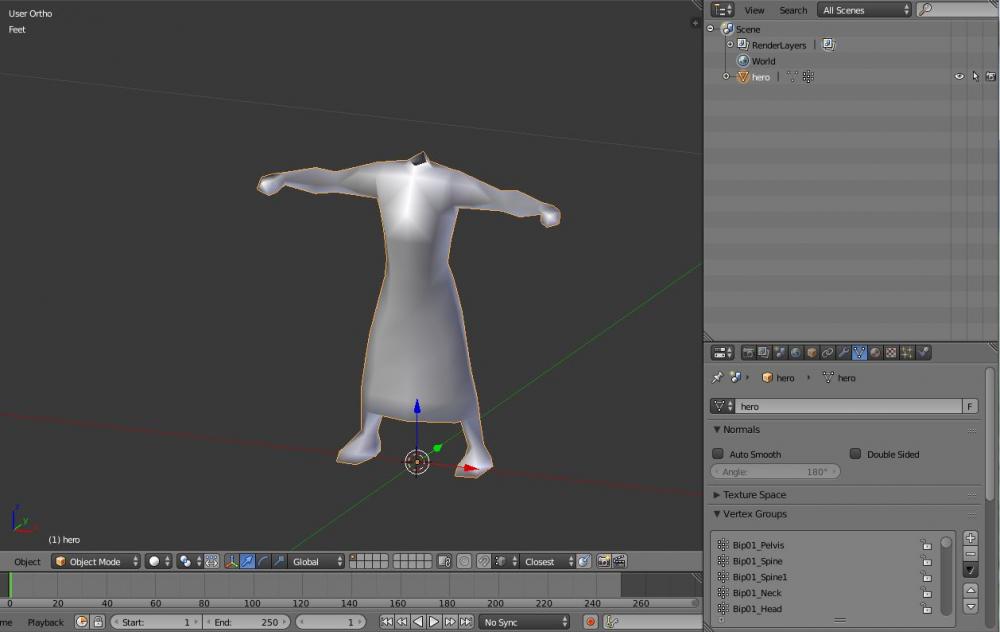
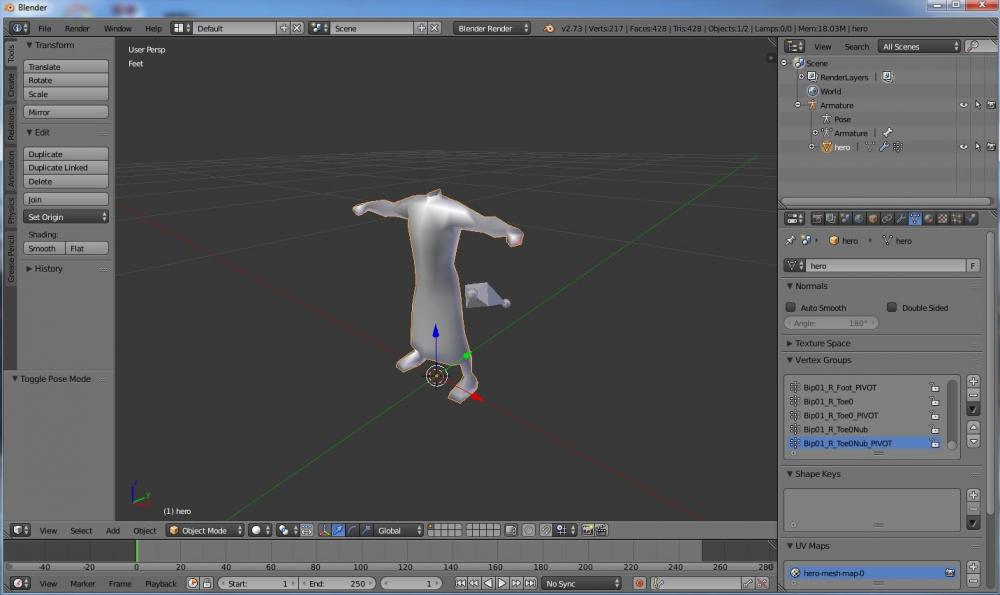
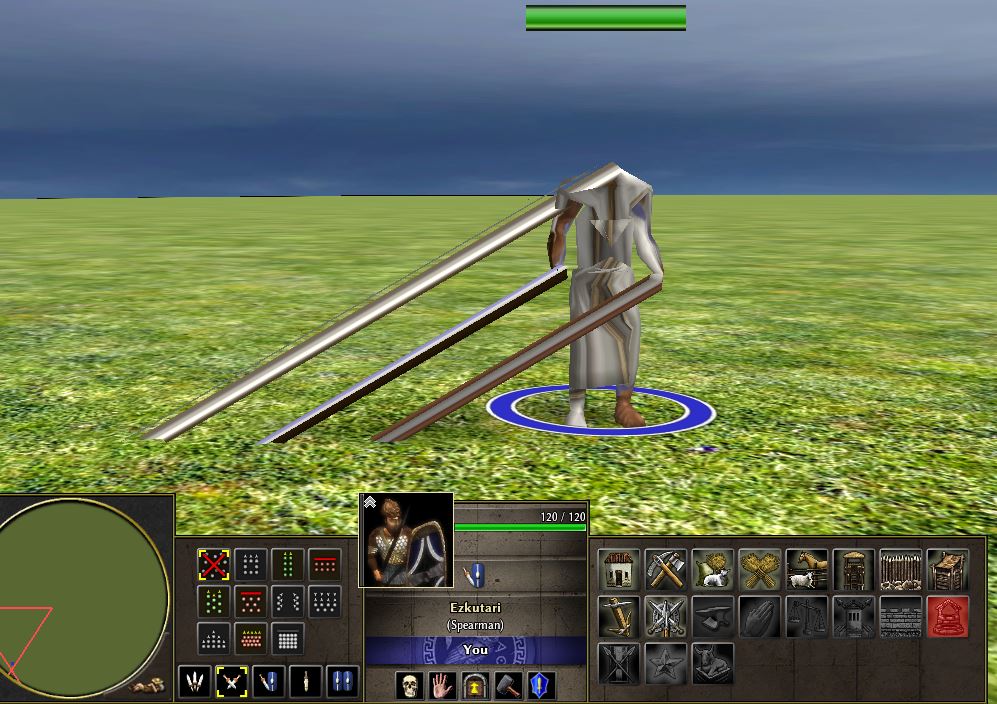
Hi Everyone, I tried to modify one of the existing old meshes and apply it to the old armature. I wanted to make the tunic longer, but not as long as the dress. It works when I load an animation, but when I export to 0 A.D. it appears deformed. My Process: 1) Import old 0 A.D. mesh --> I used m_hero 2) delete armature 3) modify mesh 4) export collada 4) open new .blend 5) load existing animation --> I used spear attack 6) delete mesh for animation 7) load modified mesh, delete all vertex groups 8) apply modified mesh to armature --> selected mesh, selected armature, ctrl+P (used automatic weights) 9) test animation --> it worked, cleared action editor, export modified mesh an armature --> followed guide for export settings --> http://trac.wildfiregames.com/wiki/AnimationExportTutorial 10) modify xml for modified mesh, put modified mesh and xml in 0 A.D. folder Result:
-
When i'm playing 0AD "Alpha 14 Naukratis" for RFremix repositories "Fedora equivalent", almost all elephants don't have animations, the "unanimated" elephants are: * Norafrican Bush Elephant * Baby Elephant * Mauryan Archer Elephant * Mauryan Champion Elephant. And the death of the Mauryan Archer Elephant and the Mauryan Champion Elephant are equal to the "death of the buildings"


.thumb.png.ce58cea22940c255f5b0a735d5abee36.png)