Leaderboard


Popular Content
Showing content with the highest reputation on 2014-03-29 in all areas
-
I am back again now with article reviews. Currently I intend to point out problems with the current articles to show the needs and hope to with time adjust them. For the moment I have looked into the Athenian articles. History Articles Still Needed Athens:Prodomos: Too generalTrireme: Too longLithobolos: Simply explains the mechanics. Compare to Oxybeles.Epibates Marine: No ArticleThemistocles: Alter "whom" to "who" in first sentence. Further alterations could be done to improve this.Pericles: Too short. An article was written by me that should fix that.Iphicrates: No articleOikos: Too general for Athenians.Agros: Olive growing is a form of agriculture.Apotheke: Too self explanatoryOutpost: Again too self-explanatory and not relevantPalisade: Self-explanatoryLimen: Focus more on AthensKhalkeion: Does not specifically inform about the metallurgy in AthensPyrgos: Self-explanatoryPylai: "pierced" is not a very good description in the first sentence. Perhaps "dotted?"Theatron: Refer to the theaters as Athenian, not Greek.Parthenon: No articleSilver Owls: Refer to the coin as "obol," the proper title.Iphicratean Reforms: No article2 points
-
May be not only ancient, modern and fantasy and Sci-fi too.( futuristic included)1 point
-
We are always looking for new members I guess. Conquering the ancient times can't be done alone.1 point
-
History Articles Still Needed Britons: Epos: Fragment for second to last sentence: I would recommend combining it as a descriptive clause with the sentence before. Gaisaredos: It would be advisable to be more specific as far as the pronouns are concerned for coherency's sake. I could otherwise be difficult to understand. Druides: Parallel structure for the list: I keep the plurality the same during it. Curoca: The tense changes from past to present tense. This is a distracting issue. Uertamika Kilngetoi: The tense again changes. Staying in past tense would be advisable. Carbanto: Remove the commas from the second and third sentences. Simbalos: The word plough is spelled in the British way, which is not proper considering that some words have been changed to the American spelling. I would recommend having one or the other spelling form be used instead of both. Ovidos: No article.1 point
-
For handheld devices, the UI needs to be recreated anyway since it is not touch-friendly. And I hope more devices will be supported than FHD only.1 point
-
We have a candidate for the paid programming work, someone on the team who is very very familiar with the code. Someone you all will like very much. However, there are still some issues to work out to make sure they can do it and we're not ready for an official announcement yet on who it is and the details of their work. We appreciate the passion. You don't ever have to apologize for that.1 point
-
800x600 is simply small in today's world. Basically any computer would support 1024x768. it's not worth it. As for the original idea, perhaps renaming it "Options & Tools" would solve the problem?1 point
-
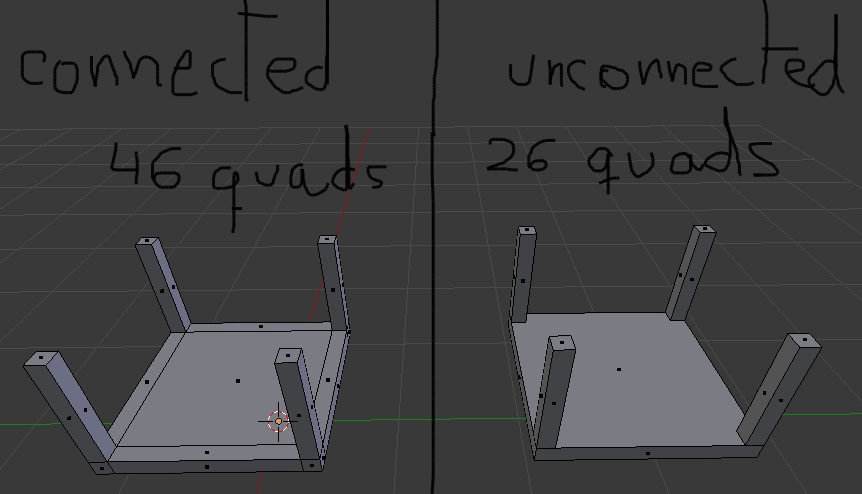
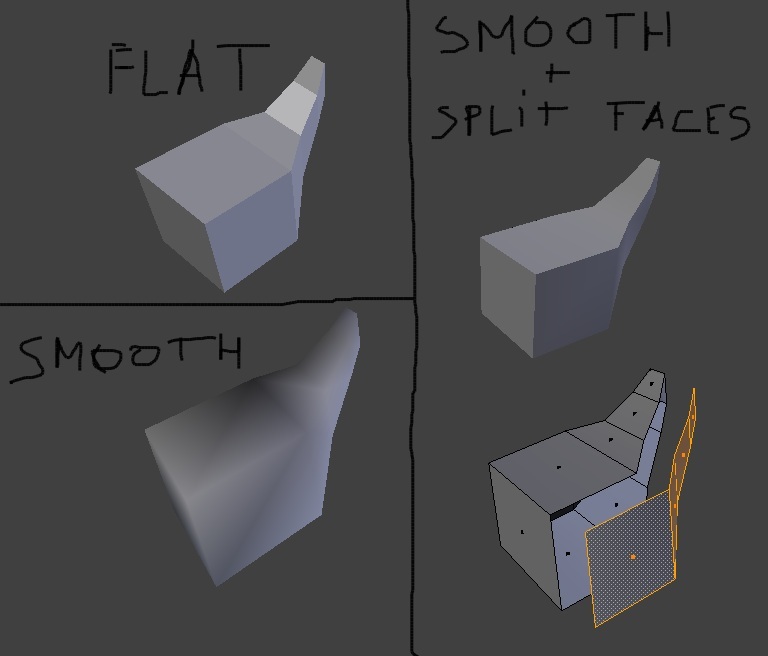
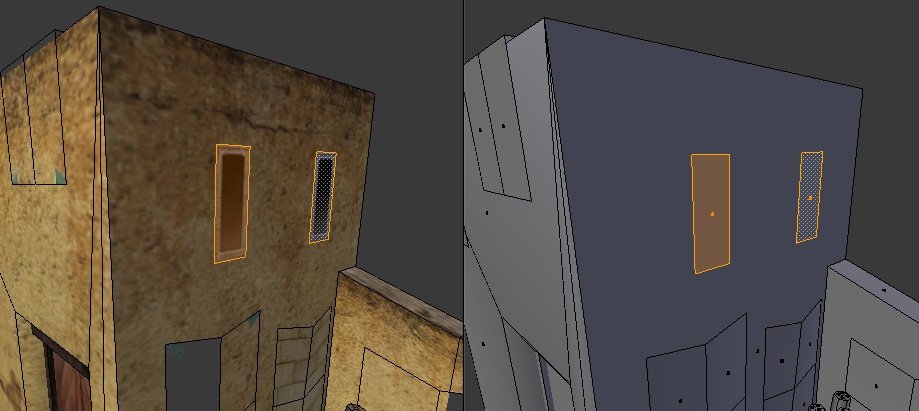
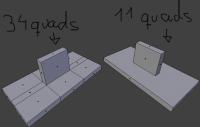
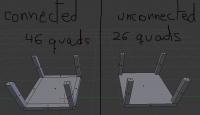
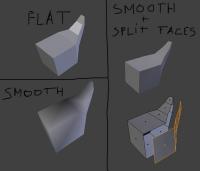
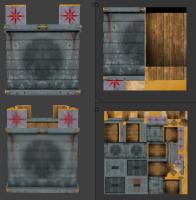
GENERAL LOWPOLY TIPS These are general tips when working with lowpoly assets, they're no software-specific. -Use unconnected geometry! This is the first and one of the most important tips. I’ve seen in a lot of models that people try to make the asset (smaller or big) all made from one mesh. This approach generates unnecessary geometry and makes the mesh more difficult to handle if you want to make changes. Here’s an example: Here we can see how many faces we’ve saved, and makes the mesh much more simple, which is good for make changes easier if required. -Split faces for hard-edge creases. Sometimes we want to create assets that contains both smooth curves and hard creases. Some 3D software lets you choose specifically which faces you want to set smooth shading and which ones set flat shading. However, in every single 3D software, you can “detach” the faces that you want to create the hard crease, this procedure will make the unconnected faces as hard creases. Left side are totally flat and totally smooth connected faces. Right side is the same smooth object, but with the faces where we want hard creases unconnected (the faces are split) -Double sided faces. 0AD’s engine does not render double-sided faces, if you want them to be shown in the game, you have to duplicate the face, and invert the normal. It is also good to move it a tiny bit, so they do not overlap for easier selection/modification or when baking AO. -Try to avoid Ngons use quads as much as possible. This one is not as important as other tips, but using always quads have more advantages than using Ngons and triangles. The main reason is that Ngons have sometimes unpredictable behaviors when triangulated (needed to export into any game engine) and not all 3D editing software supports them. Ngons, like triangles, doesn’t let you create clean loopcuts between loopfaces, which makes the mesh topology harder to modify/manipulate. -Animation loopcuts. When you are modelling meshes that are going to be animated, you must have in mind where the mesh is going to bend. To be able to maintain volume in the mesh on the points when is going to be deformed, you need to have some minimal geometry. This gif explains it visually: http://wiki.polycount.com/LimbTopology?action=AttachFile&do=get&target=BenMathis_limb_deformations.gif -Fake details with decals/textures Try to avoid geometry using textures to add detail. This can be further enhanced by the use of normalmaps. You can also use single faces, or simple geometry mapped to another part of the texture to use it as “fake” detail: several windows in 0AD’s buildings use a simple quad as a “decal” which removes the need of subdividing the geometry in the wall to make a “connected face” to map it to the window texture. (You can also make windows “insets” in the wall for more detailed windows, if the polycount permits) -Use as much texture space as possible, reuse as much texture space as possible too. This is a common mistake, and it’s one of the most important concepts of lowpoly texturing (wasting texture space). The best example to understand “reuse texture” expression is found in symmetric objects. Using only half of the mesh texture lets you make that texture portion bigger, which means more detail, at the expenses of having the exact same texture in both sides of the mesh. This is used in several things like helmets and… mainly symmetric objects. This is especially important when you are restricted to use fairly small resolution textures (like 0AD). Here are some examples of how to save texture space, increasing texture detail. Using a mirror modifier in your 3D software will make this process easier and automatic. In this example you can see the same asset mapped to different textures but both of them are 256x256. In the top example, there's heavy use of "reusing texture space" since the object is symmetrical in the Y and X axis. The bottom example is the same asset to another texture of 256x256, but each UV island has its unique space in the texture. You can clearly see the loss of detail, but in this case, you can make every face of the asset different/unique. You have to choose which assets/part of the asset are important enough to have its own texture space for unique details. -Add margin to your textures – texture bleeding Try to avoid seams showing up by texture bleeding (surrounding pixels close to the edge of the UV island gets “inside” of the UV and are displayed). You can avoid seams by texture bleeding simply giving some margin colour to your textures, and using a background of similar colour as your textures, which will minimize the seams effect. Here’s an example of texture bleeding making seams noticeable: http://www.ftc-creative.de/uploads/projects/FROG_Shading_01.jpg -Playercolor in textures. Playercolor is the term used to determine the unique colors of each player in a 0AD match. These colours help to differentiate the owner of the units/buildings even if there is other player in the match playing with the same civilization. Playercolor is shown in the parts of the texture that has not full opacity in them. Here’s a good explanation by team member quantumstate of how playercolor works in 0AD. (it’s an extract from this post: http://www.wildfiregames.com/forum/index.php?showtopic=18035) GIMP will work fine for textures as long as you understand what is happening. The issue is that the game does the player colour in an unusual way. What I think you are expecting to happen is to have a background of the player colour with the texture over the top so the player colour shows through in the alpha sections. It works slightly differently though. First with images you need to understand that each pixel in the image has 4 channels. 3 colours (red, green, blue) and the alpha or transparency channel. When you make part of the image transparent you only change the alpha channel, the colour components stay exactly the same. To see this in gimp you can use the layer mask as Enrique mentioned to show the alpha channel as a black and white image. You can disable the layer mask (from the right click menu of the layer) to see what the image looks like without the alpha channel. Now what 0 A.D. does with the player colour to create the final texture: 1. Multiply the texture by the player colour and discard the alpha channel. So if the player colour is white then the image will be left as it was (multiplying by 1 leaves things unchanged). If the player colour is black the whole image will become black, if it is blue then the image will become blueish. You can test the multiply in gimp using layer modes, just create a layer with the player colour and set the mode to multiply. 2. Take the original texture with the alpha channel and place it on top of the new multiplied image. Then the multiplied image will show through in the transparent regions giving the final texture. You can replicate this in gimp to preview what your texture will look like. 1. Open the texture, there should be a single layer. 2. Duplicate the layer. 3. Remove the alpha channel from the bottom layer. (Now you can see the colours "underneath" the transparent sections). 4. Create a new layer and put it in between the two existing layers. 5. Fill the new layer with the player colour (e.g. #0000FF for blue players). 6. Set the mode of the new layer to multiply. Now you should see an image which will look like the final texture in game. So it is important that you are aware of what the image is like "underneath" the transparent areas because it will affect what the texture looks like. This is why layer masks are useful so you can easily disable the transparency and see the colours in the transparent areas. (create the layer mask using the "Transfer layers alpha channel" option).

 1 point
 -
Is already there.1 point
-
Kimball will be happy if he sees it. Thanks for the details. This should give RoTE a boost.1 point
-
Okay, I fixed it and it is now playable. Therefore I need playtesters and critics. I need comments on the playability and the looks. It is a demo map so you can find it under demo random maps. schwarzwald2603.zip1 point
-
@book{History of the Peloponnesian War, author={Thucydides}, editor={Rex Warner} sortname={Thucydides}, title={History of the Peloponnesian War}, publisher={Penguin Classics}, year={1972}, location={United States of America}, edition={2.} } There is the citation for the Thucydides source. The other will be a bit trickier since I used an online copy, as I possess none, and it lacks the necessary material I need for it. On another note, I feel a bit ignored in this thread, hearing little praise or criticism for my work and only one of them has been published in the history section. Even though some of the articles may be brief, I have gone to great lengths to recover information from ancient sources and if really only 33.333% of my work is going to be published, I have very little motivation to continue. Thanks for all your past feedback though.1 point
.thumb.png.0d87fc71cb8a644c5d862ceabac1e0d5.png)