

Palaxin
-
Posts
217 -
Joined
-
Last visited
-
Days Won
2
Posts posted by Palaxin
-
-
@Garaf Thx for the tip and the extra work
")
I haven't worked with DEM-files yet, but it seems to me that
- there is no height data for ocean floor (bathymetry) available making the in-game ocean very flat
- in the end you still import a 8-bit grayscale image in Atlas so this does not actually increase precision (in-game height difference between two shades of gray)
In the last section of my heightmap guide I described how to overcome this problem. Basically you need to use a script to write the height data directly to the .pmp file which stores the height data of the map. The guide is not 100% finished though...
-
Hm... or toggle steady recalculations either with a simple checkbox in the GUI or automatically when the obstruction overlay is active. BTW how can I make the overlay visible in Atlas (like in the spoiler images here)?
-
@niektb is it really necessary to update terrain obstruction in Atlas in real time? Couldn't it be done when saving or running the simulation test? In Atlas you can place objects anyway without following obstruction rules...
-
 1
1
-
-
On 6/1/2016 at 7:15 AM, wowgetoffyourcellphone said:
+100 points if this can be show in real-time.
Even the existing terrain tools heavily lag on my notebook when I choose the maximum brush size and strength

Edit: Actually it is independent of brush size/strength
-
16 minutes ago, Lion.Kanzen said:
Sudden Death
"Player are eliminated when they have no Civic centre left, so protect your Civic Centre while destroying your enemy's. You cannot build any additional Civic centre. In nomad mode, players can build one civic centre."
In AOM you started with a citadel instead of a village center. Basically the same but stronger. Perhaps in this case civic centres should also have double the HP, capture points and max garrison.
-
1
-
-
Some games also provide economic victory conditions like
Economic resources
- be the first player to store a certain amount of food and/or wood, stone, metal
- could be made more interesting with randomly placed treasures
Economic buildings
- be the first player to possess x1 buildings of type y1 [and x2 buildings of type y2 [and ...]]
- similar to wonder victory condition
Economic units
- be the first player to possess x1 units of type y1 [and x2 units of type y2 [and ...]]
Economic population
- be the first player to hit x total population
Other popular victory conditions which are still non-present are
Regicide/Herocide
- every player starts with a unique king/hero unit and loses when it is killed
- already planned, see #2160, discussion can be found here
King of the hill
- in the map center there is a structure which has to be captured and owned by x minutes without interruption in order to win
- not that much discussed yet
Relic
- capture all relics on the map [for x minutes]
- first relics need to be implemented, see this topic
Defense
- you start with x1 buildings of type y1 [and x2 buildings of type y2 [and ...]] and need to hold all / at least one of them while destroying the enemy ones
- a common example is wonder defense
- Defense units could be a victory condition where you must not lose a group of units (generalization of regicide/herocide)
Invasion
- singleplayer version of defense: hold the buildings for x minutes in order to win
- Invasion units could be the singleplayer version of Defense units
I would also be interested in some experimental modes like
Bloodshed
- be the first player to kill x1 units [of type y1 [or type y2 [or ...]] [and x2 units of type x3 [or type x4 [or ... ]] [and ...]]]
- unit type would usually be citizen soldier and champion and hero
- if you lose units of the required type yourself, they could be removed from your count, so effective healing is a key to success
- during village phase the count per killed unit could be tripled, during town phase doubled
Destruction
- like Bloodshed, but only destroyed buildings add to the count
- building type would usually be any, because otherwise players would avoid building the required types
- Capture could be a victory condition where you need to capture the buildings instead of destroy them
It is very important to be able to combine several victory conditions, see elexis' ticket.
-
4
-
Some pictures of height-based texturing using a script
I am planning to do a good amount of tweaking, but if someone (@Player1) can't wait to test the map himself in Atlas, here are the files: WesternMediterraneanDemo.zip - Have fun!
BTW what do you think about square vs circle map shape?
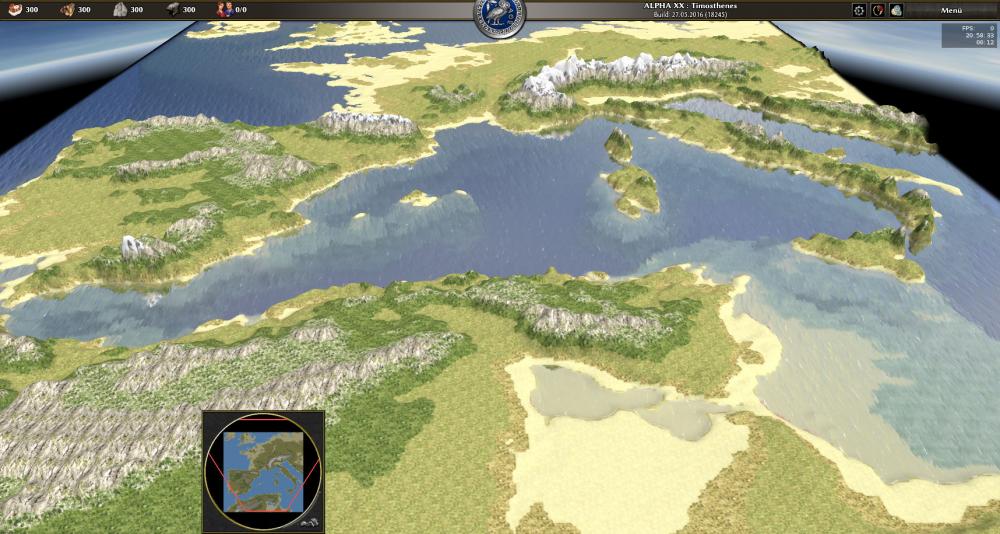
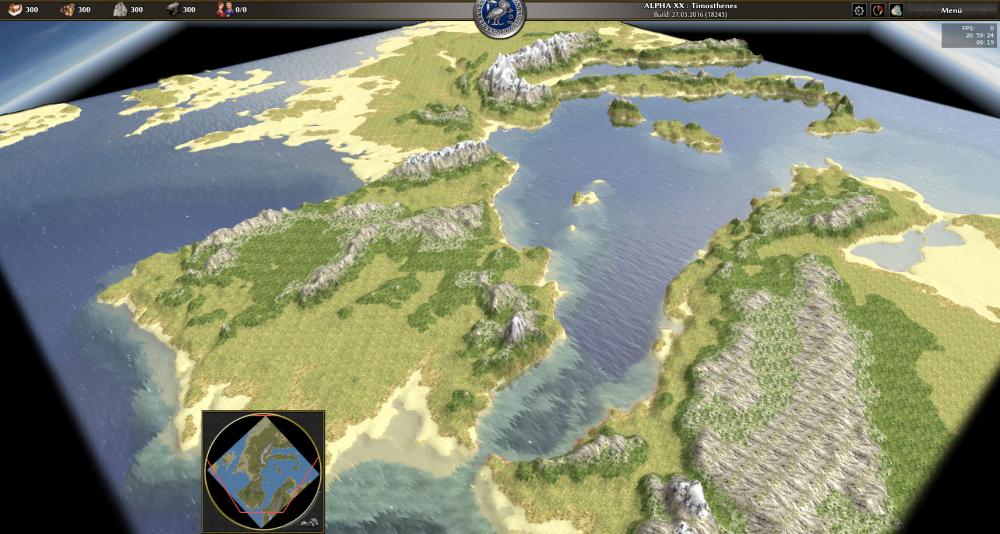
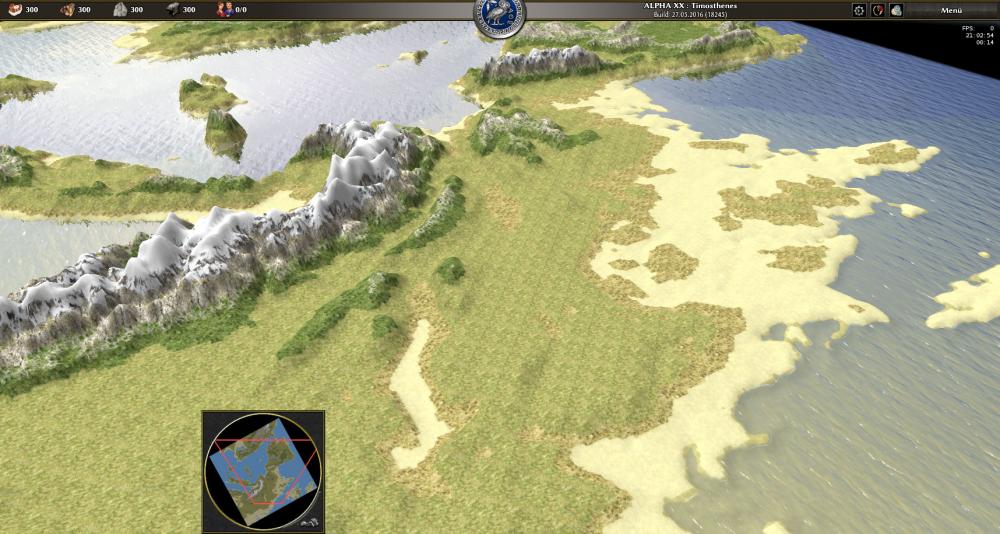
A pretty big problem is the shoreline because of the limited resolution of the 8-bit grayscale heightmaps. The topography heightmap says the grey areas are under water, the bathymetry (ocean floor) heigtmap says they are above sea level... I probably need to combine them with another source
-
3
-
 1
1
-
-
Added illustrations to the Basics and Beginner sections
4 hours ago, FeXoR said:EDIT: I wonder though if anyone could make a living with that "Pro" hints ... for that's what "professional" means AFAIK ^^
You suggest to rename it to something else? E.g. Advanced II? Or a more content related caption like .pmp file hacks or scripting or something similar? BTW thanks for linking the guide
")
-
-
Introduction
SpoilerIf you do not already know the heightmap import feature of the Atlas map editor, please read the official wiki page first before continuing here. It is especially stated there that “[c]urrently the heightmap importer doesn’t have any configuration, so if import doesn't produce the desirable result, the source image should be edited in an image editor and re-imported.”
This guide will give you a helping hand with the required image editing. In the Beginner section you will find the basics everyone needs for heightmap manipulation with easy step-to-step instructions and many illustrations. The Advanced section includes topics not everyone may use, but the necessary steps are still not too complicated for anyone who doesn't like coding. In the Expert section I will even show how to use direct hacks to the PMP file which stores the map height data. However it doesn't contain strict rules and you need to be able to write and run scripts.
I hope you enjoy this guide and strongly appreciate any constructive criticism, proposals, discussions and comments especially since this is my first guide
At this point I would like to thank @FeXoR, @Garaf and @niektb.
Basics
SpoilerSoftware
This guide comes without any liability regarding the used software. It might damage or cause instabilities to your system. My operating system is Windows 10 Pro and I will give instructions only for the programs listed below.
The minimum requirements for heightmap manipulation described in the Beginner and Advanced sections are
Heightmap manipulation techniques in the Expert section additionally require
- a text editor, preferably Notepad++
- the text and hex editor PSPad
- the hex editor HxD
- a working environment for running scripts and some knowledge for writing them
Heightmap types
The basis for all further processes are the original grayscale heightmaps, so they should be chosen carefully. There are three different types:
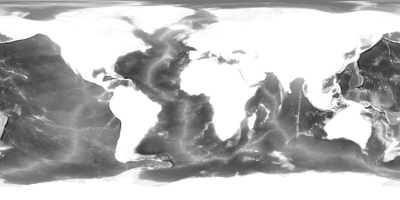
Topographic images represent the elevation of the land surface. They usually use black for ocean level and lighter gray up to white for mountains. Using topographic images alone is only useful when in your area of interest there are no to very little water areas as you will get very shallow waters.
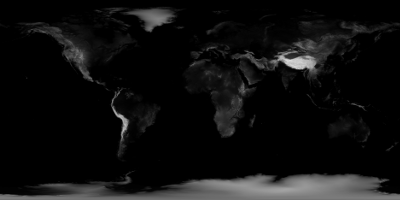
Bathymetric images represent the elevation of the ocean floor. They usually use white for all land areas and darker gray down to black for deep trenches.
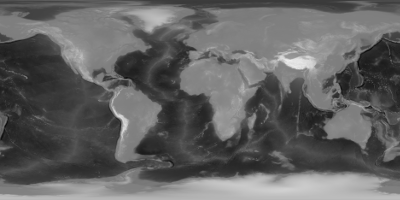
Combined topographic and bathymetric images both depict ocean floor usually with darker gray and land surface with lighter gray. Quality images of this type are very rare so most of the time you will need to combine topography and bathymetry manually. For more information have a look at the Advanced section.
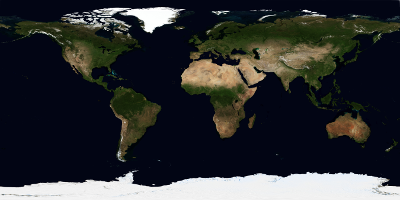
In the further mapmaking process you may also want to use photographs from airplanes or satellites as a reference for terrain texturing. However the globe has changed a lot in the last 2,000 years so it is strongly advised to take historic information into account as well.
Heightmap sources
If you are looking for large scale real world data, the NASA Blue Marble image series is an excellent source. It includes topography and bathymetry heightmaps as well as satellite based composite photographs of the earth. Examples are shown above.
For topography and bathymetry you can choose between two resolutions and image formats. The 21,600*10,800 pixels PNG images have a resolution of 1/60° = 1 arc minute which means one elevation data point every 1,855 m or 6,087 ft at the equator. For more details there are 8 GeoTIFF images available with 10,800*10,800 pixels each which also cover the whole globe when assembled together in the following way:
A1 | B1 | C1 | D1
A2 | B2 | C2 | D2Their resolution is 1/120° = 1/2 arc minute = 30 arc seconds which corresponds to 928 m or 3,044 ft at the equator. These global maps contain very much details. Even a 32*32 pixels (29.7 km or 18.4 mi) piece suits for the Tiny map size, 64*64 pixels (59.4 km or 36.9 mi) for Medium and 128*128 pixels (119 km or 73.8 mi) for Giant. For smooth terrain you can even halve that sizes. You just have to scale the piece by a factor of 4 or 8, respectively. If your image program doesn't already interpolate between the pixels, you need to add a blurring filter.
Due to image file size you should right click the link and directly save the picture as it may cause instabilities to your browser. For bathymetry, don't use the colored versions.
If you are interested in heightmaps for even smaller areas, you will find detailed data in this digital elevation data search engine. I can really recommend the 15 arc second resolution (464 m or 1,522 ft at the equator) and the 3 arc second resolution (92.8 m or 304 ft at the equator) topographic data collected by Jonathan de Ferranti. You will need to convert the data to a suitable image format, e.g. with GDAL. Have a look at Garaf's posts for a bit more information.
If you do not already have samples, you can use the ones below. Alternatively you can paint your own grayscale heightmaps in GIMP.


Beginner
SpoilerSelection and scale
First you need to crop your image to the desired area and scale it to the desired size. In the GIMP menu bar, click on Windows → Toolbox and select the elliptic symbol Ellipse Select Tool.
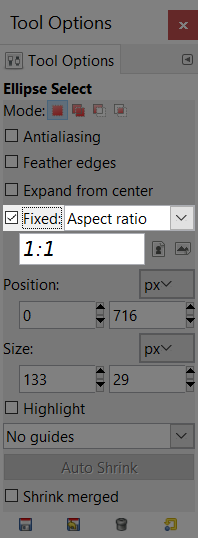
After that, go to the menu bar again and open the Tool Options dialog via Windows → Dockable Dialogs → Tool Options. Check the Fixed box and select Aspect ratio in the field aside. The ratio must be 1:1. Make sure that Mode is set to Replace the current selection (the single square filled with red).

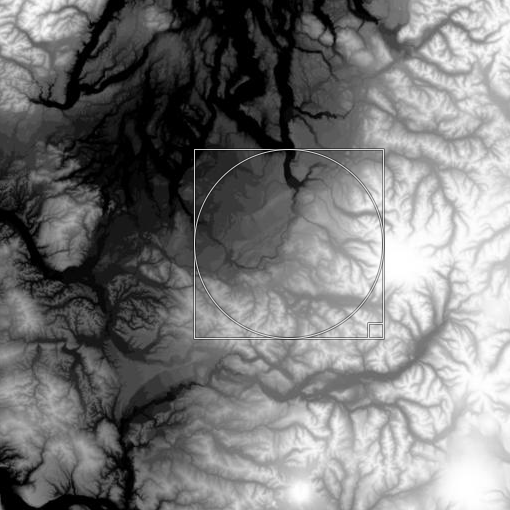
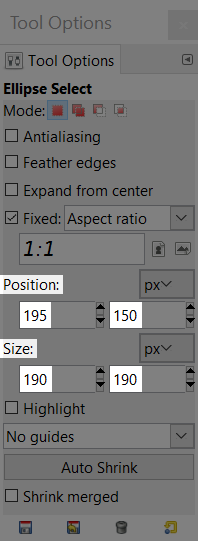
Now drag your cursor over the image while holding Left Click. You can estimate the area a circle map and a square map would include. Play around until you are satisfied. Be aware that the areas next to the map border won't be accessible for units and buildings in the game. If you want to combine topography and bathymetry files as described in the Advanced section, additionally note the pixel values for Position and Size, so you can repeat the exact selection in the other image.
Select Image → Crop to Selection and then Image → Scale Image. Enter 128, 256 or 512 pixels for both Width and Height, depending on the map size you want. Finally select Filters → Blur → Gaussian Blur with a horizontal and vertical blur radius of about 4-8 pixels. A higher amount of pixels means your map surface will be smoother which allows better building placement.
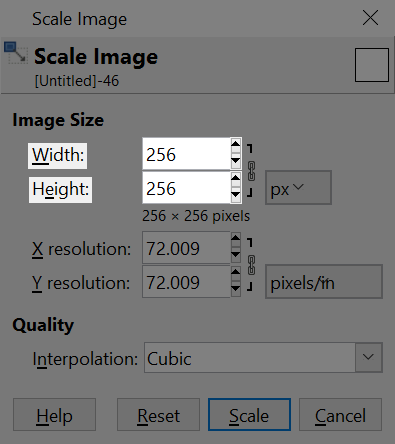
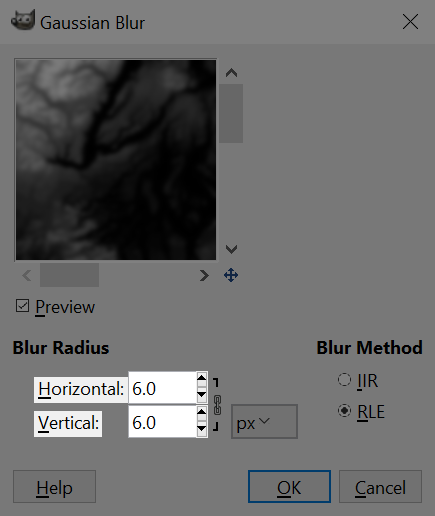
Image → Mode → Grayscale should be marked, if it's not the case, do it now. Finally save your file with File → Export As and choose an appropriate name ending with .png so the image can be imported in Atlas.
Height range
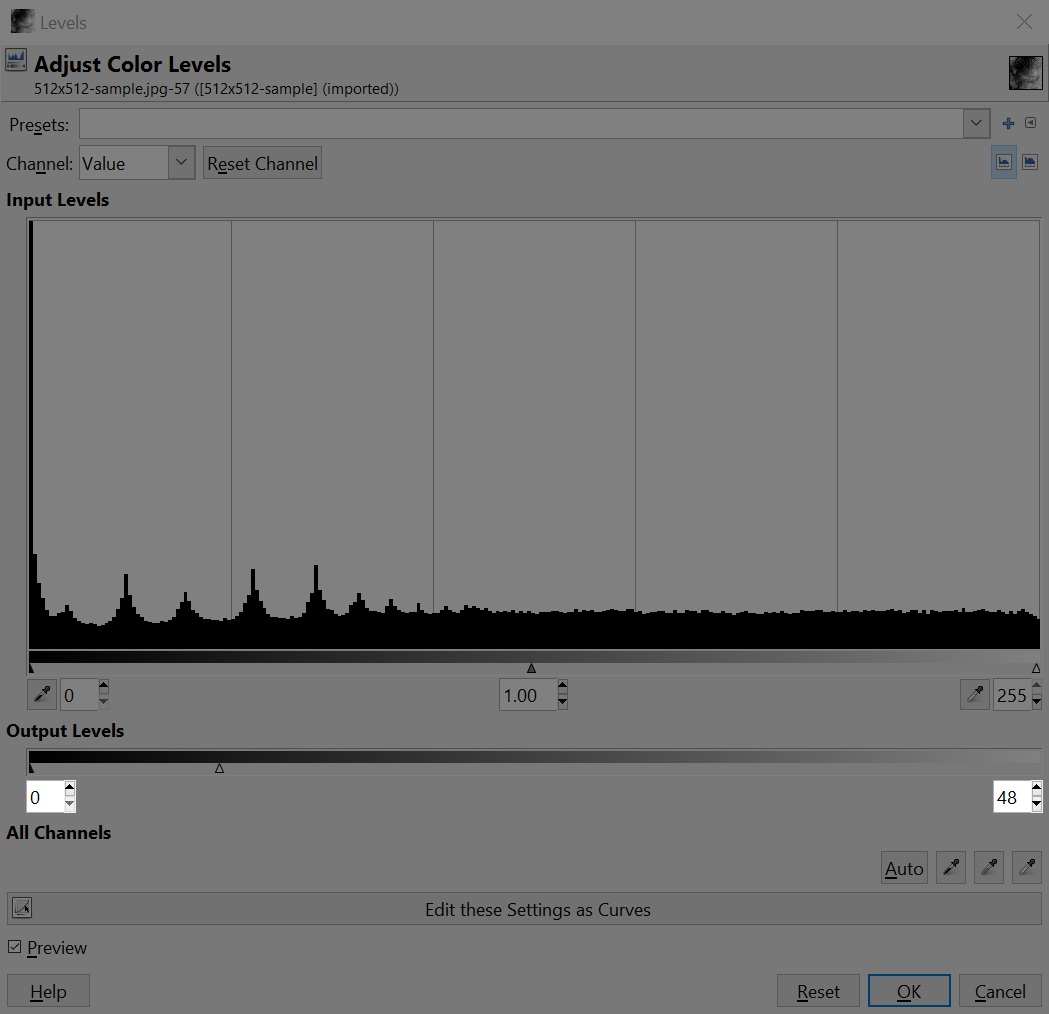
When importing a heightmap with white and black areas, you probably will find that using the whole height range will lead to very steep slopes, giant mountains and/or giant sinkholes. Therefore you need to change the grayscale range in your image.
Open the heightmap in GIMP and make sure that Image → Mode → Grayscale is marked. Select Colors → Brightness-Contrast and click on Edit these Settings as Levels in the opening dialog. In order to see more details, expand the window to the majority of your screen. Under Input Levels you can see the distribution of different shades of gray in the image. Higher columns mean the respective shade occurs more often in the image. Now play around with the Output Levels slide control. You can change the minimum and maximum gray value and thus the minimum and maximum height in your final map. I recommend to set the minimum value to 0, because the skybox (often seen on screenshots with flat camera angles) is only present for low height ranges. Set the maximum value to about 64 (fourth of the full scale) or less.
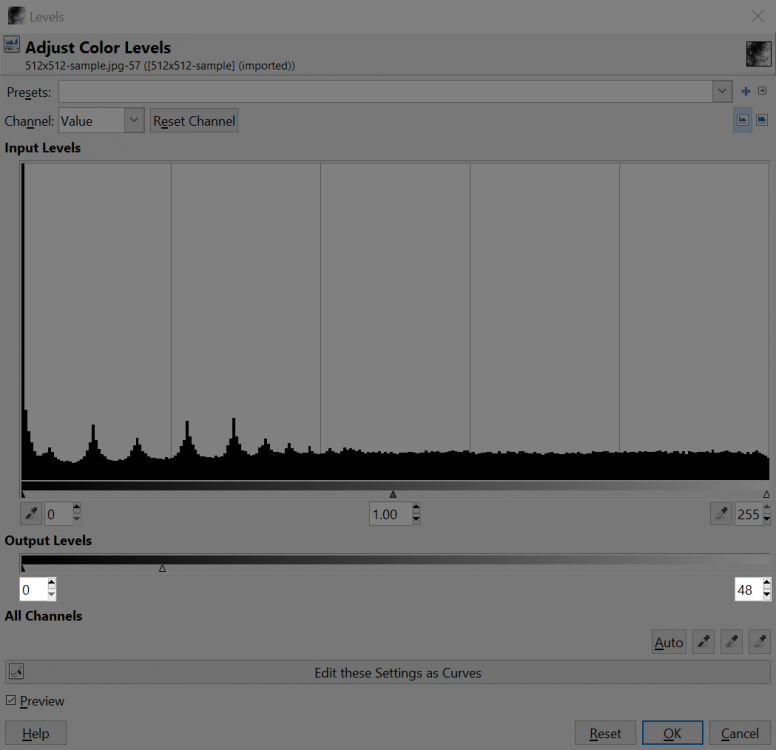
Save your edited file clicking File → Export As with a new name ending with .png. Import the heightmap image in Atlas to check the result and re-edit it in GIMP until you are satisfied. For each new version, always start with the original image to minimize the loss of information.
Advanced
SpoilerCurved surface corrections
There is an issue with the proportions on large scale heightmaps like the global maps from the NASA Blue Marble series. It can be neglected for maps depicting areas smaller than roughly about 1,000*1,000 miles or 1,600*1,600 km. The problem with earth's surface is that it can't be mapped on a flat surface without changing scale and/or proportions. There is no perfect solution, but if you are taking only a part of such a big map, there is a great potential for enhancement. Near the equator or the vertical center of the original map we don't need to do corrections, but the closer your area of interest is to the upper or lower edge, the greater the deviations of size and/or proportion are in that area.
Now, take the center of your area of interest and determine its deviation from the center of the original map in degrees. You can use a globe or Google Maps for this task. Calculate 1/cos(degrees) and note that number. In GIMP, click on Image → Scale Image and then on the chain right of the Width and Height field. Then multiply your calculated number with the height and enter the new height. The proportions in your map center should be correct again, and they will deviate more and more to the upper and lower map edge (but much less than before).
Of course you need to do this scaling before you crop your map to the final square piece, or you need to crop it again.
Merging topography and bathymetry
Often it will be necessary to combine bathymetric and topographic heightmap images. If they have the same size and depict exactly the same area, this task is quite simple. Open the bathymetry file in GIMP and copy the topography image on top of it. Open the Windows → Dockable Dialogs → Layers dialog and set Opacity to 50.0. Now you have combined the two heightmaps with the cost of halving the precision. Before their fusion they had 256 steps of gray each, now only 256 steps in total. I will show how to eliminate this information loss in the Expert section.
Now it can get pretty complicated if your heightmaps don't fit 1:1 on top of each other. You will need to scale one to the other. You can get the best estimation for the right scale by examining steep shorelines. You may also edit the images to make the shoreline more visible. For example you can use the upper slide control in Colors → Brightness-Contrast → Edit these Settings as Levels to accomplish this.
Expert
SpoilerHere I will show you how to extract height information directly from BMP bitmap images and write them to the PMP file which stores the height data of the actual 0 A.D. map.
This is only one possible solution, and it is not the most efficient nor the most elegant. It's just working with the tools and skills available to me. I would be glad if some developer could use this as an inspiration for a better solution.
Motivation
Atlas imports 8-bit grayscale heightmaps which are encoding 256 possible heights. These heights are mapped on the whole height range supported by 0 A.D. There are 65,535 possible heights corresponding to about 712 m meaning one height step corresponds to about 1.1 cm. However, the grayscale heights produce steps of about 2.78 m. If you have a close look at imported height maps this leads to a terrace like style especially at smaller slopes. Making direct changes to the PMP file in theory allows access to the full range of 65,535 possible heights. However, you usually find 8-bit and not 16-bit grayscale heightmaps so the precision increase is not that big. In most cases it is still big enough to make the terrace steps so small that they are not noticed in-game.
A typical map in 0 A.D. only uses less than an eighth of the possible height range (because this was the old height limit, see ticket #3112), newer maps may also use about a quarter of the range. This means there are fewer than 32 discrete height values (up to 64 for newer mountainous maps) when using the standard heightmap import. If you combine topographic and bathymetric height data and write it to the PMP file, you can have a total of up to 2*256 = 512 discrete heights within the same range. This means a precision increase of about 5-15 depending on the number of shades of gray and in-game height range. The height steps shrink from 2.78 m to about 19 to 56 cm in size.
Currently you need to do a lot of extra work for a quality map after the heightmap import due to the limited precision. But if you use the methods described in the next sections, you can reduce that work to a minimum.
Extracting height data from BMP images
Usually images are stored in a binary file format so you can't simply read them with a text editor. However, uncompressed data can be accessed easily with a hex editor. I recommend to export the heightmap as grayscale BMP file in GIMP and open it with PSPad. Click on View → Hex Edit MODE if you are still in the text edit mode. Wikipedia describes how to interpret the shown data. It is important to know that the data is stored in little-endian format meaning the least significant byte is found most left. Some important bytes in the BMP file format are:
- 11-14: 32-bit unsigned integer, offset or starting address of the actual bitmap image data
- 19-22: 32-bit integer, bitmap width in pixels
- 23-26: 32-bit integer, bitmap height in pixels
If the last number is positive, we have a bottom-up bitmap where the data starts in the lowest line and ends in the highest. This is important for our use since the PMP file also stores the data bottom-up. Otherwise we would have a top-down bitmap.
We would expect that the data block has a size of the pixel width*height since GIMP exports to 8-bit grayscale. However, if the width is no multiple of 4, the rest is filled up with zeros. This is important because the PMP map size is (mapsize*16 + 1), so there are three empty bytes following the end of each pixel line. You need a 129*129 pixels image for the Tiny map size, 257*257 pixels for Medium and 513*513 pixels for Giant.
Script calculations
With the right scripting languages you can directly readout data from binary files. However I'm a JScript noob. No it's not JavaScript, but a scripting language invented by Microsoft. I didn't choose it, but had to learn it for my Bachelor thesis and it's the only scripting language I'm comfortable with at the moment. The bad thing about JScript is that it only supports the readout of text files. If you need a text file like me, copy the hexadecimal code into Notepad++ and save it in text format. This procedure is done for both the topography and the bathymetry file.
With the knowledge about BMP files from the previous section, the script extracts the 8-bit height values of topography and bathymetry, chooses one of them and converts them to 16-bit values considering some boundary conditions. These include the minimum and maximum height of the output and the number of additional steps inserted between land and ocean. This is an useful feature for maps with very shallow waters as units won't just walk through the ocean. The calculated data is then written to a new text file. You can have a look at my script bmp-to-pmp-conversion.js.
Writing height data to PMP files
Our wiki contains all information you need to know about the PMP file format which stores the height and terrain texture information of the 0 A.D. maps.
The easiest way to get an empty PMP file for your needs is to open the Atlas editor, generate a new random map Wall Demo of the desired map size, remove all structures and lift all the terrain to the maximum height. This way the data section will be clearer visible when you open the file with HxD. This hex editor supports the selection of huge file parts with Shift + Left Click. However, unlike PSPad, HxD inserts whitespaces when you copy hex code to a text file, so I'm using both editors.
Now copy the processed data of the script with Notepad++ (or with a hex editor if you didn't use text files) and paste it in the right place in the PMP file. You should skip the first 16 bytes and select all data until the F-sequence stops before pasting the new data. If no This operation changes the file size message is shown you probably haven't done much wrong yet. Save your edited file and open the map again in Atlas and voilà – there it is!
Changelog
Spoilerversion 0.5 - 06/26/2016
- Introduction: also thank FeXoR and niektb, remove outdated picture announcement
-
Basics - Heightmap sources - 2nd and following paragraphs:
add information about GeoTIFF images and resolution in degrees, arc minutes/seconds, (kilo)meters and miles/feet
link/recommend high resolution data collected by Jonathan de Ferranti - Advanced - Curved surface corrections - 2nd paragraph: link Google Maps
- Expert - Motivation - 2nd paragraph: add information about old height limit and correct some numbers
- Changelog: added as a new spoiler
- wording and formatting improvements
version 0.4 - 06/06/2016
- Introduction: thank Garaf
- Basics - Heightmap sources: link DEM search engine, GDAL and Garaf's posts about its usage
version 0.3 - 06/05/2016
- Pro: rename to Expert
version 0.2 - 05/28/2016
- Basics: insert pictures, simplify instructions by removing unnecessary steps
version 0.1 - 05/28/2016
- initial commit
-
7
-
2
-
-
I noticed there are some useless tags in trac tickets and listed all of them below. The only official guideline for the use of tags which I know is [PATCH]. Also [ATLAS] and [NEEDS INFO] are used, but they can be also accessed via the component and resolution filter (which also include many tickets where the tag is missing). There are also many tags which are only used once. AFAIK tags are used to mark a category / group of things, not single ones.
Now the problem is that ticket summary changes will spam the IRC channel. It could be done between around 02:00 and 06:00 UTC where there usually are no conversations. I could do it if you allowed the cleanup. Perhaps there are also some unofficial guidelines I don't know. Perhaps you also think this is totally useless though I think cleanup is never a bad thing...
[Art] x 1 - remove because you can also filter with Art & Animation
[ATLAS] x 50, [Atlas] x 8 - remove because you can also filter with Component is Atlas editor, alternatively add the [ATLAS] tag to all tickets with the respective component
[DEFECT] x 1 - remove because you can also filter with Type is defect
[ENHANCEMENT] x 1 - remove because you can also filter with Type is enhancement
[Fixed] x 1, [Solved] x 1 - remove because you can also filter with Resolution fixed
[i18n] x 1 - remove because you can also filter with Component is I18n & L10n
[NEEDSINFO] x 13, [NEEDS INFO] x 83, [NEEDS MORE INFO] x 1 - remove because you can also filter with Resolution needsinfo, alternatively add the [NEEDSINFO] tag to all tickets with the respective resolution
[PATCH] x 1058 - leave as it is
[PATCH READY] x 1, [PATCH / DISCUSSION] x 1, [WIP PATCH] x 1, [PATCHES] x 1 - rename to [PATCH]
[Petra-AI] x 1 - remove because you can also filter with Component is AI
[REVIEW] x 1 - remove because you can also filter with Keywords contains review
[SOUND] x 2 - remove because you can also filter with Component is Music & Sound FX
special tags (do not use as a tag because there is usually only one or two tickets using it):
[ATTACHED] x 1, [BUG] x 2, [Copy & Paste] x 1, [CRASH] x 1, [CRASHLOG] x 2, [Formations] x 2, [FreeBSD compat] x 3, [Git] x 3, [Information Leak] x 1, [Integrated graphics] x 1, [Mac OS X] x 2, [Mac OSX 10.7] x 1, [nvidia linux driver bug] x 1, [OOS on rejoin] x 1, [PERFORMANCE] x 1, [Premake] x 1, [Proposition] x 1, [Step 1] x 1, [Step 2] x 1, [Step 3] x 1, [spam] x 1, [STEPS TO FIX] x 1, [ Testudo / Syntagma not working] x 1, [Typo] x 1no actual tags and/or not at the beginning of the summary (x 1 each):
[0], [2], [7341], [br], [j], [p], [pre], [shipId], [SVN], [-Wempty-body]-
1
-
-
Hey @Orpheus,
did you use SVN (r17785)? The mod is not compatible with the current Alpha. Mainland and flood random maps have been added after I finished the 0.2 version. I have plans to rebase it in the future (perhaps for the Alpha 21 release) but due to this change it requires me to edit 200 or 300 actor files, so this is a good amount of work...
Edit: If you don't like to use SVN you can try to run the mod with the Alpha 19 release. I didn't test it but it should work fine...
-
1
-
-
-
3 minutes ago, stanislas69 said:
You might want to post it here before so you can get feedback =)
Ok I will do when I'm finished
-
Thanks for the reply
I couldn't find the function, but I'm making progress with direct changes to the .pmp file with a hex editor. May I create a new wiki page with a tutorial how to create accurate heightmaps from bathymetry and topography grayscale images?
-
Added my suggestions to the ticket
Do you know where this function is located? However, I currently don't have the environment (and not much experience either) for compilation, so I'm not sure if it's worth the effort...
-
In Atlas there is no feature to define custom height limits when importing grayscale images. As a result the imported map will be scaled to the full height (which can be changed by editing the heightmap) and shows discrete terrace-like elevation steps (which can't be influenced) because there are used only 256 out of 65536 possible elevations.
Is it possible to hack the Atlas code somewhere to change this? I would need to compile after that, right? May I open a new ticket for this issue (implement custom height limits)...?
EDIT: or would you recommend to read the heightmap data with a script and directly write into the .pmp file?
-
1 hour ago, Player1 said:
Where is the link?
If I remember right, it was initially there. He may have removed it (accidentally?) when editing the post...
-
1
-
-
27 minutes ago, av93 said:
If they have made it well, they could have more profit. I'm thinking about E-sports and that. Don't know if Aoe HD could have reach them.
TheViper is probably the best AoE II player of all time, but I'm still not sure if he could live well with his earnings from tournaments... Compare that to the players in this table.

BTW sitting all day long should be the contrary to sports... Citing Wikipedia:
Sport (UK) or sports (US) are all forms of usually competitive physical activity or games which, through casual or organised participation, aim to use, maintain or improve physical ability and skills while providing enjoyment to participants, and in some cases, entertainment for spectators.
E-sports improving physical ability? Well if it's about finger muscles... we could debate

-
1
-
-
@Lion.Kanzen expansions etc. are very nice but they typically do not change gameplay. I think better gameplay is more important than more civilizations. I would say nothing against a number of 3 total civs if gameplay is perfect. Personally I tend to like a good amount of complexity and realism. However, the game should start very simple and evolve with the possibility to choose between many techs, buildings, units, strategies, ... For me a good RTS match lasts at least 1 hour and can be more than 2 hours if there are enough late game possibilities.
About Microsoft... regardless if they will make AoE IV or not, I really don't expect anything from them and don't care. AoE II can be only beaten by itself, e.g. if it's destroyed with new expansions like AoM. 0 A.D. is a somewhat different kind of game and has great potential to be successful in it's own way.
-
1
-
-
On 12/2/2015 at 1:01 AM, MetaPhaze said:
Ground units with armor and swords dying to a wolf? Ridiculous.
@MetaPhaze I don't assume you will ever read this, but I'm working on wildlife balance, see #3778 and #3918. Currently wolves are overpowered indeed when compared to other aggressive animals and I want to change that.
-
2
-
-
@Lion.Kanzen additionally, using spoilers could often help when posting several images or TL;DR excerpts from Wikipedia. No offense
-
1
-
-
2 hours ago, Lion.Kanzen said:
because they make errors, that 0AD don't be make
True. 0 A.D. is a great game in many aspects but I think it still shares one weakness (in a less extreme way, perhaps) with AoE III: You do not have that much the feeling to make great advancements with your civilization. This is personal opinion of course.
Visually it feels like you start and end in "Imperial Age", because the initial CC usually looks like a high level building from start and the structure models don't change at all. Advancing in phases feels a little bit arbitrary and not that epic than ages (I know that this already has been discussed). There is no real timescale. There is no feeling to grow a big empire out of @#$%. I know the reasons why there are no ages and I don't really question this basic concept. I would advocate though to start more nomad style like e.g. with some tents / a camp so you can regain a bit of the described feeling. Assuming we had infinite motivation, programming and artistic resources I would indeed go for the AoE I style where you start in Stone Age. Not before the start, but during the game you would make the decision into which civ you want to evolve. E.g. at the beginning you have to decide if you want to migrate to Europe or the Near East or America (symbolically, could be a huge GUI element like in AoM). Depending on that choice you can choose an early civ and from that develop into (one of several) later civs. The timescale is what I am missing most in 0 A.D.
Gameplay wise it (currently) feels like you just pump out as many units as you can early on to hit XYZ pop at 10 minutes. After that you mass champs as early and as much as you can. Just mass production. No 3 militia unit rush, no attempts to steal the enemy's boar and lure it to your base etc., little things that made AoE II so interesting. I know this is Alpha so complaints should be spared. I also know that we will more likely have battalions and even more units than AoE II style microing. This is good and bad, but I'm sure I will always miss that early game with super @#$% units where every little achievement adds to bare survival.
It might be time to write an RTS Utopia, a Chuck Norris of all Design Documents. Actually... it neither will be possible nor help anyone with anything...
-
1
-

Palaxin's Heightmap Guide
in Scenario Design/Map making
Posted
I finally went for "Expert", thx for the feedback")