Leaderboard
Popular Content
Showing content with the highest reputation on 2014-03-26 in all areas
-
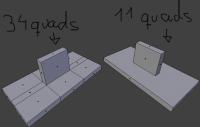
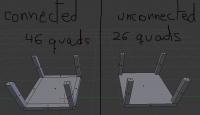
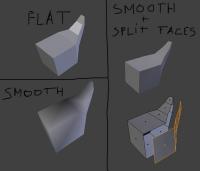
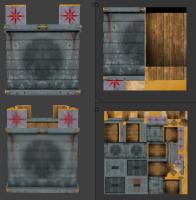
GENERAL LOWPOLY TIPS These are general tips when working with lowpoly assets, they're no software-specific. -Use unconnected geometry! This is the first and one of the most important tips. I’ve seen in a lot of models that people try to make the asset (smaller or big) all made from one mesh. This approach generates unnecessary geometry and makes the mesh more difficult to handle if you want to make changes. Here’s an example: Here we can see how many faces we’ve saved, and makes the mesh much more simple, which is good for make changes easier if required. -Split faces for hard-edge creases. Sometimes we want to create assets that contains both smooth curves and hard creases. Some 3D software lets you choose specifically which faces you want to set smooth shading and which ones set flat shading. However, in every single 3D software, you can “detach” the faces that you want to create the hard crease, this procedure will make the unconnected faces as hard creases. Left side are totally flat and totally smooth connected faces. Right side is the same smooth object, but with the faces where we want hard creases unconnected (the faces are split) -Double sided faces. 0AD’s engine does not render double-sided faces, if you want them to be shown in the game, you have to duplicate the face, and invert the normal. It is also good to move it a tiny bit, so they do not overlap for easier selection/modification or when baking AO. -Try to avoid Ngons use quads as much as possible. This one is not as important as other tips, but using always quads have more advantages than using Ngons and triangles. The main reason is that Ngons have sometimes unpredictable behaviors when triangulated (needed to export into any game engine) and not all 3D editing software supports them. Ngons, like triangles, doesn’t let you create clean loopcuts between loopfaces, which makes the mesh topology harder to modify/manipulate. -Animation loopcuts. When you are modelling meshes that are going to be animated, you must have in mind where the mesh is going to bend. To be able to maintain volume in the mesh on the points when is going to be deformed, you need to have some minimal geometry. This gif explains it visually: http://wiki.polycount.com/LimbTopology?action=AttachFile&do=get&target=BenMathis_limb_deformations.gif -Fake details with decals/textures Try to avoid geometry using textures to add detail. This can be further enhanced by the use of normalmaps. You can also use single faces, or simple geometry mapped to another part of the texture to use it as “fake” detail: several windows in 0AD’s buildings use a simple quad as a “decal” which removes the need of subdividing the geometry in the wall to make a “connected face” to map it to the window texture. (You can also make windows “insets” in the wall for more detailed windows, if the polycount permits) -Use as much texture space as possible, reuse as much texture space as possible too. This is a common mistake, and it’s one of the most important concepts of lowpoly texturing (wasting texture space). The best example to understand “reuse texture” expression is found in symmetric objects. Using only half of the mesh texture lets you make that texture portion bigger, which means more detail, at the expenses of having the exact same texture in both sides of the mesh. This is used in several things like helmets and… mainly symmetric objects. This is especially important when you are restricted to use fairly small resolution textures (like 0AD). Here are some examples of how to save texture space, increasing texture detail. Using a mirror modifier in your 3D software will make this process easier and automatic. In this example you can see the same asset mapped to different textures but both of them are 256x256. In the top example, there's heavy use of "reusing texture space" since the object is symmetrical in the Y and X axis. The bottom example is the same asset to another texture of 256x256, but each UV island has its unique space in the texture. You can clearly see the loss of detail, but in this case, you can make every face of the asset different/unique. You have to choose which assets/part of the asset are important enough to have its own texture space for unique details. -Add margin to your textures – texture bleeding Try to avoid seams showing up by texture bleeding (surrounding pixels close to the edge of the UV island gets “inside” of the UV and are displayed). You can avoid seams by texture bleeding simply giving some margin colour to your textures, and using a background of similar colour as your textures, which will minimize the seams effect. Here’s an example of texture bleeding making seams noticeable: http://www.ftc-creative.de/uploads/projects/FROG_Shading_01.jpg -Playercolor in textures. Playercolor is the term used to determine the unique colors of each player in a 0AD match. These colours help to differentiate the owner of the units/buildings even if there is other player in the match playing with the same civilization. Playercolor is shown in the parts of the texture that has not full opacity in them. Here’s a good explanation by team member quantumstate of how playercolor works in 0AD. (it’s an extract from this post: http://www.wildfiregames.com/forum/index.php?showtopic=18035) GIMP will work fine for textures as long as you understand what is happening. The issue is that the game does the player colour in an unusual way. What I think you are expecting to happen is to have a background of the player colour with the texture over the top so the player colour shows through in the alpha sections. It works slightly differently though. First with images you need to understand that each pixel in the image has 4 channels. 3 colours (red, green, blue) and the alpha or transparency channel. When you make part of the image transparent you only change the alpha channel, the colour components stay exactly the same. To see this in gimp you can use the layer mask as Enrique mentioned to show the alpha channel as a black and white image. You can disable the layer mask (from the right click menu of the layer) to see what the image looks like without the alpha channel. Now what 0 A.D. does with the player colour to create the final texture: 1. Multiply the texture by the player colour and discard the alpha channel. So if the player colour is white then the image will be left as it was (multiplying by 1 leaves things unchanged). If the player colour is black the whole image will become black, if it is blue then the image will become blueish. You can test the multiply in gimp using layer modes, just create a layer with the player colour and set the mode to multiply. 2. Take the original texture with the alpha channel and place it on top of the new multiplied image. Then the multiplied image will show through in the transparent regions giving the final texture. You can replicate this in gimp to preview what your texture will look like. 1. Open the texture, there should be a single layer. 2. Duplicate the layer. 3. Remove the alpha channel from the bottom layer. (Now you can see the colours "underneath" the transparent sections). 4. Create a new layer and put it in between the two existing layers. 5. Fill the new layer with the player colour (e.g. #0000FF for blue players). 6. Set the mode of the new layer to multiply. Now you should see an image which will look like the final texture in game. So it is important that you are aware of what the image is like "underneath" the transparent areas because it will affect what the texture looks like. This is why layer masks are useful so you can easily disable the transparency and see the colours in the transparent areas. (create the layer mask using the "Transfer layers alpha channel" option).1 point
-
It seems to me that the trac is offline again, not funny if you want to download and try out a patch.1 point
-
1 point
-
Maybe move that higher at the priority list? (So as soon as the AI could be called stable)1 point
-
Just got an e-mail from CG Cookie with a sum up of the new features. http://cgcookie.com/blender/cgc-courses/blender-2-70-overview-new-features/?utm_source=mailchimp&utm_medium=email&utm_campaign=blendercookie-032514 Here are the full release notes http://wiki.blender.org/index.php/Dev:Ref/Release_Notes/2.70 and here it is to download the latest version http://www.blender.org/1 point
-
I started recording some of the stuff I was doing and thought it would be nice to share it with future modders, so I recorded the process of drop propping1 point
-
I've given a look at the code. Seems like you mostly took it where I wanted but never did and fixed quite a few of the style/redundancies. I'm liking where this is going. Now I should try this in-game, but I can't see why it'd be way less efficient.1 point
-
The Celts (Gauls and Britons) talked something that mostly resembles the current Gaelic (though most written resources are Latin). Persians talked Farsi, Indians talked ancient variants of that region (Magadhi Prakrit, Sanskrit, ...). Egyptian names are in some Egyptian language for which there are few written resources, let alone we know how it's pronounced. Maybe we should try to get the specific names to use the local script (so Greek letters for Greek cultures, instead of using the Latin alphabet). But our font system currently only supports unicode characters from the first unicode plane. While most historical scrips are in other planes (like Egyptian hieroglyphs). This still wouldn't be possible for the Celts (as they didn't have their own script). But it would work for most other civilisations I think. For now, I advise you to not translate it (unless the specific name is English, i.e. not specific enough).1 point
-
It’s time again to take a closer look at one of the contributors to 0 A.D. This time we’ve chosen to feature Pureon, one of the most versatile contributors we have, but I’ll let him elaborate on that below. Let’s just say that it was an easy decision to feature him, and that we are very grateful that he’s part of the Wildfire Games team and community. Tell us a bit about yourself Prior to joining the 0 A.D. team I participated in online community projects for games such as AOE3 and Supreme Commander, however my experience of RTS games started with the classics AOE1 and Total Annihilation. My enthusiasm for creating user generated content for the early generation of RTS games helped define what degree I studied at university and therefore my current employment in the creative industry. Some AoE3 units I created in 2006: A couple of Supreme Commander units from 2009: What have you found most interesting about contributing to 0 A.D.? I first heard about 0 A.D. about 6 years ago, and at the time it looked good but no alpha releases were available to play or mod so it slipped my mind until 2010. That’s when I heard it had switched from closed development to opensource and had released a playable alpha. I was hooked. Why work on mods for commercial games when I can use my skills to shape a ‘real game’. The variety of tasks I’ve been able to contribute to allows me to acquire new skills and keeps me motivated. Some of these tasks include 3D modeling, unit animations, map making, texturing units, designing the new website, managing the sound department, creating the trailer videos, and illustration (icons). Once triggers and a few other key features are implemented I’d really like to work on some scenarios for 0 A.D., just like I did for AoE 1,2 and 3. Some random 0 A.D. stuff I’ve created: Anything you want to add? Some Nostalgia:1 point

