Leaderboard


Popular Content
Showing content with the highest reputation on 2014-03-03 in all areas
-
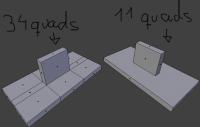
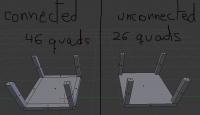
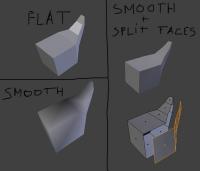
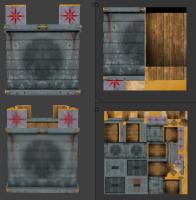
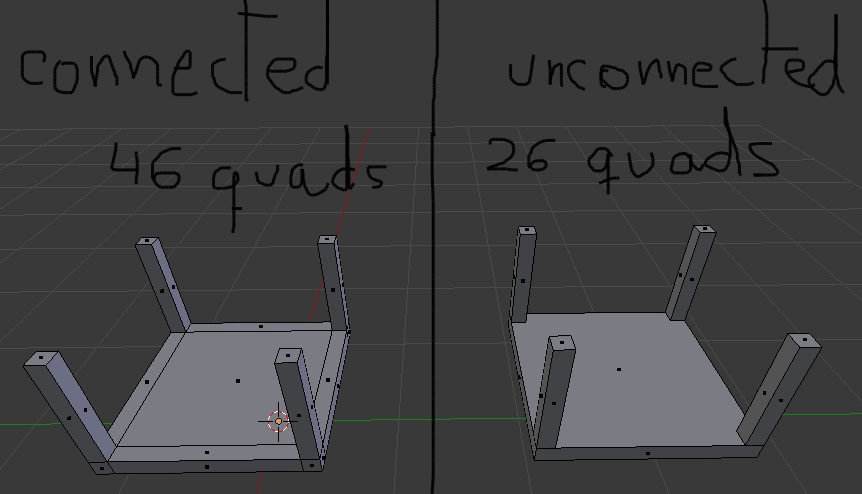
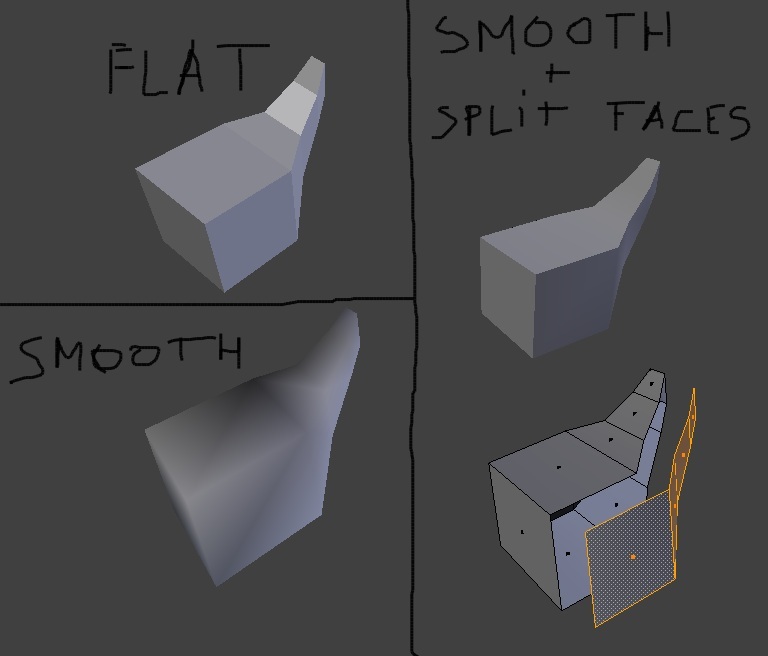
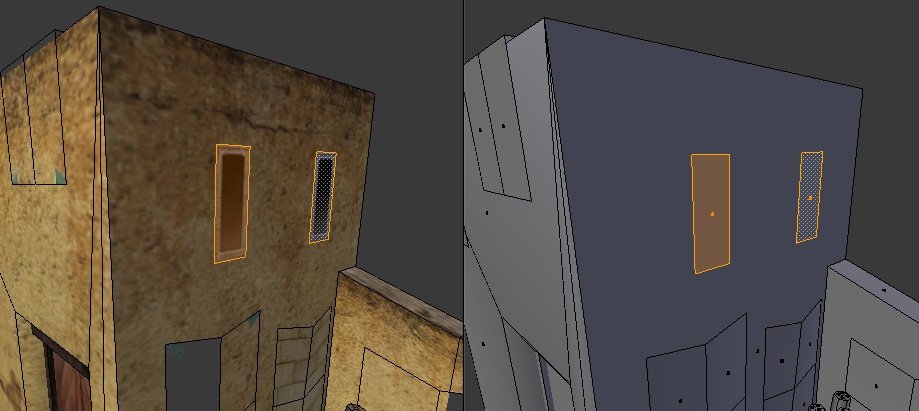
GENERAL LOWPOLY TIPS These are general tips when working with lowpoly assets, they're no software-specific. -Use unconnected geometry! This is the first and one of the most important tips. I’ve seen in a lot of models that people try to make the asset (smaller or big) all made from one mesh. This approach generates unnecessary geometry and makes the mesh more difficult to handle if you want to make changes. Here’s an example: Here we can see how many faces we’ve saved, and makes the mesh much more simple, which is good for make changes easier if required. -Split faces for hard-edge creases. Sometimes we want to create assets that contains both smooth curves and hard creases. Some 3D software lets you choose specifically which faces you want to set smooth shading and which ones set flat shading. However, in every single 3D software, you can “detach” the faces that you want to create the hard crease, this procedure will make the unconnected faces as hard creases. Left side are totally flat and totally smooth connected faces. Right side is the same smooth object, but with the faces where we want hard creases unconnected (the faces are split) -Double sided faces. 0AD’s engine does not render double-sided faces, if you want them to be shown in the game, you have to duplicate the face, and invert the normal. It is also good to move it a tiny bit, so they do not overlap for easier selection/modification or when baking AO. -Try to avoid Ngons use quads as much as possible. This one is not as important as other tips, but using always quads have more advantages than using Ngons and triangles. The main reason is that Ngons have sometimes unpredictable behaviors when triangulated (needed to export into any game engine) and not all 3D editing software supports them. Ngons, like triangles, doesn’t let you create clean loopcuts between loopfaces, which makes the mesh topology harder to modify/manipulate. -Animation loopcuts. When you are modelling meshes that are going to be animated, you must have in mind where the mesh is going to bend. To be able to maintain volume in the mesh on the points when is going to be deformed, you need to have some minimal geometry. This gif explains it visually: http://wiki.polycount.com/LimbTopology?action=AttachFile&do=get&target=BenMathis_limb_deformations.gif -Fake details with decals/textures Try to avoid geometry using textures to add detail. This can be further enhanced by the use of normalmaps. You can also use single faces, or simple geometry mapped to another part of the texture to use it as “fake” detail: several windows in 0AD’s buildings use a simple quad as a “decal” which removes the need of subdividing the geometry in the wall to make a “connected face” to map it to the window texture. (You can also make windows “insets” in the wall for more detailed windows, if the polycount permits) -Use as much texture space as possible, reuse as much texture space as possible too. This is a common mistake, and it’s one of the most important concepts of lowpoly texturing (wasting texture space). The best example to understand “reuse texture” expression is found in symmetric objects. Using only half of the mesh texture lets you make that texture portion bigger, which means more detail, at the expenses of having the exact same texture in both sides of the mesh. This is used in several things like helmets and… mainly symmetric objects. This is especially important when you are restricted to use fairly small resolution textures (like 0AD). Here are some examples of how to save texture space, increasing texture detail. Using a mirror modifier in your 3D software will make this process easier and automatic. In this example you can see the same asset mapped to different textures but both of them are 256x256. In the top example, there's heavy use of "reusing texture space" since the object is symmetrical in the Y and X axis. The bottom example is the same asset to another texture of 256x256, but each UV island has its unique space in the texture. You can clearly see the loss of detail, but in this case, you can make every face of the asset different/unique. You have to choose which assets/part of the asset are important enough to have its own texture space for unique details. -Add margin to your textures – texture bleeding Try to avoid seams showing up by texture bleeding (surrounding pixels close to the edge of the UV island gets “inside” of the UV and are displayed). You can avoid seams by texture bleeding simply giving some margin colour to your textures, and using a background of similar colour as your textures, which will minimize the seams effect. Here’s an example of texture bleeding making seams noticeable: http://www.ftc-creative.de/uploads/projects/FROG_Shading_01.jpg -Playercolor in textures. Playercolor is the term used to determine the unique colors of each player in a 0AD match. These colours help to differentiate the owner of the units/buildings even if there is other player in the match playing with the same civilization. Playercolor is shown in the parts of the texture that has not full opacity in them. Here’s a good explanation by team member quantumstate of how playercolor works in 0AD. (it’s an extract from this post: http://www.wildfiregames.com/forum/index.php?showtopic=18035) GIMP will work fine for textures as long as you understand what is happening. The issue is that the game does the player colour in an unusual way. What I think you are expecting to happen is to have a background of the player colour with the texture over the top so the player colour shows through in the alpha sections. It works slightly differently though. First with images you need to understand that each pixel in the image has 4 channels. 3 colours (red, green, blue) and the alpha or transparency channel. When you make part of the image transparent you only change the alpha channel, the colour components stay exactly the same. To see this in gimp you can use the layer mask as Enrique mentioned to show the alpha channel as a black and white image. You can disable the layer mask (from the right click menu of the layer) to see what the image looks like without the alpha channel. Now what 0 A.D. does with the player colour to create the final texture: 1. Multiply the texture by the player colour and discard the alpha channel. So if the player colour is white then the image will be left as it was (multiplying by 1 leaves things unchanged). If the player colour is black the whole image will become black, if it is blue then the image will become blueish. You can test the multiply in gimp using layer modes, just create a layer with the player colour and set the mode to multiply. 2. Take the original texture with the alpha channel and place it on top of the new multiplied image. Then the multiplied image will show through in the transparent regions giving the final texture. You can replicate this in gimp to preview what your texture will look like. 1. Open the texture, there should be a single layer. 2. Duplicate the layer. 3. Remove the alpha channel from the bottom layer. (Now you can see the colours "underneath" the transparent sections). 4. Create a new layer and put it in between the two existing layers. 5. Fill the new layer with the player colour (e.g. #0000FF for blue players). 6. Set the mode of the new layer to multiply. Now you should see an image which will look like the final texture in game. So it is important that you are aware of what the image is like "underneath" the transparent areas because it will affect what the texture looks like. This is why layer masks are useful so you can easily disable the transparency and see the colours in the transparent areas. (create the layer mask using the "Transfer layers alpha channel" option).

 2 points
 -
We ought to make mods easier (have in-game download manager and stuff), and the mods where you only add a civ, and don't change anything to the gameplay code are very easy to make. So we hope there will be plenty of them. But I don't think that this dynasty will ever make it to the main game.2 points
-
The name 0 A.D. actually was chosen partly because it sits right in-between 500 B.C. and A.D. 500 (and in case anyone wonders, yes, we are aware that there wasn't actually a year 0), and in the first part it is indeed the B.C. period that will be covered, so in this regard you are wrong. You are right that it's probably best to add this civilization as a mod, it doesn't seem big enough (and from what I could tell from a quick read of that Wikipedia page it might not be all that easy to find enough accurate information for that matter).2 points
-
1 point
-
Very cool blog. To put my thoughts down "on paper," I am now thinking we should make the "Military Settlement" system a "Successor" trait and give it to both the Ptolemies and Seleucids. We can use the Mercenary Camp as a capturable Gaia structure for the training of mercenaries in a new "mercenary" system for the game. That would mean the Ptolemies and Seleucids both need a "Military Settlement" structure, each with the same basic layout but unique Egyptian and Seleucid details.1 point
-
Many users ask for add Han Dynasty from rise of east Mod. But that is the most close to add a new civ. Developers are not interesting add civilizations before the game is done. Is for balancing gameplay reasons and art department needs focus in other details. But the project is open in a year the things can be changes.1 point
-
This is 0 A.D not BC. but you can always mod1 point
-
Problem solved! It looks like a bug in VisualStudio, but passing the JS::Value as reference instead of using a return value works around the problem. It was a bit of work to adjust all implementations of ToJSVal and change all call-sites, but I don't see any disadvantages for the final result. I've registered at Github too and created a branch for the SpiderMonkey upgrade. You can get it here: https://github.com/Yves-G/0ad It should build as normal on Windows and Linux now and shouldn't require any additional steps. Feedback is appreciated but be aware that it still contains some known issues too. EDIT: On Linux you need to install libnspr-dev1 point
-
Recording more or less works already, there might be a few things needed for proper replayability (I don't think e.g. camera movements etc are recorded), but generally that part works.The big thing though is to actually make it possible to play it back, the existing code just plays it back automatically without anything being displayed. So it's not as if it works as-is, but the recording part works.1 point
-
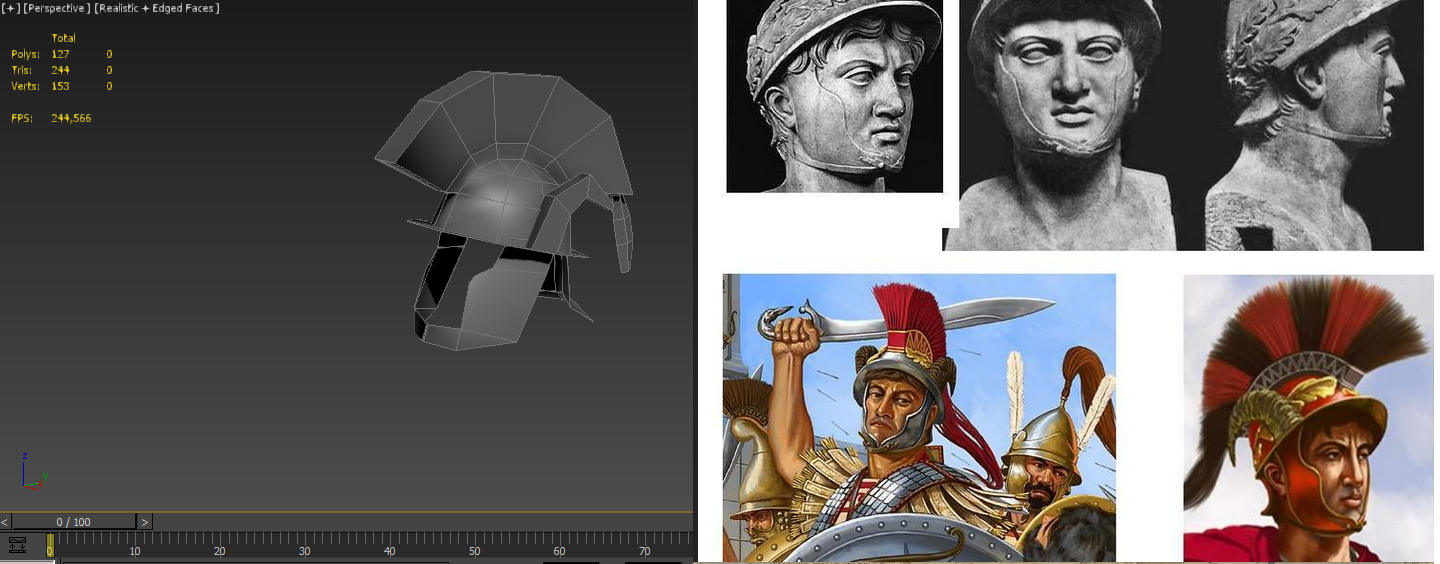
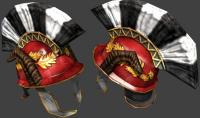
Modified and textured: Sadly, those textures are 256*256, which is double the resolution it will be in the in-game version, so details will be lost. (they won't be noticed in the game anyway ) @Stan: Please, use the mirror/symmetry modifier when modeling helmets or whatever other symmetric prop. It makes things much easier.
 1 point
 -
1 point
-
Cool reference along the video. The best one imo is 1:10 - 1:19 If you want a very cool tip.... if you're able to download the video as .flv and extract the portion that you want, you can use it as background "image", and blender will cycle between the video frames when you move the timeline. You can pull off very realistic animations that way1 point
-
In my opinion it's still too static. I can only encourage you to try to make as many "intuitive" movements as you can, nothing should really stay static, even if it's just to slightly rotate it. For example the head should sway a bit too. You might also want to create some variations.1 point


.thumb.png.ce58cea22940c255f5b0a735d5abee36.png)