viridis
-
Posts
15 -
Joined
-
Last visited
-
Days Won
1
viridis's Achievements
")
Discens (2/14)
11
Reputation
-
Ok, now it's done. He had already read the legal waiver before uploading the model but completely forgot to apply the license. Cheers.
-
LEGAL WAIVER: Please read this before contributing
viridis replied to Jeru's topic in Art Development
I am the copyright holder of original works I post in the Wildfire Games 0 A.D. Art Development forum. I hereby release all original works I uploaded to this forum in the past, and those I will upload in the future, under the Creative Commons Attribution-Share Alike 3.0 Unported license. -
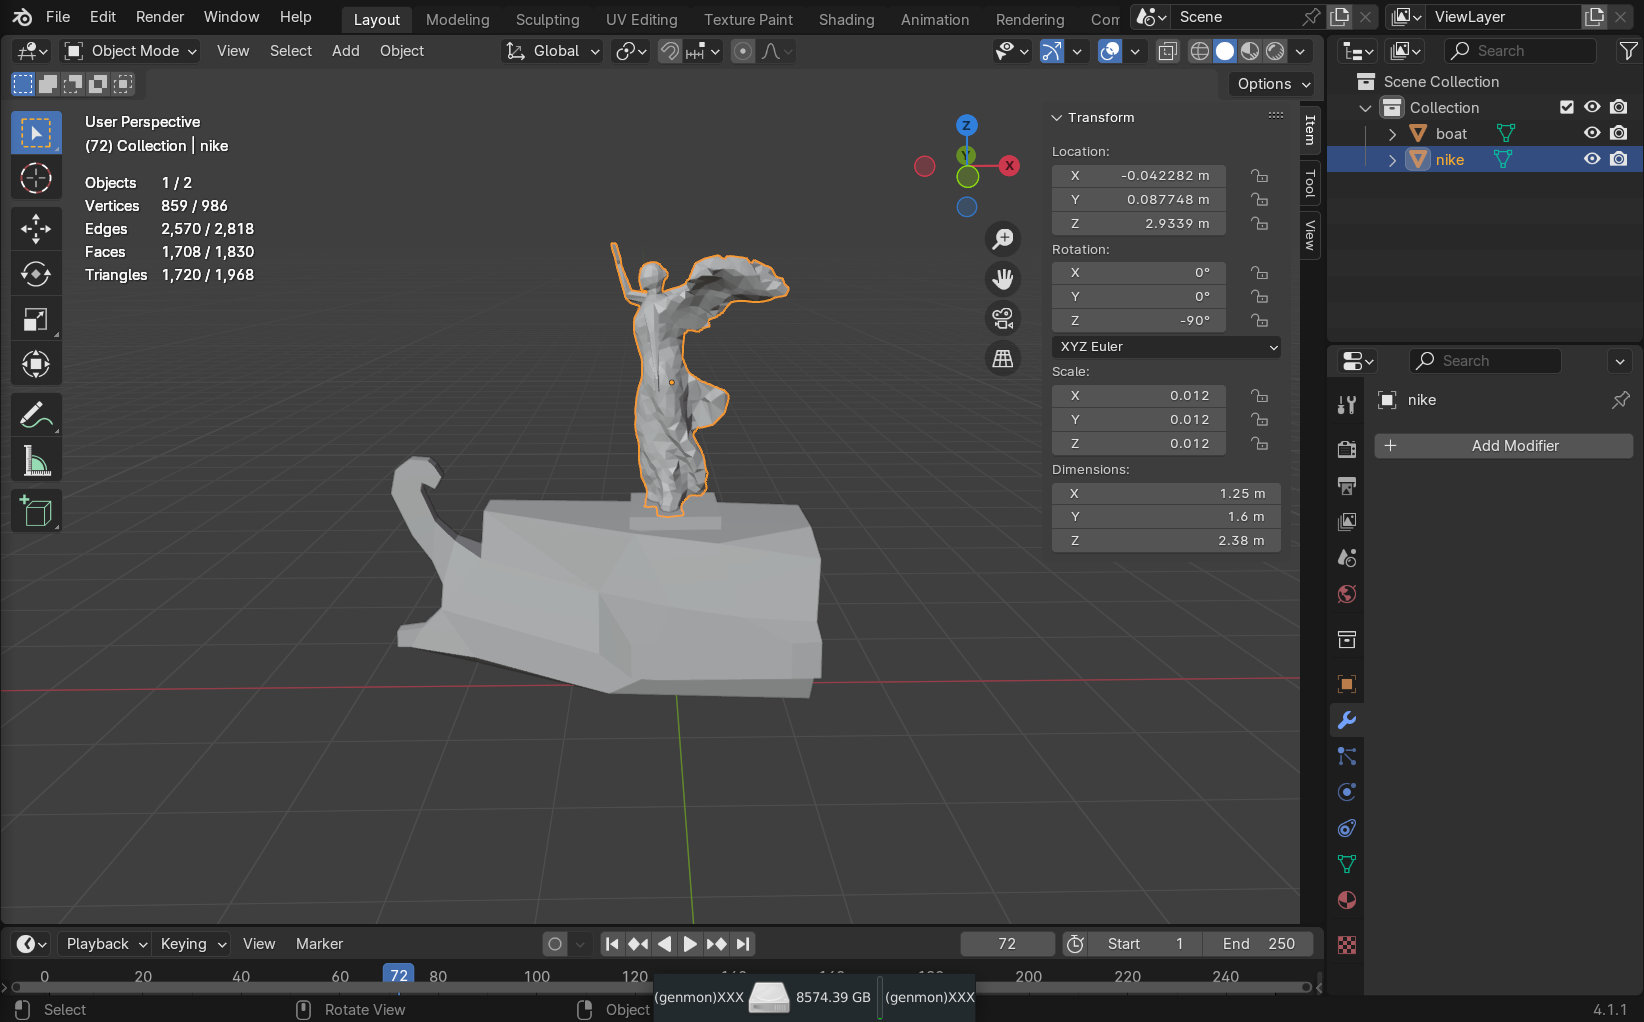
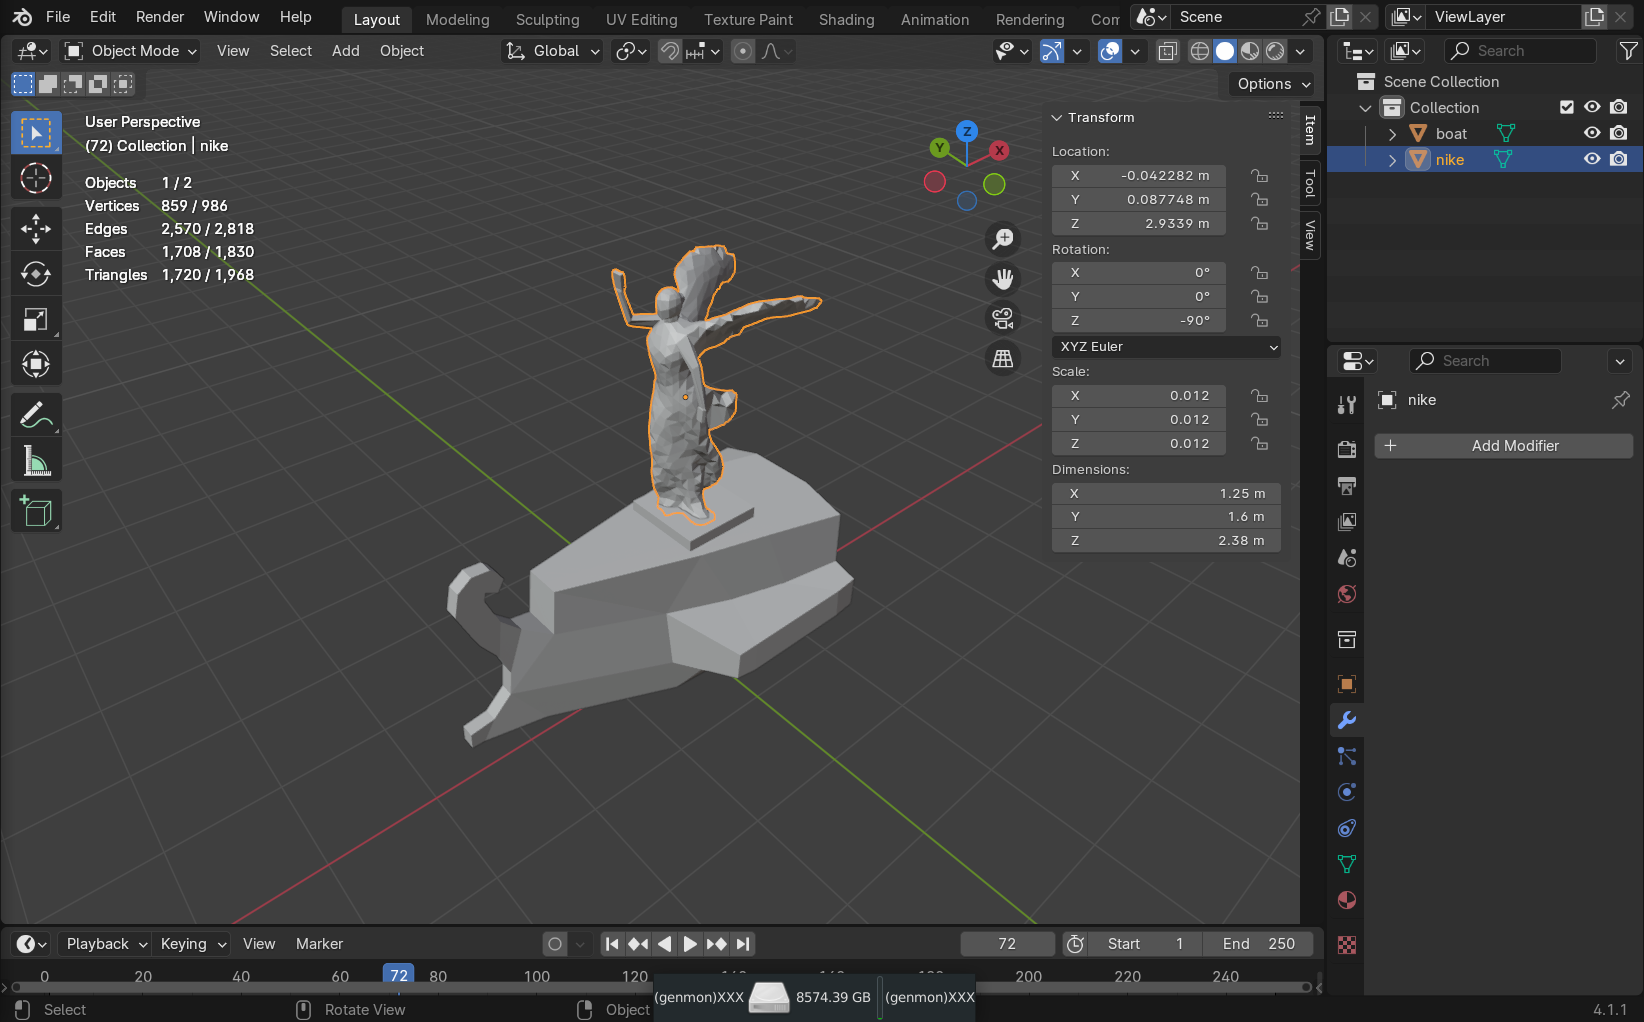
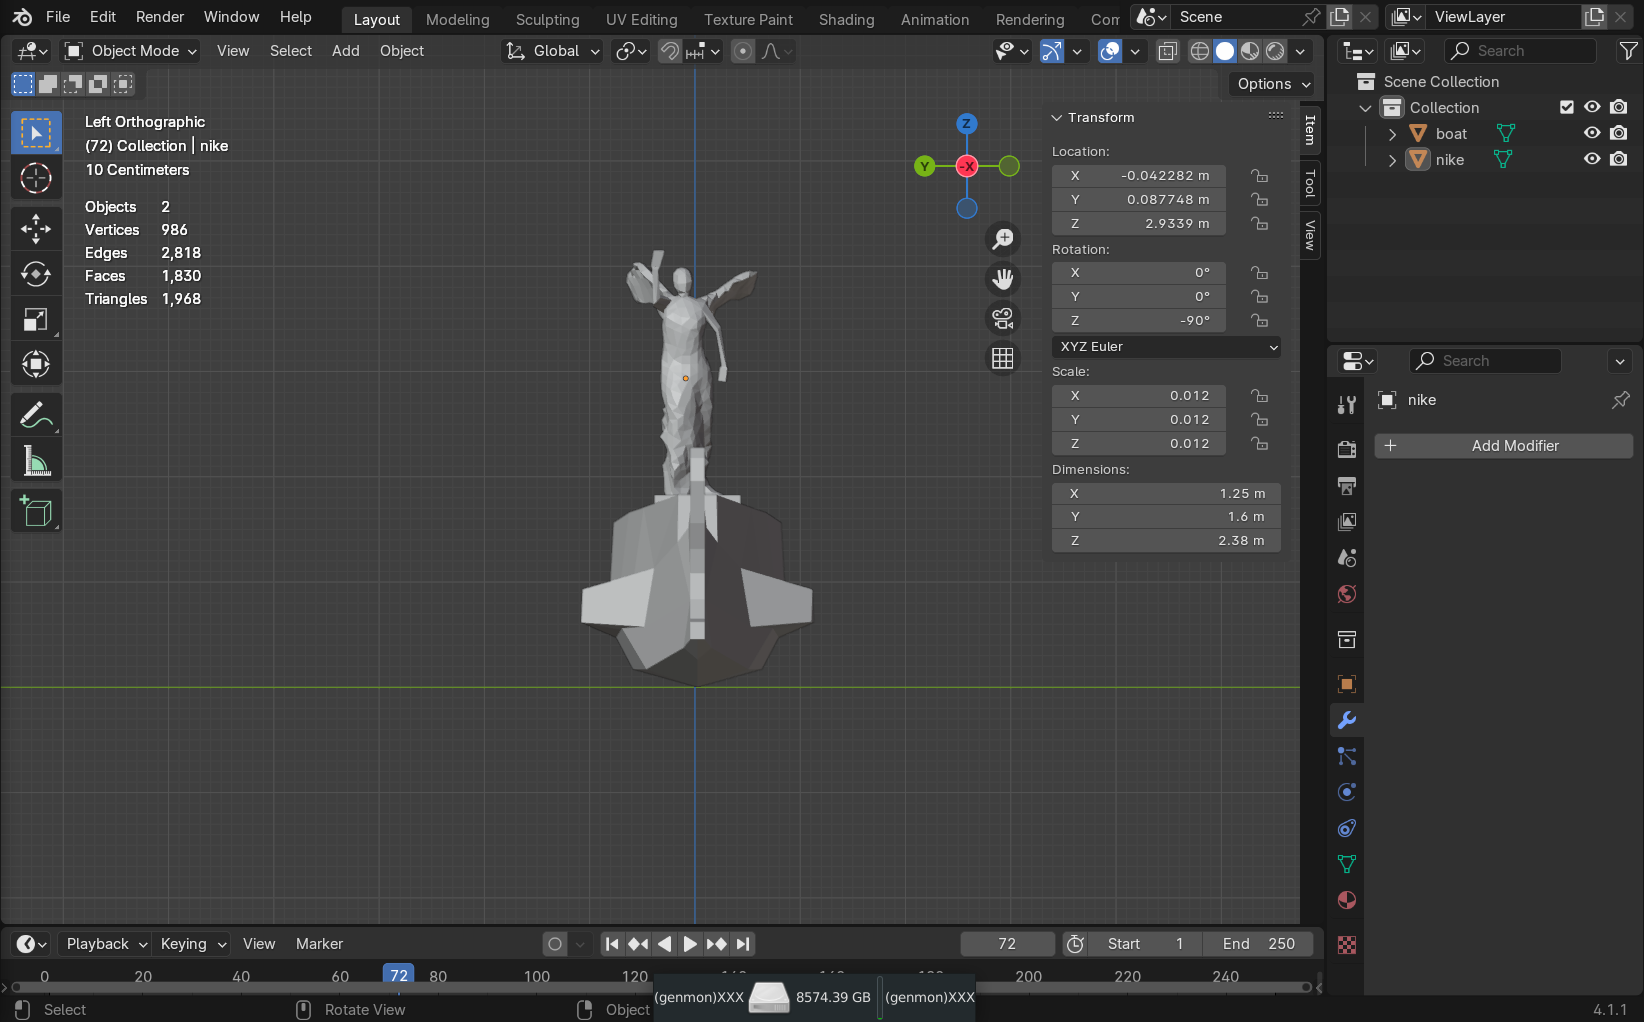
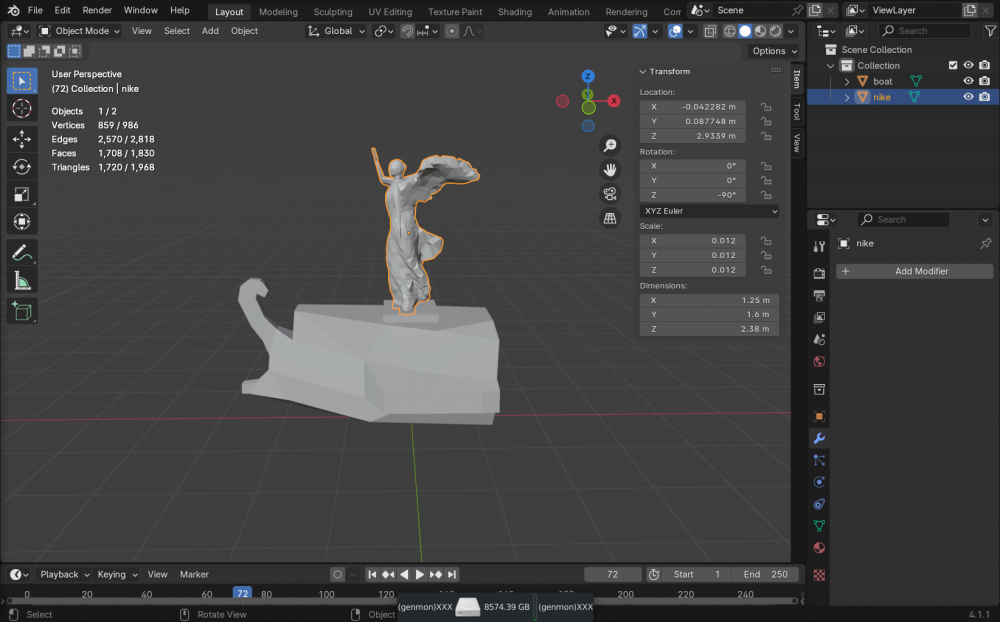
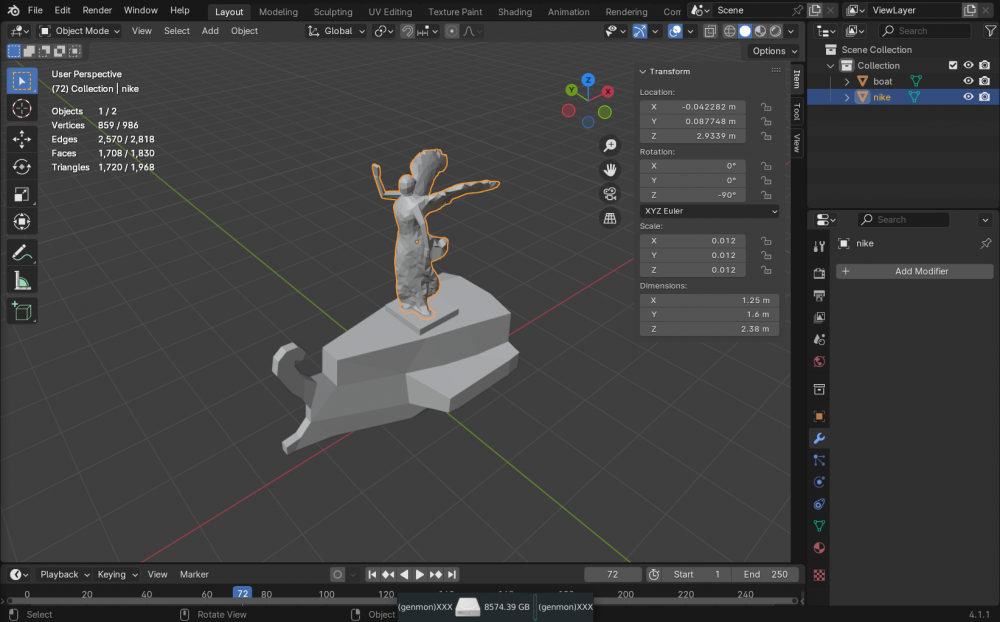
Hi! My son made this 3d model in blender. It is in a .blend file and there is nothing more than the statue. It is UV mapped with the "smart UV project" option (really useless output in some parts of the model) so the UV mapping needs to be redone. There are some images from different angles at the bottom so it's not necessary to download the file. Anyone willing to help with this? Thanks! nike_of_samothrace.blend

-
heightmap import improvement
viridis replied to viridis's topic in Game Development & Technical Discussion
Also asked at stackoverflow if easy to write a plugin or script for ImageJ. Should improve my own tutorial on this. Greetings. -
Hello and thanks for your development effort, In the past I have been strugling with heightmap import when mapmaking following palaxin's heightmap guide and written some posts in the forum regarding this: discussion on heightmap sources and technical data Novel method on preparing a heightmap from topographic and bathymetric images using ImageJ. The persisting problem I have experienced when importing a heighmap is that the image imported appear to be limited to 8-bit grayscale (or 24 bit RGB, but grayscale, which in practice is the same) whereas 0ad an its map editor allows 16-bit different heights. This fact is stated in the response of another post showing an import error. So, if the editor allows 16-bit height, why not allowing 16-bit grayscale images? I am convinced that mapmakers do not usually have enough technical background to deal with this and the suggestion of modifying the PMP map file by hand in a HEX editor is discouraging. So as I see it there would be two possible ways of improving the heightmap impor: Modify the code that import the image file allowing other options that can contains 16-bit images (such as TIFF or RAW) in order to edit the map in 16-bit already in your favourite editor. Write a plugin for your preferred image editor so that PMP files can be saved directly from image data and publish it. Open source community usually prefer GIMP, I use ImageJ, but any (free) image editor shall be picked. As I am not a programmer I cannot afford doing this by myself, however I encourage the development team to make a small effort in order to encourage mapmaking enthusiasts. Greetings.
-
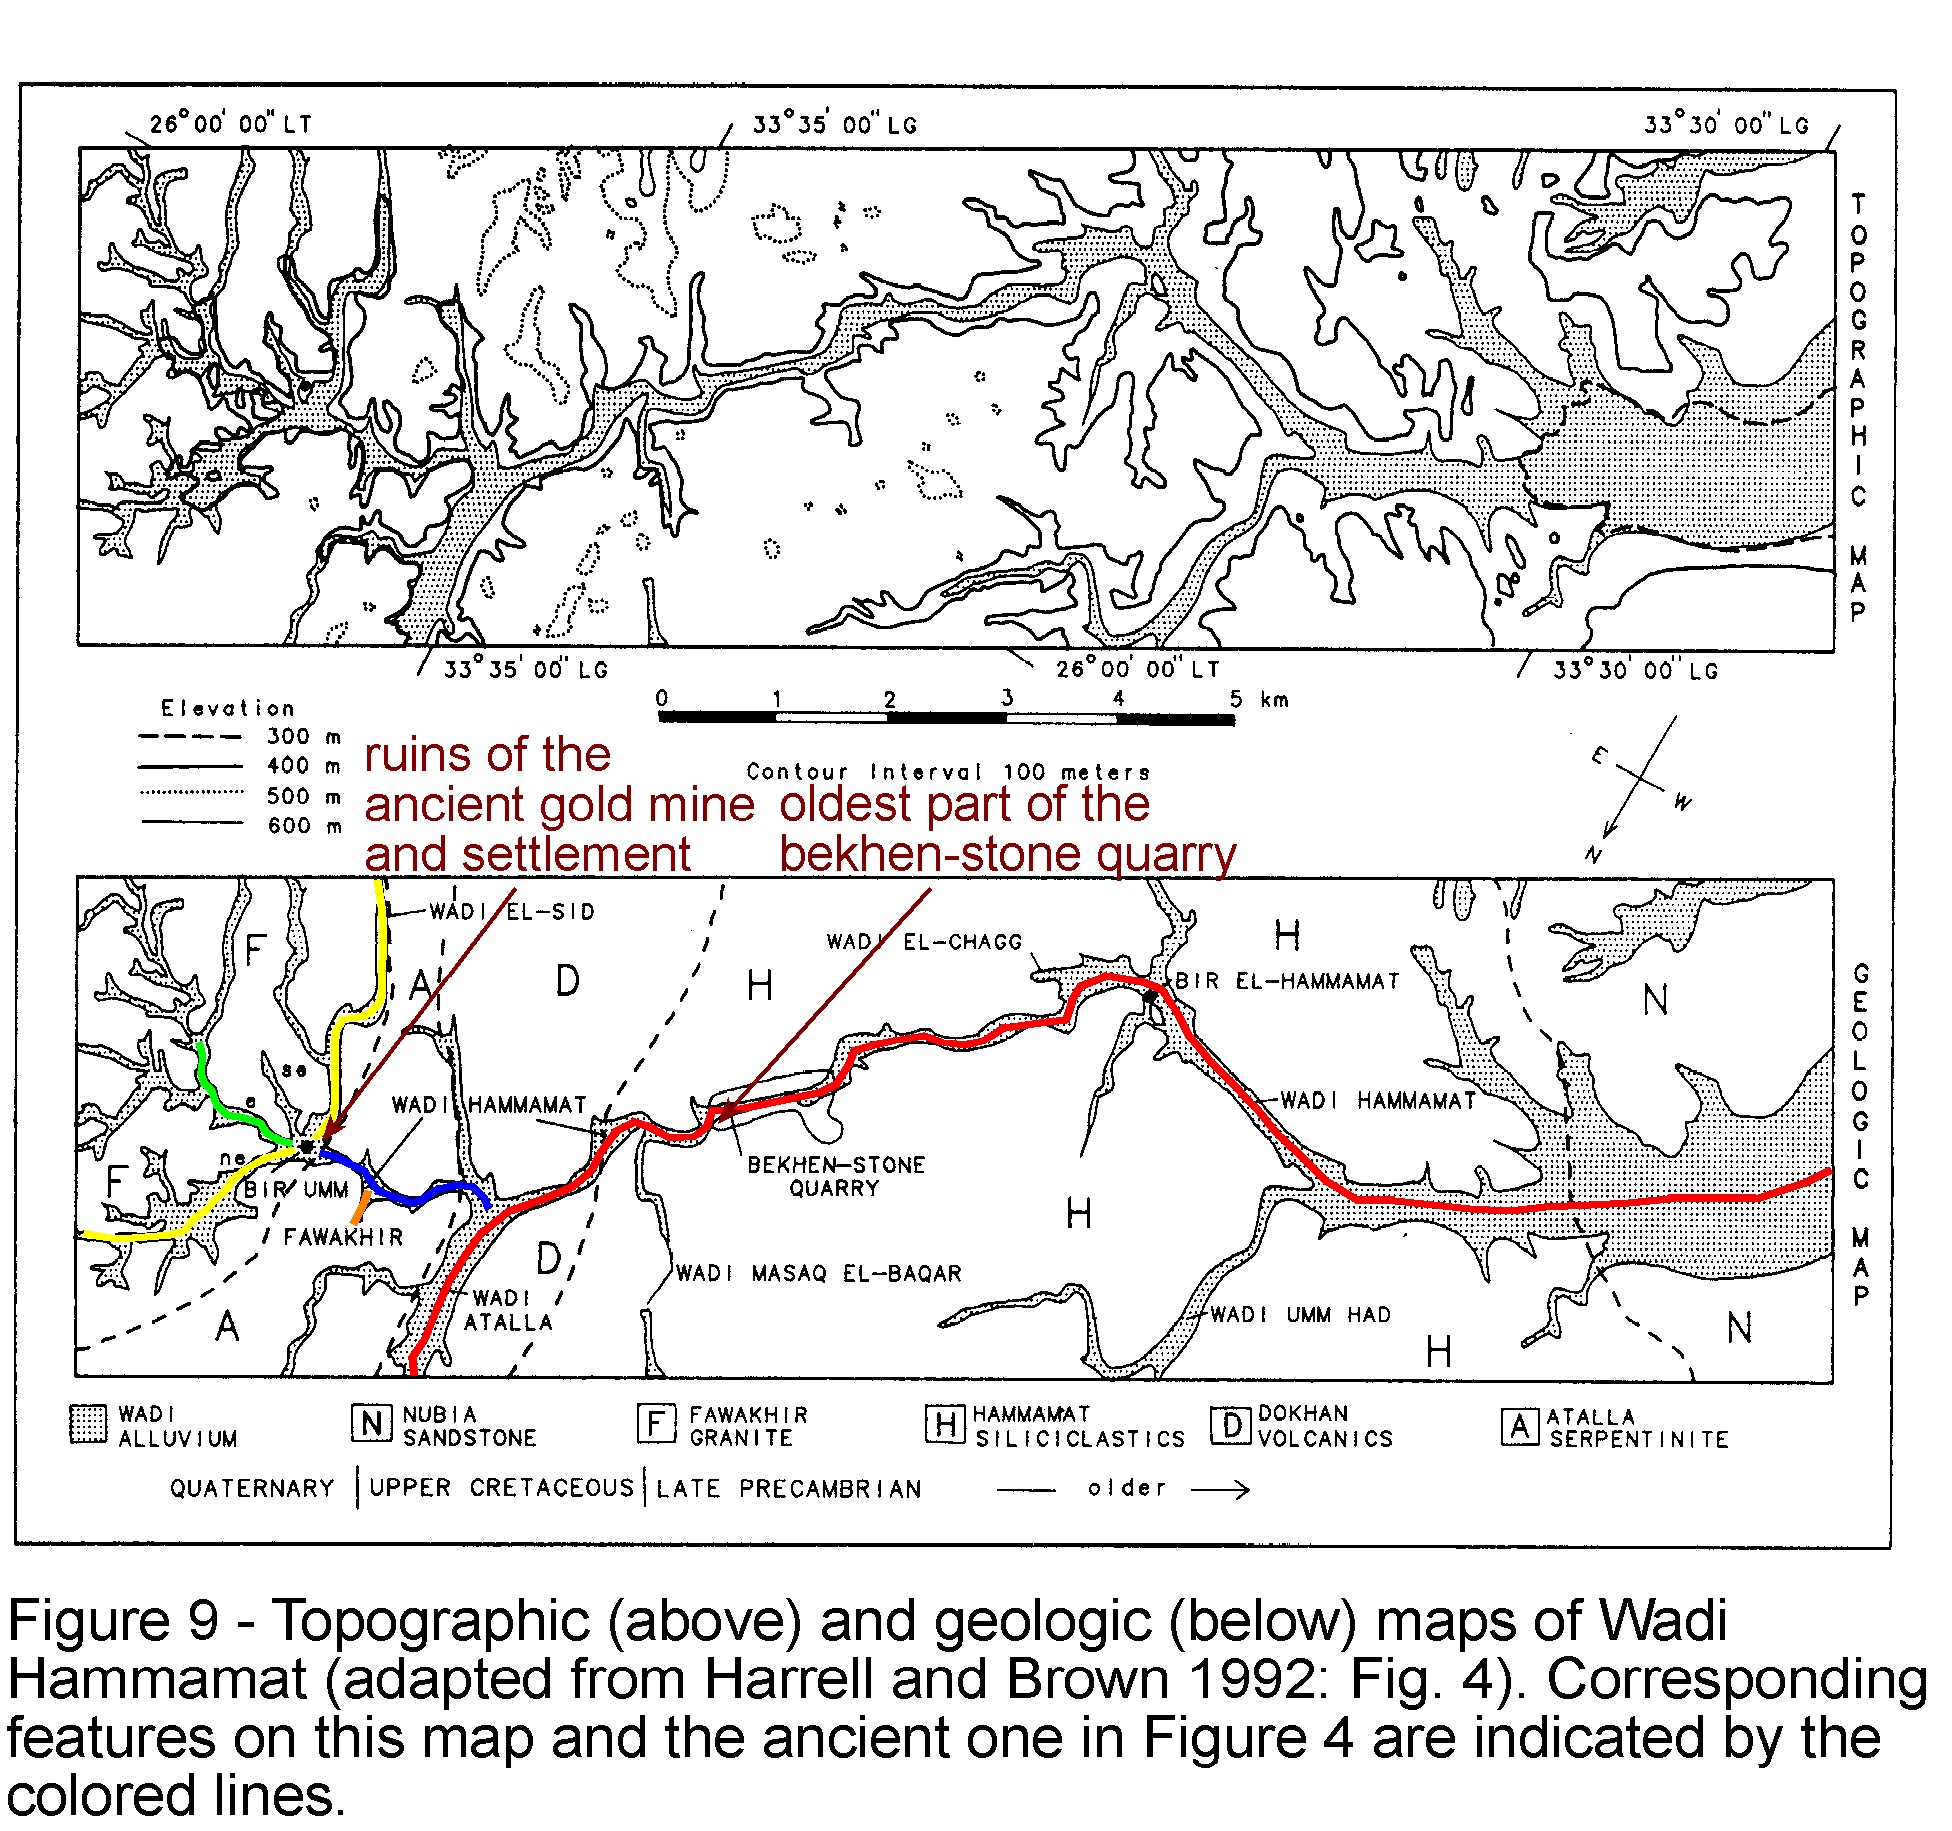
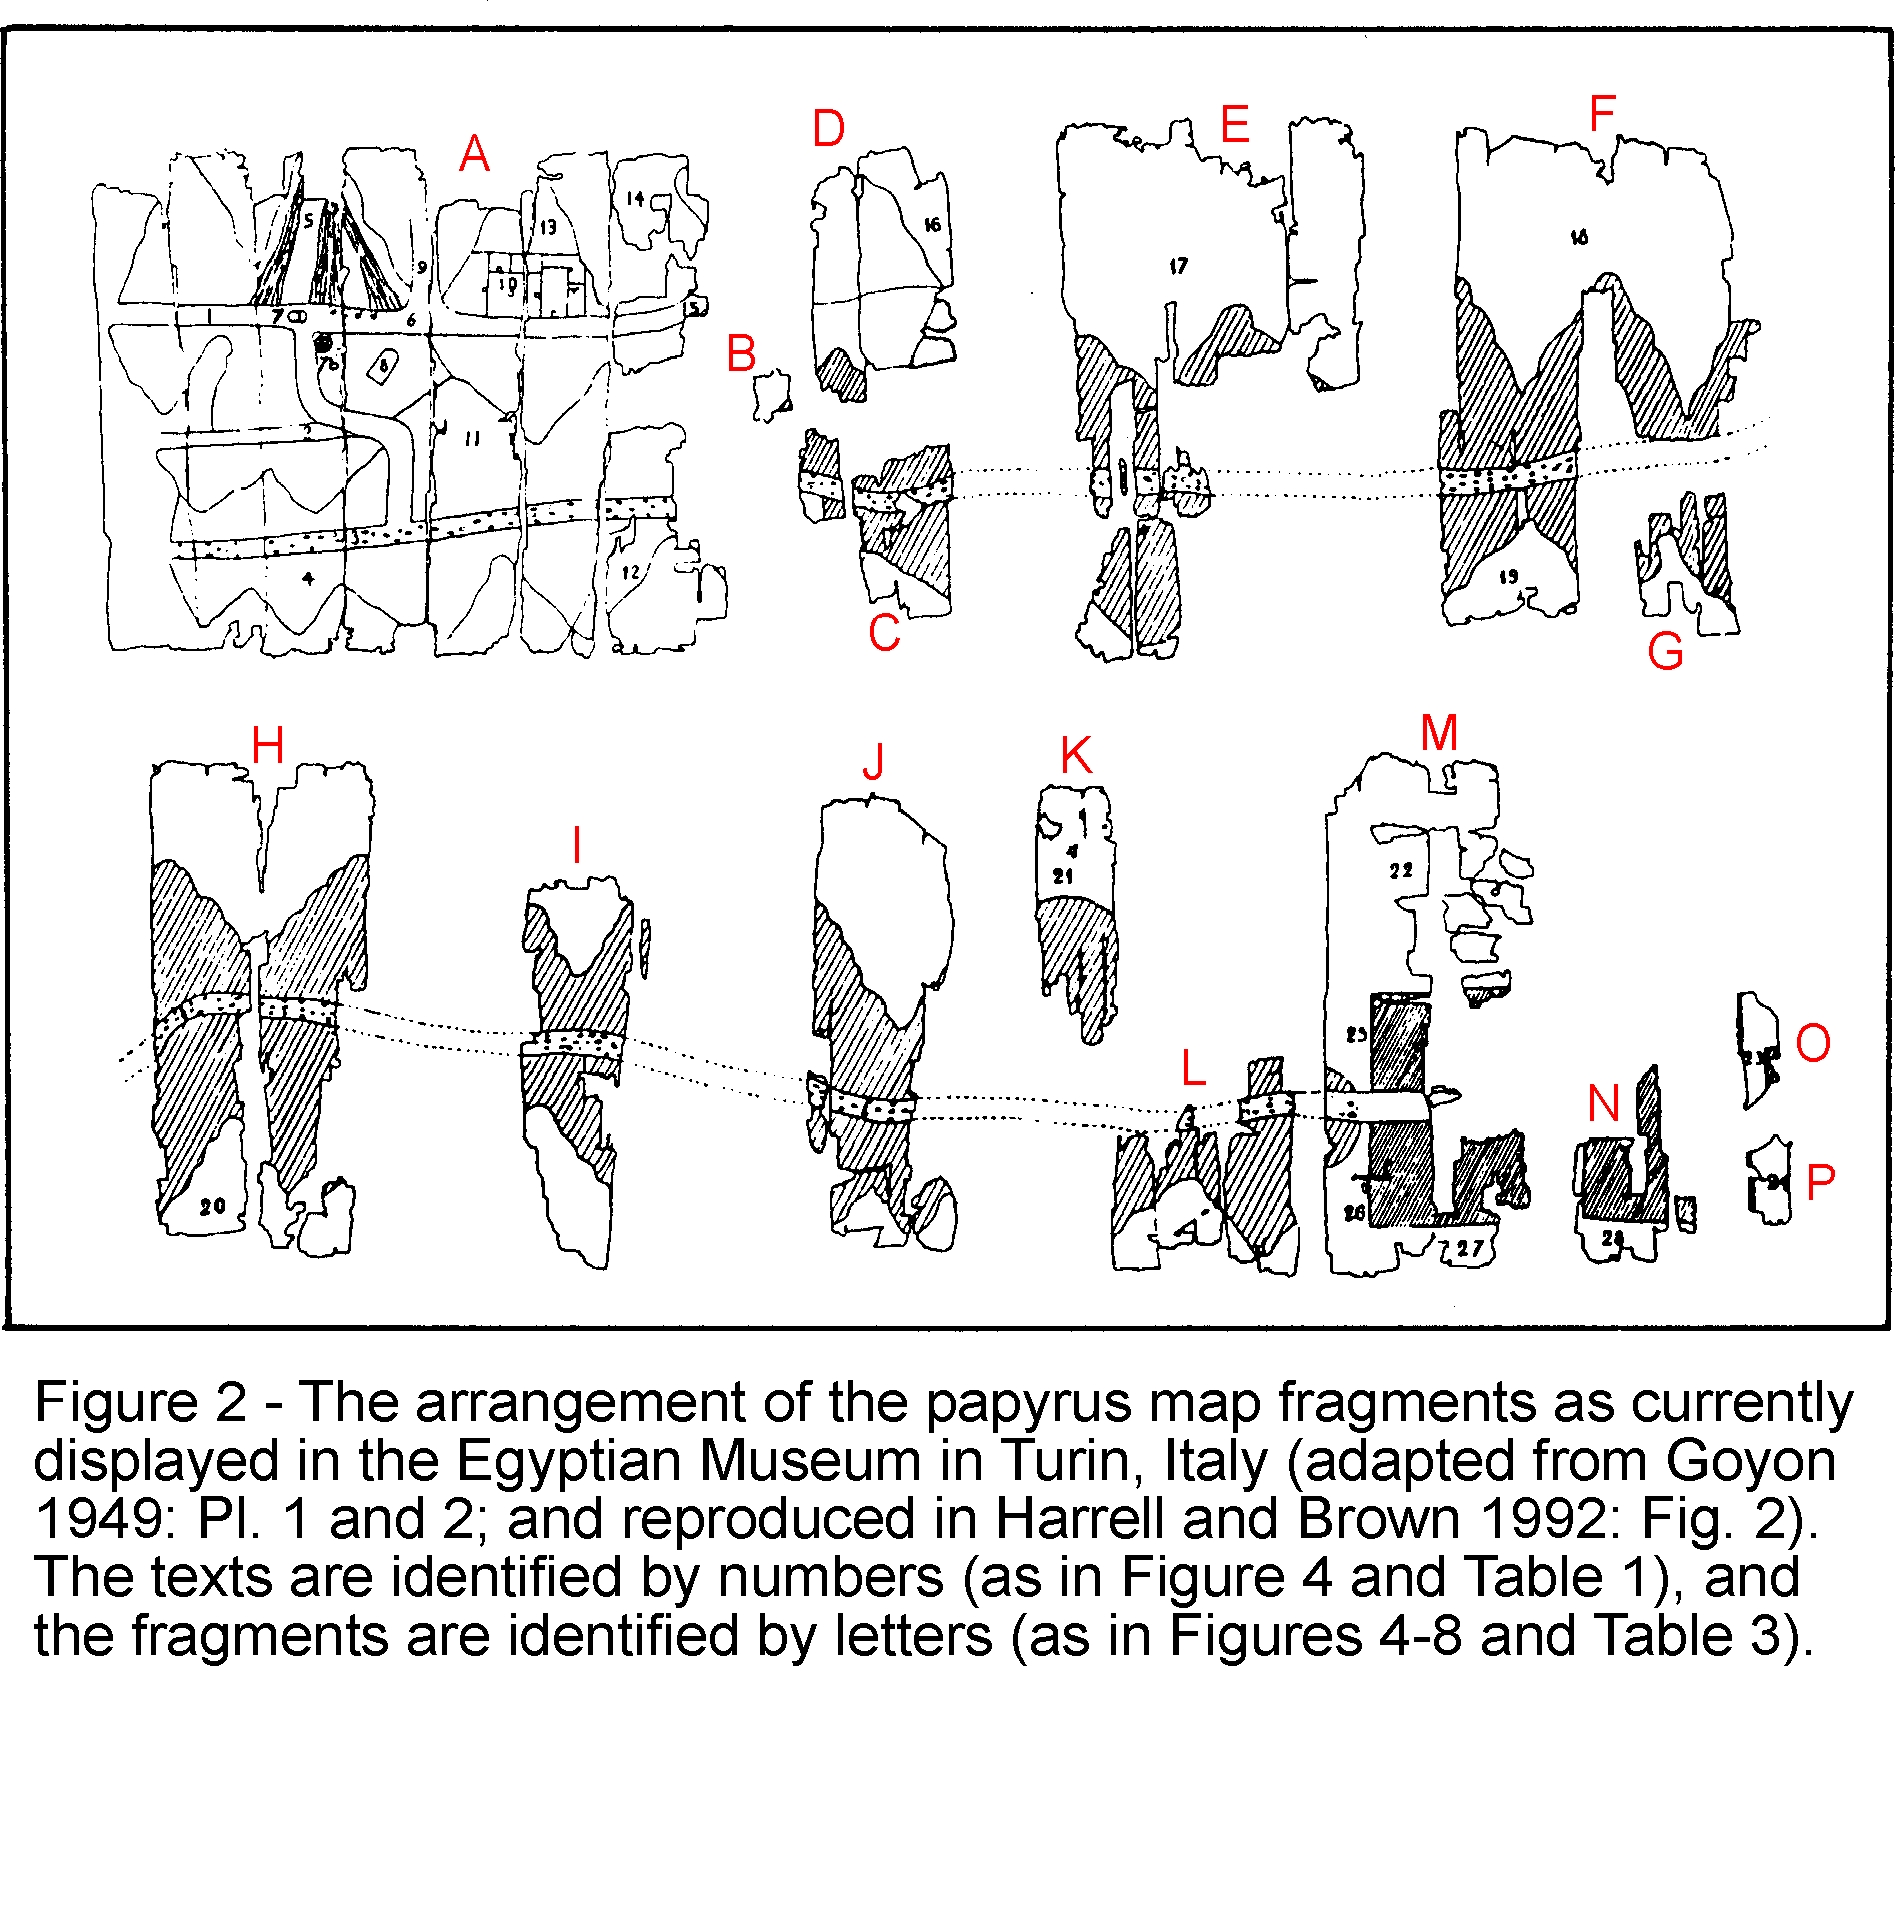
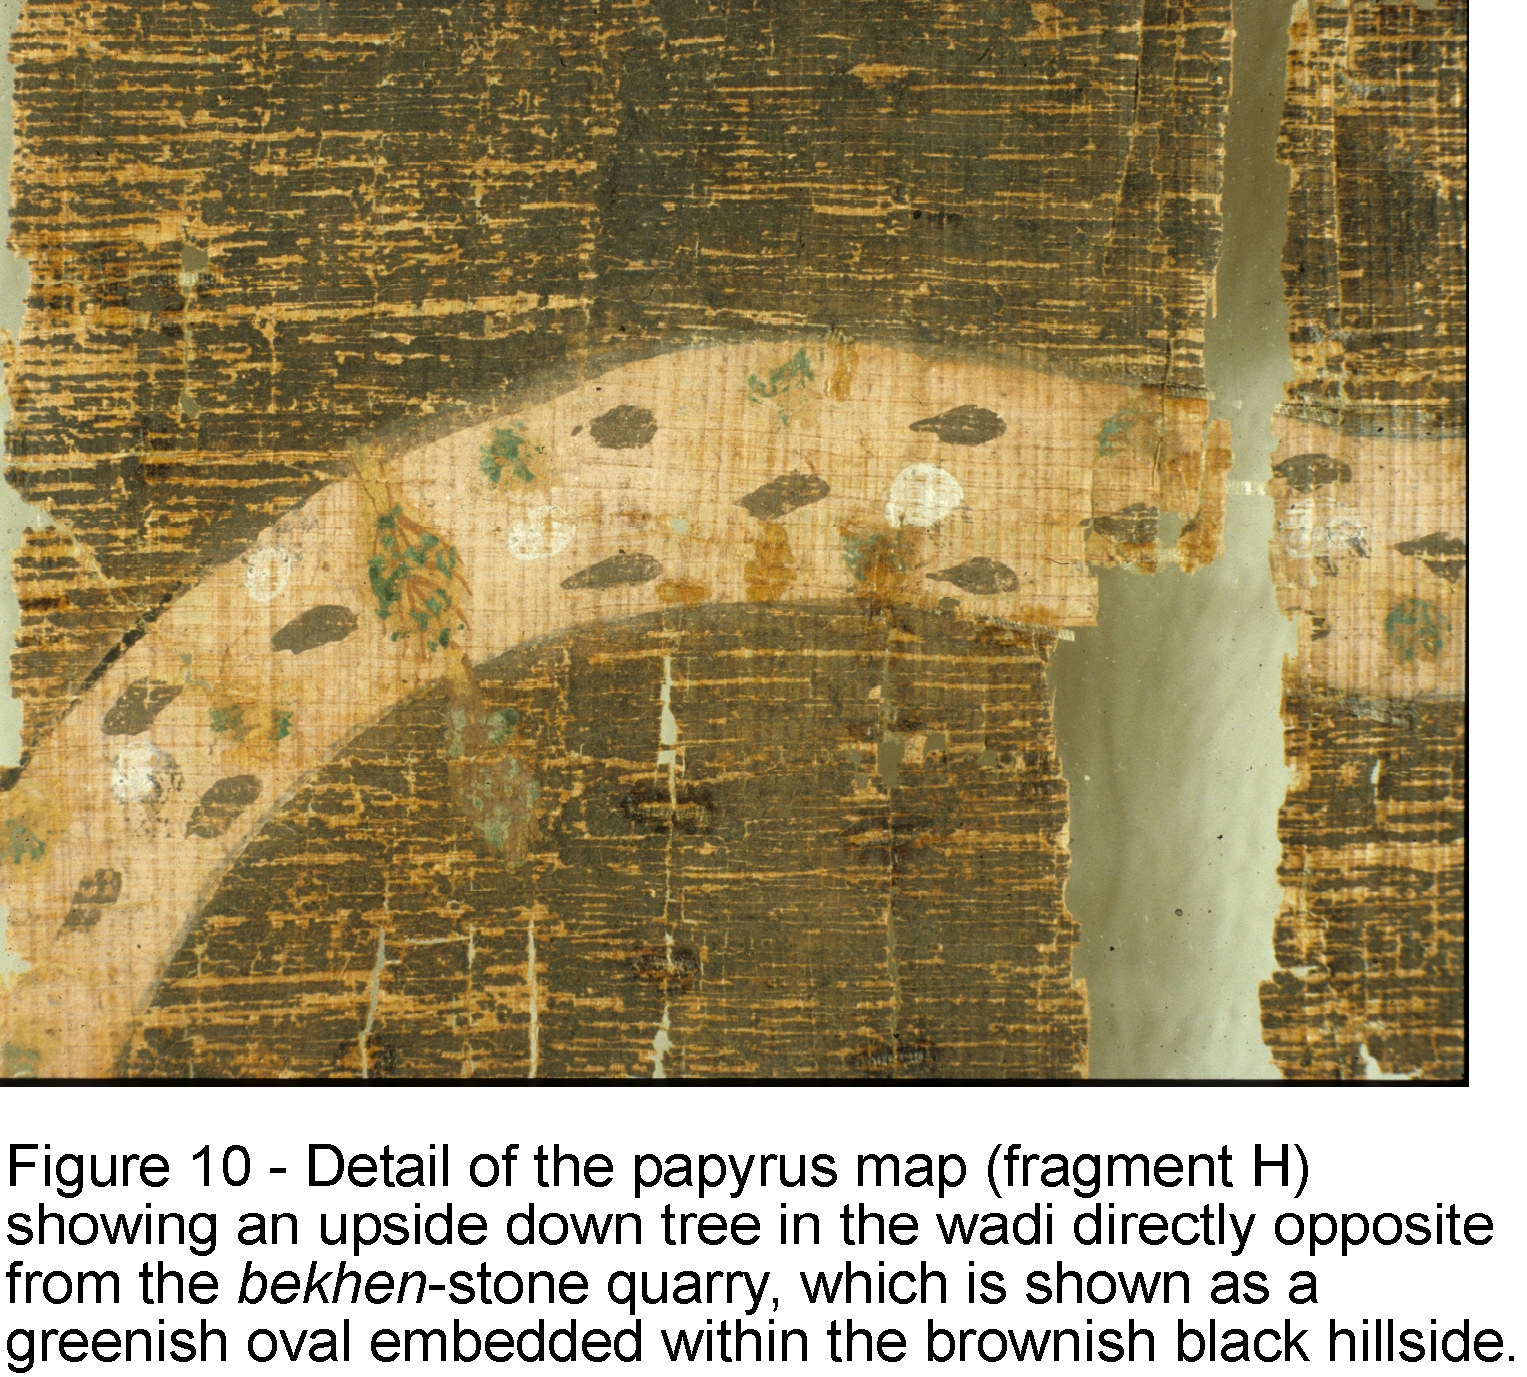
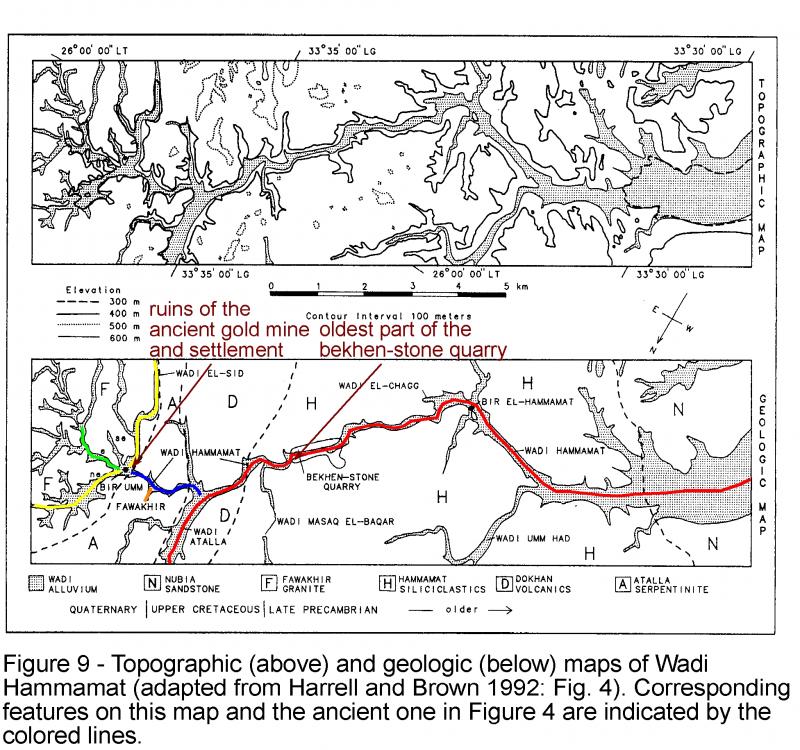
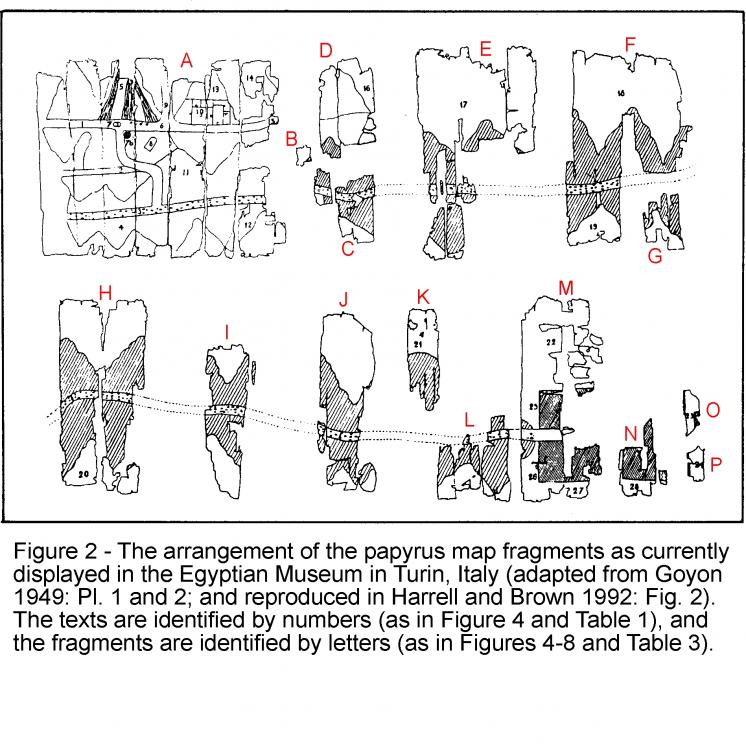
Hi, friends, I have come across the first known document of topographic cartography which apparently is the "TURIN PAPYRUS MAP FROM ANCIENT EGYPT". Details in a good article here. I will probably try to make a map inspired in this. Uploaded some images from the article in order to inspire others. By the way I feel a lack of leadership regarding map-making. More specifically I think a sticky post in Scenario Design/Map making with a list of desired maps is a MUST. If so, then you can have a ROADMAP of any campaign you want to design and anyone willing to start a map from scratch but lacking ideas can help better and quicker. Thanks, will post the map if I achieve it.

-
Hi, friends, I have come across the first known document of topographic cartography which apparently is the "TURIN PAPYRUS MAP FROM ANCIENT EGYPT". Details in a good article here. I will probably try to make a map inspired in this. Uploaded some images from the article in order to inspire others. By the way I feel a lack of leadership regarding map-making. More specifically I think a sticky post in Scenario Design/Map making with a list of desired maps is a MUST. If so, then you can have a ROADMAP of any campaign you want to design and anyone willing to start a map from scratch but lacking ideas can help better and quicker. Thanks, will post the map if I achieve it. P.S. I tried to delete this post because I should have posted it in the subforum "Design/mapmaking", but I do not know how to delete it. I have opened a new one in the subforum here.
-
Hi, everyone, I have been working for some weeks on mapmaking using the heightmap import from the atlas. I have found it great but found some problems I would want to be discussed here in the forum. Then (maybe) we will have a guide or tutorial with all the precious technical information about heightmap import involving all the process. Please correct me or comment as you wish, so I can edit the post and include more information. I followed the guide in the wiki, but found myself stuck some errors (my fault, but miss more technical information) before I learnt (thanks to vladislavbelov), the bit depth and format that the Atlas require for this import. However, still have questions about that: Which bit depth should I pick? 16-bit gray, 24-bit RGB (8-bit per channel)? In the guide in the wiki I can only read a generic "greyscale" Which formats are supported? BMP, PNG, JPEG, TIFF, RAW... not information about that neither, BMP appears to work, but the way bits are stored vary between these, may the results also vary? I would like to have more information or advice here aswell. Regarding the data sources I found good advise, but I would like to write a comprehensive guide on this also. The sources I found are: NASA blue marble: really great source, here you find loads of data. Specially interesting for 0ad the elevation, bathymetry and satellite images actual "colors" (to know where to apply a green or brown texture). Best of all, the images fit perfectly one onto the other cause all represent the same area and size. The disadvantage? Well... resolution might be enough for some maps, but if you want to make a big map from an small area (the island of Malta, for example), you may encounter the limits of this source. Moreover, I've noticed, the elevation is not proportional (yet should be enough for doing maps), cause Himalaya gets 255 (8-bit maximum) value, whereas greenland about 230, and Southamerica reaches 255 also. imagico.de: awesome, a search tool for various data sources. Sadly most sources only have data from America, while the civilizations present in 0ad are from Europe/Asia/Africa. Yet you get very very good resolution indeed, but only for elevation, bathymetry is missing. What can you do? Well, I have found no better solution but getting this greater resolution images for the most important in gameplay elevation (Earth part), and combine them with the coarse NASA blue marble bathymetry data. I have even written a macro in a scientific imaging analysis tool (ImageJ) for this purpose, given some coordinates and pertinent images, however, I have not been capable of doing a proper and beautiful heightmap import, tend to mess everything during my struggle. Perhaps, if I had more info about the required formats for the Atlas I could fix it. One thing really cool about the data I selected in this search tool (J. de Ferranti) is that images are in 16-bit, so data in Z-axis (height) can have a lot more resolution and (not sure about this, but tested on Sicily's mount Etna) it stores actual elevation in meters. In the case of mount Etna I measured values around 3200-3300 m which is really close to its true altitude. What about that? Well, if you know your image is 1 degree x 1 degree (width x height), the Earth's radius and that elevation values are real, you can work out a 100% REALISTIC MAP! when it comes to elevations. Cool, uh? Yet, I still struggle with the formats and Atlas import as I stated above. Global Data Explorer (powered by GeoBrain): thanks to niektb, for this source. He made a video tutorial about getting data from there and so on. Have'nt tried yet (needs login, and my laziness... well... ), but seems easy to navigate and download, but guess no bathymetry is found. What about its resolution, bit-depth, etc? ... there might be more data sources out there, any collaboration is welcome! Just a final comment regarding realistic maps (which is my goal to achieve realistic historic simulation). Does anyone knows where we can find data about sea level about 1st century A.D.? The coastline might have changed quite a lot. Other factors might have modified this also (read the text below the linked photograph). Well... what do you think? Suggestions? Can we push a bit further the heightmap import?
-
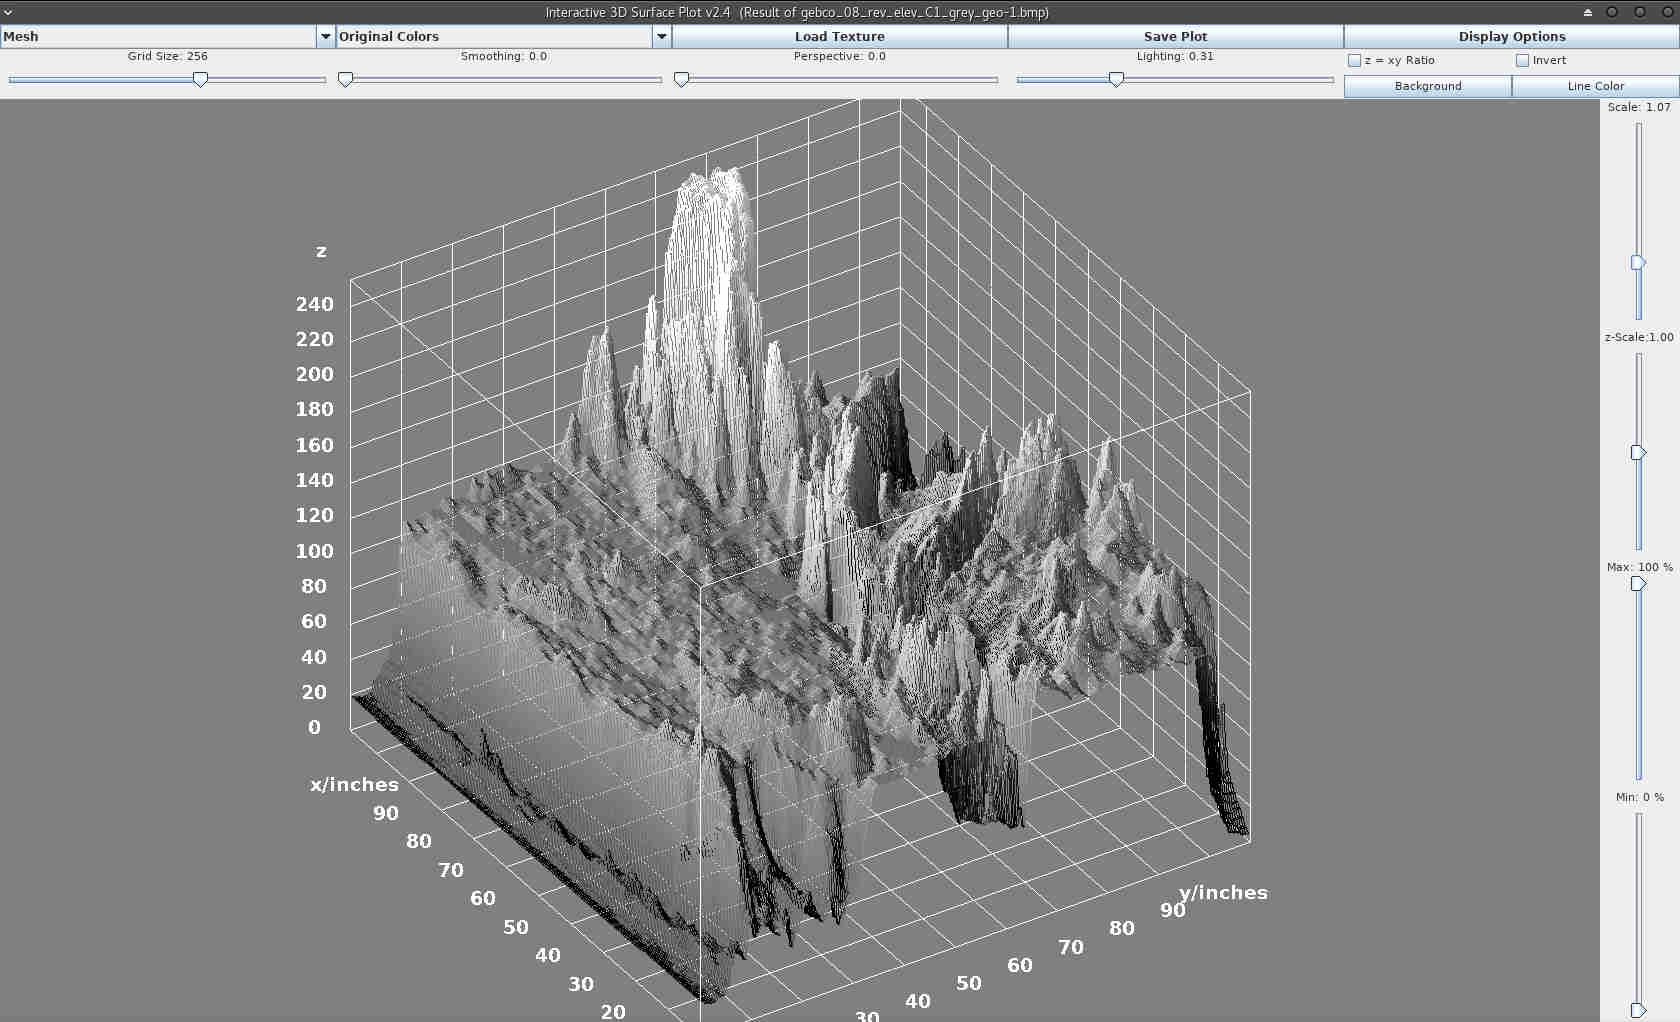
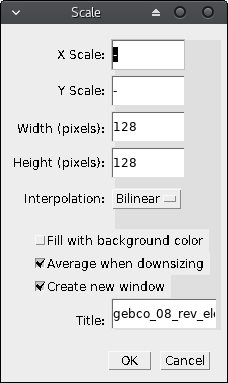
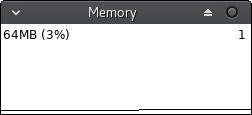
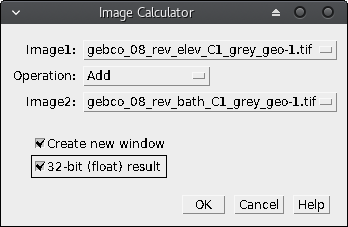
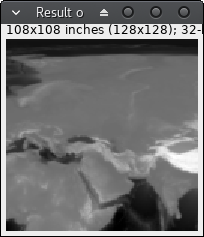
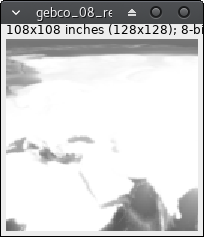
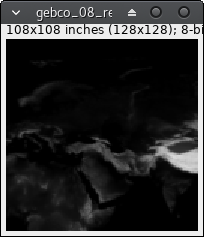
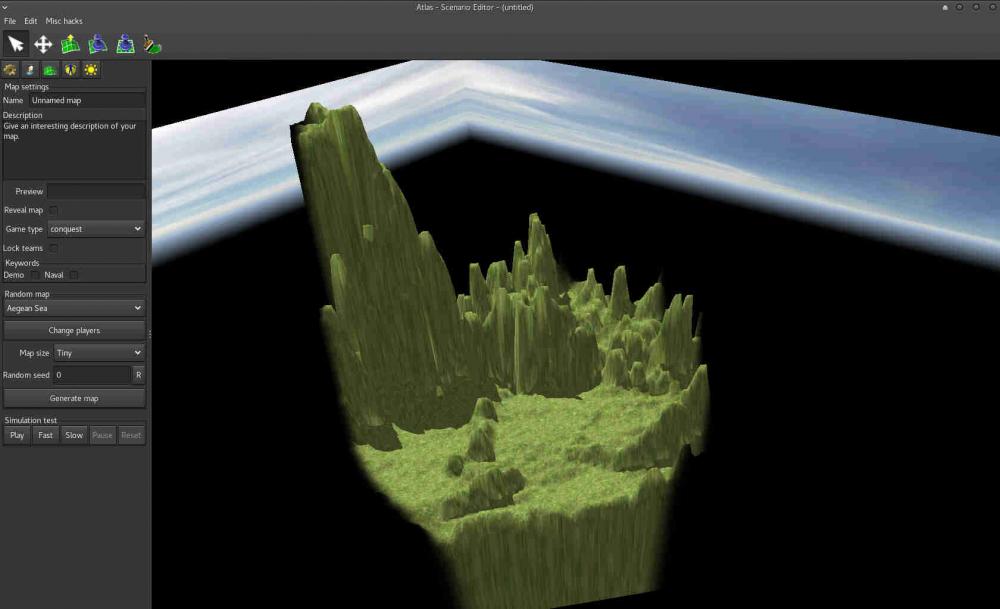
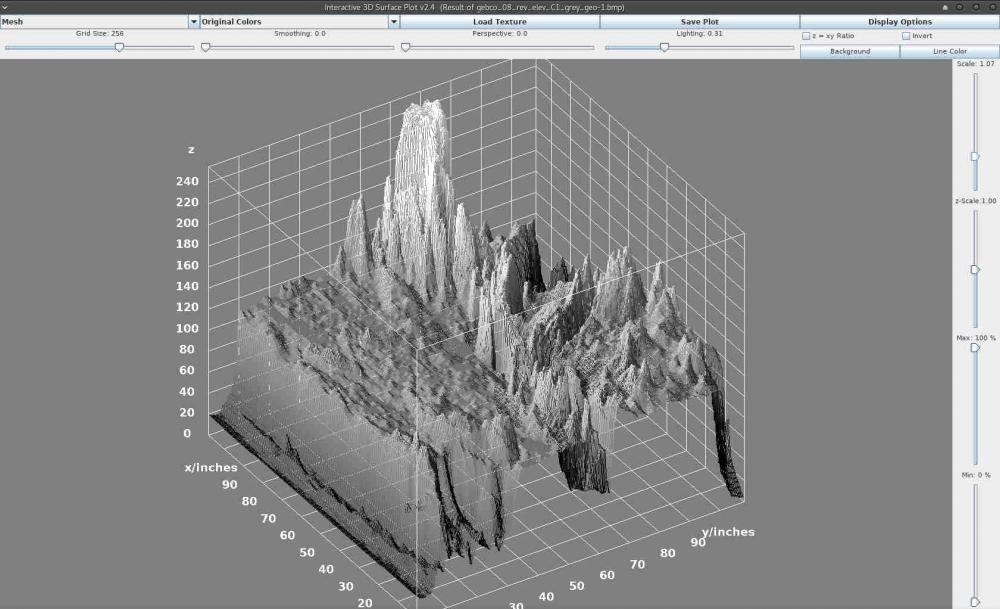
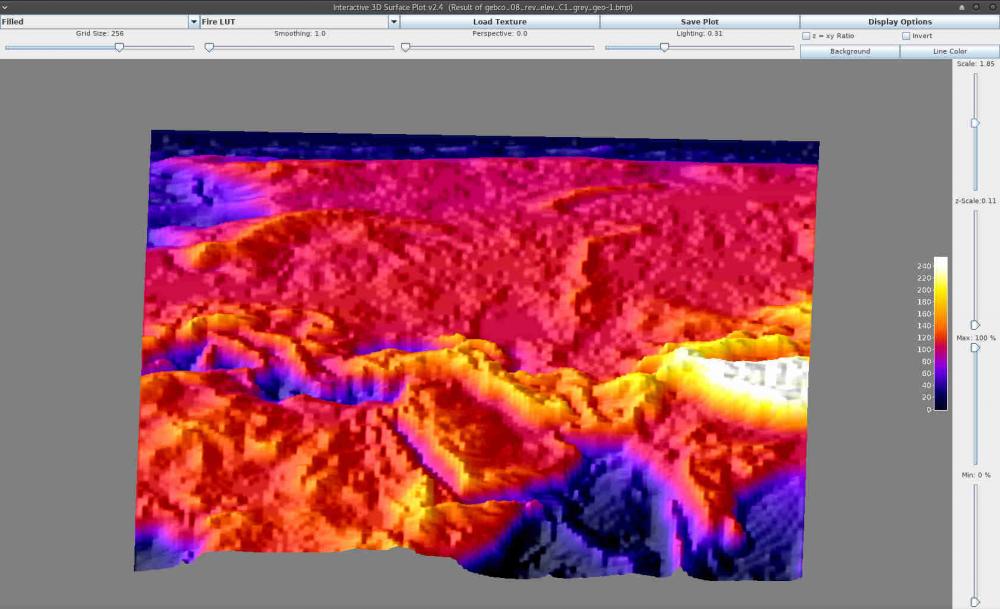
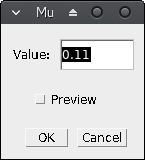
Been trying to master the Heightmap import from the editor, found quite limited in input options as Palaxin's noted in the Height guide. As I have some background on scientific imaging software I started playing around with elevation data here and there and found that there is need for more control on horizontal scaling (the map) related to height scaling. Aswell as (maybe) simpler way of preparing image data for heightmap import in the 0ad editor. ImageJ is an open-source image processing and analysis software written in Java. It is a multi-purpose piece of software very well suited when working with (very) different types of images, specially for scientific analysis. It has the advantage of allowing the extension of software via macros (very simple scripting language for repeated processes) and plugins (Java coding), so anyone can share any piece of code for automating the preparation of geospatial data for the (great but currently limited) heightmap import in the 0ad editor. One of the problems I found first is when I try to prepare a very small map (e.g. 128*128 pixels) having the height values from 0 to 255 (8-bit per pixel) the elevation (z-axis) has too much range whereas the map surface (x,y axis) has too little. Moreover, even if you don't have this problem, you may find in the need of controlling the z-axis scale independently from x,y (to obtain not too steep mountains or not too shallow cliffs, etc. depending on the case). This is precisely the problem I am going to address below. Preparing your system Install ImageJ from its download website (I recommend using your distribution repository if you use GNU/Linux or the platform independent download for other system if you already have Java already installed as ~99,99% people does , if it does not work refer to the documentation or try your platform download ). Download elevation and/or bathymetry data. For simplicity I've selected NASA Blue Marble image series as with this data source you have elevation and bathymetry on the same scale so both maps fit perfectly. I'll use the C1 area that includes the Mediterranean Sea as can be seen here. And download both the topography and bathymetry. Remember using right-click/save-link-as... cause the images are huge and you don't want to crash your browser. Select in both the same areas. I've picked C1. Basic map preparation Start ImageJ, you should see something similar to this: It's a tiny window for a great program don't let you misunderstand this: size in this case DO NOT matter. Open the elevation file, either using menu File/Open... or drag and drop. It is quite big, I strongly recommend you downsample (scale) it before continuing. So click menu Image/Scale... or just press Ctrl+E. I'll pick 128x128 px for showing you the problem with this kind of tiny sizes. I recommend "create a new window" option as I have experienced some weird problems if not. Just close the source image after finishing. If you believe your machine and patience can stand huge images skip scaling. If you prefer cropping than scaling try yourself, this is beyond the scope of this basic tutorial. Just try menu Plugins/Macros/Record... before cropping and guess how to repeat exactly the same crop in the bathymetry image. Further on this: write me or comment this and I will try to post and advanced tutorial on this. Maybe you've seen an error in the log: <Out of Memory>. If so you will have to close ImageJ and start it from the command line with the memory option. In my GNU/Linux it is -x (I guess is the same in other systems, but maybe with whole path before the command in windows): imagej -x 2048 As 768 MB is currently the default limit, and I have 6GB I guess 2GB will suffice (2048 MB). Of course do not reserve too much memory or your system might crash (you can see the free available memory in your task manager or sort-of). Now you can repeat 2, 3 steps until you achieve your wanted image. Close the big one, you want to preserve your memory. If you want to check the available memory ImageJ ships with a tiny monitor: menu Plugins/Utilities/Monitor Memory. You'll see a new tiny window and if you click on it the program will force garbage to be collected and reduce the memory used. This is very handy, if you find the memory usage is growing too much just click the monitor. Also you can click the status bar of the main window and there will appear the program info including its memory usage. Save your file. Either using menu File/Save... or hitting Ctrl+S. The default tiff file will suffice and preserve our original 8-bit pixel depth data. Repeat steps 2-5 with the bathymetry data. You should end up having two (not so big) images with the desired data. Now the magic comes. As I've mentioned above as NASA data uses the same scale and regions for all maps, now we have both elevation and bathymetry data from the very same region. Let's join that. We will use the image calculator. Think of it as a per-pixel calculator, so having 2 opened images of the same size from the same region you can combine it's data and finish having a bathymetry+elevation image. If you hover your mouse over any of the images you will see the value of the pixel under the mouse in the status bar, such as: x=23, y= 46, value = 125 note that x,y coordinates might be expressed in pixels or in inches or any length measure. Remember the value is the 8-bit value (0-255) for each pixel. If you explore a bit, you'll note the elevation image store 0 in the sea level whereas in the bathymetry the earth (above water) level is stored as 255. This gives us the clue to guess the kind of calculation we should choose. Now click menu Process/Image Calculator: So if we add the two images we will have both bathymetry data (from 0 to 255) and elevation data (from 256 to 511) merged into a new image. Please, note that if you do not use 32-bit result you will obtain an 8-bit data with the result of data loss (because with 8 bits you can store up to 256 values). Create a new window is also recommended option always. bathymetry + elevation = result + = Now, when you start thinking you have the perfect image to import on the 0ad editor, you save it (tiff will maintain all your precious data), then you just need to change the image type to RGB (menu Image/type/RGB color), then save it (menu File/Save as/BMP). Go to the 0ad editor import heightmap and get a horrid result: But this is not the end of the tutorial. Remember the z-axis (or height) scaling problem? Here you can see it. Let's address that. Ok, let's return to ImageJ and close anything but the result window (or reopen the tiff saved in 8). Click menu Plugins/3D/3D Surface Plot) There goes the result. The appearance is similar to the map generated by the editor, but you have now 3D superpowers. Have a look and play around: above you can change the visualization type (drawing as a mesh, dots, etc. and colors). At the right you can see Scale (zoom the visualization) and the most important z-Scale. Change the z-Scale value until you like the result and take note of the z-scale value (in my case 0.11). Return to the result window (elevation+bathymetry). Click menu Process/Math/Multiply... Type your desired value, OK and voilá! The image might have appear to become invisible, but the data just have changed (each pixel value has been multiplied by 0.11) You can save this tiff with another filename, such as "corrected" or -0.11 or as you want. Then repeat step 8 (type RGB save as BMP) and import it in the editor. THIS IS INCOMPLETE. SORRY FOR THE INCONVENIENCE BUT I'LL TRY TO FINISH THE TOPIC WHENEVER POSSIBLE.

-
Cool, I see the battle of Messana looks great. Can you post the map so that we can try it? By the way, how are the other battles going? Has anyone got work in progress? If so, please let us know in order not to duplicate work. Lately I was trying to build maps from height maps so I could help in this project. Is it ok if I try to make some preliminary maps for the battles suggested? Is anyone working on this? Thanks. Good work!
-
I have found the origin of the JavaScript errors while playing. In the XML there are some entities from an unexistent Player 3. Just search "<Player>3" string to find them and thelete the whole <Entity> tag (from <Entity> to </Entity>) In all Player 3 entities. leper: I am looking for the logs from the Javascript console, and in the data Paths that appear in the wiki I cannot find this. Lankusnav: Glad to hear you removing the scorpions, but... have you uploaded the map? I have found no link in your post. If you upload it again I can fix the XML part. And then focus on the Petra AI inactivity. Yes, I have tried them. Same cascade errors. I will have a look to javascript logs if I find where are they stored, any clue on that? If you achieve something before, please notify it on the forum. Regards. Hello, I'm glad to see the map developmet was useful. Regarding the errors: Don't know why or how to fix this. I'm a newbie still :-D No clues with this, however I have experienced my editor crashing with heigthmaps import. I use the x64 GNU/Linux version. Might error be related to this? Despite this editor limitation I take it into accout as a disadvantage of the Roman player so if the player does not take into account this he/she will loose the advantage of roman forts. If the Scorpio units issue remains (they couldn't be deleted or modified), they might be possible to find them and delete them in the XML file by an XML editor. Do you know which uid these scorpions have?
-
Hi, I am trying to learn how to import heightmaps in order to collaborate with mapmaking, but find an error after importing the file. It is: BMP format 128x128 px 8 bit gray-depth but RGB color mode I am using Linux x64 and 0ad version Pyrogenesis 0.0.21 After some time working, the editor opens a window with the following error: Function call failed: return value was -120102 (Invalid/unsupported texture format) Location: tex.cpp:124 (tex_validate_plain_format) Call stack: (0x8fc9ee) /usr/bin/pyrogenesis() [0x8fc9ee] (0x8bd0e9) /usr/bin/pyrogenesis() [0x8bd0e9] (0x8bd4b5) /usr/bin/pyrogenesis() [0x8bd4b5] (0x8bd838) /usr/bin/pyrogenesis() [0x8bd838] (0x8f250d) /usr/bin/pyrogenesis() [0x8f250d] (0x8f36c4) /usr/bin/pyrogenesis() [0x8f36c4] (0x8f4c56) /usr/bin/pyrogenesis() [0x8f4c56] (0x81bea0) /usr/bin/pyrogenesis() [0x81bea0] (0x7e23e3) /usr/bin/pyrogenesis() [0x7e23e3] (0x7f9c7665f2e7) /usr/lib/libpthread.so.0(+0x72e7) [0x7f9c7665f2e7] (0x7f9c763a054f) /usr/lib/libc.so.6(clone+0x3f) [0x7f9c763a054f] errno = 0 (No error reported here) OS error = ? Any ideas? could you try my image and tell me if you are able to generate a map with it? I have attached both the BMP and the original image file. Messina.tif Messina-substract-8bit-128.bmp
-
Yes, I have tried them. Same cascade errors. I will have a look to javascript logs if I find where are they stored, any clue on that? If you achieve something before, please notify it on the forum. Regards. Hello, I'm glad to see the map developmet was useful. Regarding the errors: Don't know why or how to fix this. I'm a newbie still :-D No clues with this, however I have experienced my editor crashing with heigthmaps import. I use the x64 GNU/Linux version. Might error be related to this? Despite this editor limitation I take it into accout as a disadvantage of the Roman player so if the player does not take into account this he/she will loose the advantage of roman forts. If the Scorpio units issue remains (they couldn't be deleted or modified), they might be possible to find them and delete them in the XML file by an XML editor. Do you know which uid these scorpions have?
-
Hello, I'm glad to see the map developmet was useful. Regarding the errors: Don't know why or how to fix this. I'm a newbie still :-D No clues with this, however I have experienced my editor crashing with heigthmaps import. I use the x64 GNU/Linux version. Might error be related to this? Despite this editor limitation I take it into accout as a disadvantage of the Roman player so if the player does not take into account this he/she will loose the advantage of roman forts. If the Scorpio units issue remains (they couldn't be deleted or modified), they might be possible to find them and delete them in the XML file by an XML editor. Do you know which uid these scorpions have?
-
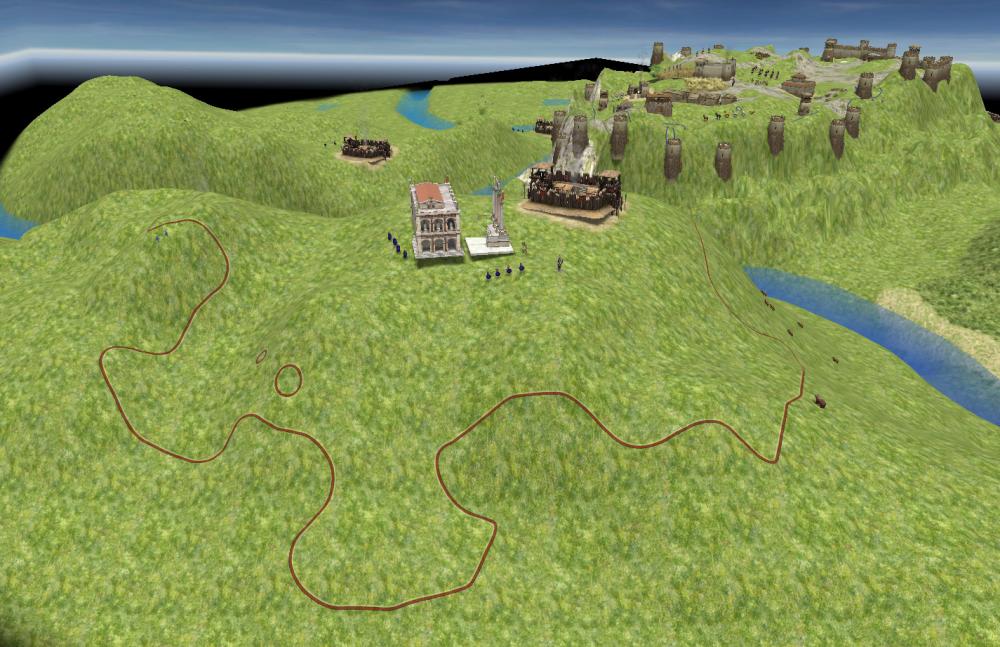
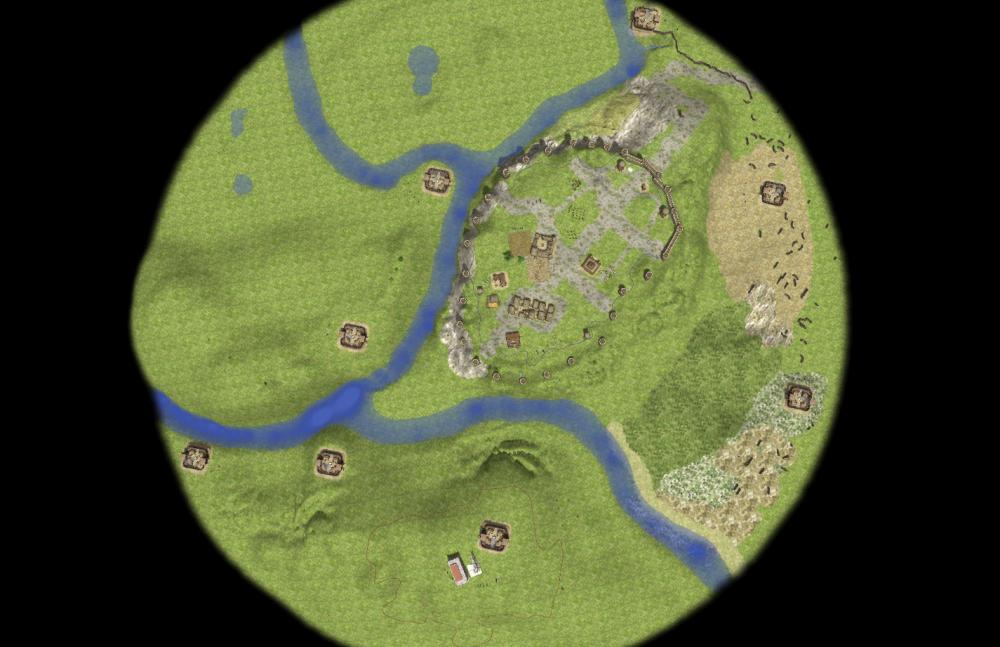
Hello everyone, I am a newbie but wanted to test how the 0ad map editor works so I tried a map of the Battle of Numantia (Celtiberian city that was besieged by the romans) in the 2nd century BC. It is unfinished, but I share it in this post. You are free to use it. The terrain is more or less accurate as I have copied it from the map (however I have drawn it by hand), aswell as the roman fortification spots. Tell me if it is interesting in order to develop it more or not. The city finally was burnt by their own inhabitants to avoid the romans to take it and they killed themselves before becoming slaves. Numancia.xml Numancia.pmp