Wijitmaker
-
Posts
9.675 -
Joined
-
Last visited
-
Days Won
12
Everything posted by Wijitmaker
-
Task 60 [Deer]
Wijitmaker replied to ewu_swarrington's topic in Game Development & Technical Discussion
Hmm, Michael has a good point, but it would be nice to have grazing be a part of the idle animation. I wonder if we might need 2 more animations... One animation of the deer stationary grazing (start and stop with head down), and another walking very slowly with head down grazing. It might take some tricky AI to splice the animation sequences together correctly though. I'll see if I can get Matei's input. -
Task 60 [Deer]
Wijitmaker replied to ewu_swarrington's topic in Game Development & Technical Discussion
Well, I looked at the videos briefly last night. It is a good start. One of the things I noticed was that the run wasn't really a deer running motion, it sort of looked like a horse. Deer/Gazelle/Antelope 'bound' rather than gallop. I'm trying to find some references for you. YouTube is a good place to start. This is the best I can do on my lunch break -
Task 60 [Deer]
Wijitmaker replied to ewu_swarrington's topic in Game Development & Technical Discussion
This is a bit of an oddity in CS, I don't know why they do this, but you have to specify exactly what kind of a movement you want when you move the Biped center of gravity (that ball thing in the pelvis). See this image: Where that last arrow on the bottom is pointed. You toggle between those 3 options: I don't think it is very intuitive, but it must have been done for a reason... ask Brian Note - don't have that biped character depressed like that first image has - that would modify your default biped structure which you don't want to do, that shouldn't be blue when you click those three options. -
Task 60 [Deer]
Wijitmaker replied to ewu_swarrington's topic in Game Development & Technical Discussion
Quite the mystery, but I think I solved it (I hope) What I ended up doing was to use the clavical for the upper shoulder region so now the deer walks on it's feet. I think Michael is right, horses and elephants walk on their toes. I'm not sure the deer do to the extent of the horse. See here: http://www.oricomtech.com/projects/leg-anat.htm So, I reversed the direction of the arm movement, and made the hoof the hand rather than a finger. Also I changed the biped to "classic", which in my opinion is easier to work with and modify perfectly to meet your needs for a non-human. Note that you can 'edit mesh or poly' on every one of the pieces of the skeleton to modify them how you want. Just be careful to keep the pivot between the joints where you want them, because it is easy to modify the meshes to an extreme and loose representation of the pivot. Go ahead and modify the mesh and the skeleton to your needs for the length of the joints. I froze the deer in transparent, in case you wonder what is going on there. I also left a copy of your deer skeleton there for reference. -
Task 60 [Deer]
Wijitmaker replied to ewu_swarrington's topic in Game Development & Technical Discussion
Hmm, I'll take a look at the file in your task folder tomorrow. Should be something that could be done. -
Low Poly Modeling and Smoothing.
Wijitmaker replied to ewu_swarrington's topic in Game Development & Technical Discussion
Sorry, didn't catch that question, if you see it - looking horizontal to it, you can generally leave it. If you start to pitch the camera down and start to look up, you could probably remove many of those polygons. RTS games don't usually offer a FPS type camera view unless there is some sort of special cinematic. -
Task 60 [Deer]
Wijitmaker replied to ewu_swarrington's topic in Game Development & Technical Discussion
That looks pretty good Steve! Excellent for a first time biped animation! The gif plays kind of fast, so its hard to tell exactly - but one thing I noticed is that the animation for the game needs to start and stop with the same pose so that it can loop. For that reason, you might not want to have the deer actually step forward so much in attack, but perhaps simply lunge. Feel free to upload .avi files to the SVN folder for the task and we can review them there -
Student Created Reference
Wijitmaker replied to ewu_swarrington's topic in Game Development & Technical Discussion
Steve, I didn't get the building final tweaks done - but I uploaded to SVN what I've been doing. I also have your deer task created for you. I have all day tomorrow (wife doesn't get home till 9) to work on these - Michael and I should get a screenshot for you by the end of the week. -
Low Poly Modeling and Smoothing.
Wijitmaker replied to ewu_swarrington's topic in Game Development & Technical Discussion
Yeah, this isn't a prop, this is a full fledged building -
Low Poly Modeling and Smoothing.
Wijitmaker replied to ewu_swarrington's topic in Game Development & Technical Discussion
50 seems really low - I think you would be able to go up to 200 or so for those (what does the art spec say for buildings)? -
Low Poly Modeling and Smoothing.
Wijitmaker replied to ewu_swarrington's topic in Game Development & Technical Discussion
Check this out Steve - I found this today for you. Hopefully it helps with smoothing groups: http://www.free3dtutorials.com/index.php?t...ftware=1&id=104 http://lounge.ego-farms.com/ <= also some great tutorials I'm unfortunately not going to be able to finish reviewing the roman buildings today nor get you the deer task. I'm not sure if I'll get to the computer again till Tuesday. Carry on with the deer though (but it kinda looks like a moose ) -
Student Created Reference
Wijitmaker replied to ewu_swarrington's topic in Game Development & Technical Discussion
hehe, no worries. Deer? That is a good choice. Challenging though because it requires animation. We have some meshes already created, so basically requires animation. I'll get the task created for you though today hopefully. -
Student Created Reference
Wijitmaker replied to ewu_swarrington's topic in Game Development & Technical Discussion
OK, had a chance to look at them and they good. Just a few final things to tweak. I'd like you to have the brick textures be consistent in scale. There are a few floating arches on some of the sides of walls. If you need to split up a poly to repeat a texture, that is ok too Again, great work - it has been exciting to see what you have been able to do. Once you make those changes and submit I'll get these exported and ask Michael to put together a screenshot. Lets see how they look in the game! -
Student Created Reference
Wijitmaker replied to ewu_swarrington's topic in Game Development & Technical Discussion
Nice mapping Steve! I'll take a look when I get home, only thing that looks like it might need some touch up from here is to gain some consistency in the roof tile sizing. We might want to throw some more props around the buildings too like vases, fruit, etc.. -
Student Created Reference
Wijitmaker replied to ewu_swarrington's topic in Game Development & Technical Discussion
I am typing from my phone, so I will be breif. Steve I think what you have going is good enough for this task I asigned you to. Michael's request is valid but he will/can create a seperate task for that specific temple. It isn't fair to you to redo something from the start. What you have is great eyecandy (the purpose). It can be used as a shrine. The texture scale for the roof is great. Keep matching the references. The walls were made to do as you did. -
Student Created Reference
Wijitmaker replied to ewu_swarrington's topic in Game Development & Technical Discussion
Unfortunately, the plugin only works for R6. I should have made that more clear in the documentation. The image looks great though!. What defines what is a prop and what isn't is basically what texture it uses. If it is the normal building texture, then it's building, if it uses the fancy texture with all the added stuff would be going to a central prop. -
Student Created Reference
Wijitmaker replied to ewu_swarrington's topic in Game Development & Technical Discussion
I checked out the files and fantastic, looks great Also, feel free to use File=>Merge to pull in the buildings from the reference file and use more parts and pieces from them to make your UV mapping job a little easier. -
Student Created Reference
Wijitmaker replied to ewu_swarrington's topic in Game Development & Technical Discussion
Excellent, I'll look at them in more detail tomorrow The best way I've found to do pillars is this: Select the temple - go into editable poly mode and then into element. Select the pillar. Detatch as Object (not as a clone and not as an element). Next exit the poly mode of the temple and select the pillar. Go to the heirarchy tab and click "affect pivot only" - then click "center to object", drop the z depth down to the bottom if you'd like. Then deselect "affect pivot only" Next with your column select hold down shift and drag your gizmo, a little dialog will come up and ask you how many copies you want to make. It will then create a line of evenly spaced pillars. (Copy option makes them all unique, Instance option means if you modify one you modify them all (I think), Reference means if you alter the original you alter them all - these options can be useful) Position the pillars where you want them. Next select the temple and and go to element mode. Go to the "edit geometry section" and then click attatch. A dialog will pop up, go with the default for now. Then click Ok - you should be now good to go -
Student Created Reference
Wijitmaker replied to ewu_swarrington's topic in Game Development & Technical Discussion
Looking great! Some things are easier for me to fix than explain with text. Have a look at the new file I committed (v2a). I really like the new pillar buildings, very stately - good choice. Also the inward sloping roofs - nice! Here is briefly what I did: *I added the geometry in the back door for those 2 buildings. *Fixed the smoothing on the roofs *Made the Pediments flat *Fixed some potential zdepth-fighting with the rails I added some references for you. The roof might be helpful. There are some pillars on the temple you could use - Already UV mapped. Your pillars are pretty high poly and when you have lots like that, it's good to cut down where you can. Also a nice way to cut down on polies is to delete faces that point toward the inner part of the building that nobody would see. Your steps could be simplified, or scaled up - see the steps on the reference temple. Your 2nd stories look good - I threw in the 2 story from the market reference to just put next to some of your buildings. Great work! -
Yo ~ The First of Many...
Wijitmaker replied to ewu_rpike's topic in Introductions & Off-Topic Discussion
Welcome Becky, I don't have you down for a task yet, have you chosen one? If so, let us know in the Academic forum please. -
Student Created Reference
Wijitmaker replied to ewu_swarrington's topic in Game Development & Technical Discussion
Ok, well I had a chance to look them over and here are some tips Please don't take the feedback personally. I was going to do an image of each and try to show you with pictures the issues with each one, but it took me an hour just to do one... so I'll try typing a description and I'll clarify as needed. I'm going to number you buildings from the photo you took, 1-4 on the back, left to right. 5-7 on the front left to right. Here are a few generic comments that apply to most all of them: Roofs can be detatched and be enlarged just a touch to drop down over the building, it give an appearance of more geometry than there really is. There is unneeded geometry on the underside of some buildings. This helps me find it... right click a building go to properties and turn on backface cull, that will show you how the building will look in the game (because we don't have 2 sided objects in the game). The smoothing groups in many of the buildings are messed up. What I would do is select the building (ignore props like windows, posts, etc...) in poly mode and do an autosmooth with the value of 15. It is also easier to see without a material and just a simple color. Also you might want to turn up the ambient light in the scene from black to a dark grey. In general your buildings are short, I think it is because your second story is short. Compare the 2 story buildings to the other 2 story buildings that were given as reference. Building #1 - I like the style and this was the first one I did with the photo so I'll upload that as a reference to the comments. *Top left of the image shows smoothing issues (see below) *Bottom left shows some duplicate geometry, when I selected the face - do you notice the zdepth-fighting? *Bottom right shows an arch that seems to be off on the right side *Top right image shows a lot of duplicate geometry in the roof *I needs some more props (windows?) on it's walls, kind of bare Building #2 - Looks good, I remember seeing lots of this style shown in the reference images. *Make the second story taller *I'd like to see some more geometry under the eaves, right now they are just flat plains. Have a look at the reference building that has the crane with it, see how those eaves were done. Notice how it has much more depth to it than a flat (no thickness) plane. *The posts can be made thicker, note the object titled 'port' in the reference model Building #3 - One of my favorites of your buildings! It has a unique Roman look to it with lots of detail *Make the second story taller *Back door needs some geometry on the right side of the entry (left probably isn't needed because the camera would never go that deep) *The posts on the porch should just barely touch the upper beam, and could perhaps be scaled down a touch to prevent zdepth-fighting *Like building 2 the eaves need more geometry and the front posts should be made thicker *There is smoothing group problems, mainly in the back portion under the porch *Could use some props on the sides to make it a bit more interesting Building #4 - this is a very simple building. I'm not sure if it has enough roman character as it is. Could you show me what building in a reference image you were using for inspiration? Maybe find a way to give it something more that says it is Roman and not a simple box home. Perhaps you could try one of the inward directed roof buildings like what you see in ref04 and ref05? *If you decide to stick with the eave, it needs more geometry *Posts could be larger Building #5 - Same comments as 4 Building #6 - I like this building a lot too. Exact same comments as 3 actually. Building #7 - It looks like you used the hospital in ref03, I thought it would be a good reference, but now that I see it, I can't help but think it looks like a http://www.texasbarnco.com/images/horse_barn1_lg.jpg. I think it would be great if you did something that had pillars or was a defensive structure too. I'm going to ask Michael to put his 2 cents in on buildings 4, 5, and 7.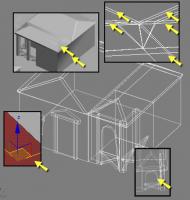
-
Student Created Reference
Wijitmaker replied to ewu_swarrington's topic in Game Development & Technical Discussion
I took a look at it Steve and just had time to open up the file (realized I had to install Max R9). I'll look at it in more detail, but one thing I noticed is that you have extra geometry showing the 'bottom' of the building. You can cut that off because it is never going to be seen in the game. -
Student Created Reference
Wijitmaker replied to ewu_swarrington's topic in Game Development & Technical Discussion
Looking good Steve, I'll check over the files today after I get home from work and give you some feedback -
Student Created Reference
Wijitmaker replied to ewu_swarrington's topic in Game Development & Technical Discussion
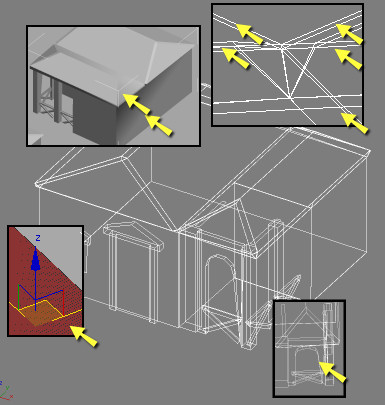
A big Ditto on all of Bobbo's comments Just a few quick comments - Nice work! I like the wireframe images you posted - it is easier to help give feedback It looks like you rescaled the door and window? That is a no-no per the task description document. If you would like to use that door, you will need to either raise up the roof line or remove the decorative triangle piece from the top of the door frame. Like Bobbo mentioned - the decorative caps on the edges of the roof lines goes a long way. Your pitch on the roof looks a little steep.
-
Student Created Reference
Wijitmaker replied to ewu_swarrington's topic in Game Development & Technical Discussion
He doesn't have those files. He can work to the other roman structures for consistency sake. We can modify them all as required at a later date.