Leaderboard


Popular Content
Showing content with the highest reputation on 2013-08-30 in all areas
-
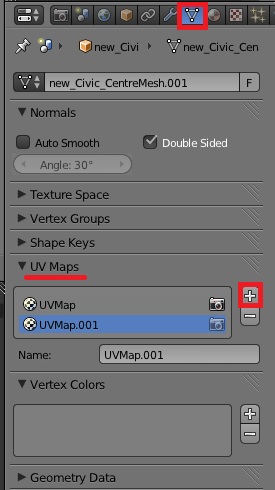
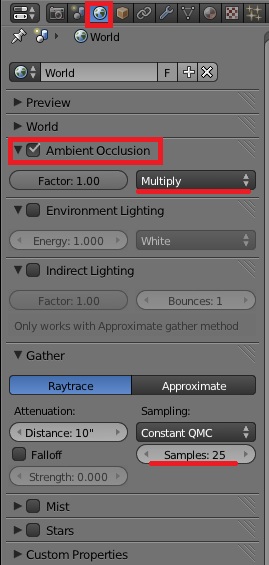
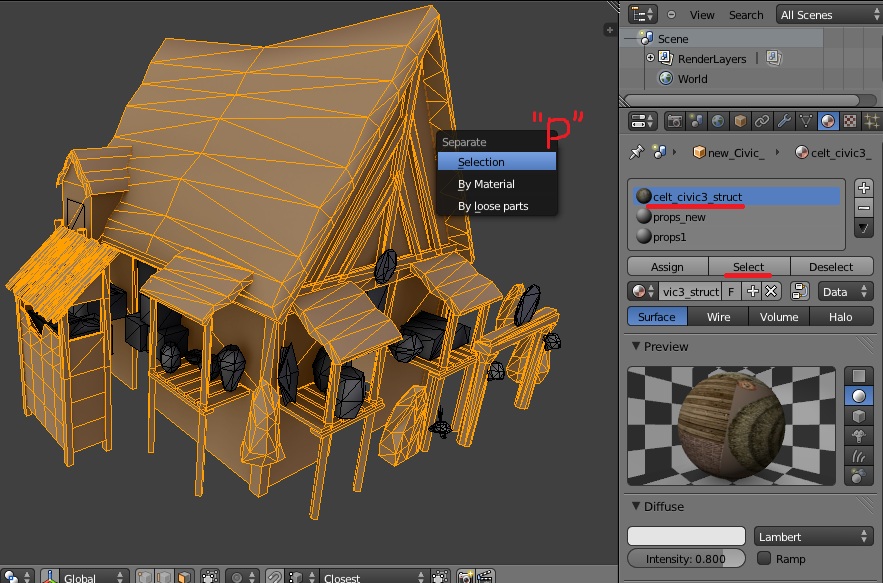
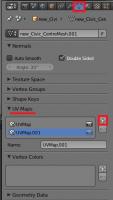
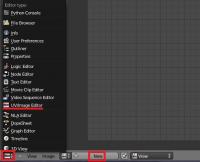
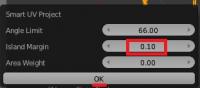
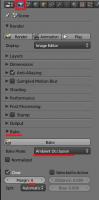
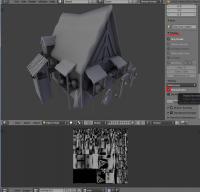
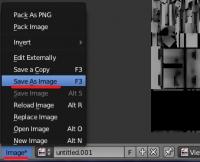
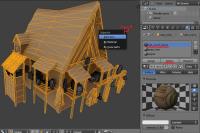
Introduction This is a guide covering how to import assets from the game to blender, create a second UV coordinates, bake the AO maps and export again. The game's buildings are usually divided in different .dae files (one per diffuse texture used) Usually, they consist in one main ".dae" file located in "meshes/structural" and one or more ".dae" children (props) that are attached to the main file, this "prop" daes are located in "meshes/props". (this is not always the case) In this example, we're going to bake the AO map for the celtic civil centre. 1.- Import the mesh into blender3D Inside blender, remove the starting cube, camera and point light. Go to file->import-> Collada (.dae) and select the .dae file to import. This building consists on three files: celt_civic3.dae, celt_civic3_props_1.dae and celt_civic3_props_new.dae If blender shows an error importing: *Note: The file may be imported rotated -90º in the X axis. To solve this, simply center the pivot point at the origin with SHIFT+C, select the cursor for your pivot point, select the asset and hit "R" for rotate, "X" for the axis, and then type "90" on the numpad and hit enter. Each time you import an asset, it is important that you create a new material with the name of the .dae or the texture that is going to use if you know it. This will let us separate the object again after we join all the meshes together. 2.- Set up a new UV coordinates. Select all your meshes and join them with CTRL+J Go to "object data" panel, scroll down to UV Maps menu and click the "+" sign to create a new UV coordinates. --Select the building, enter in edit mode with TAB. --Open a window with the UV/Image editor. Click in "new image" and "ok" in the pop-up menu. This creates a new 1024*1024 black image where we will bake the Ambient occlusion. --Now let's unwrap the model automatically. Go to object mode, select the model, use "CTRL+A" and select "apply scale" this will recalculate the scale of our building, so the polygons could be unwrapped nicely. --Enter "edit mode" with TAB. select all with "A" and hit "U" and select "Smart UV Project" in the pop-up menu. --In the next menu select the following settings: 3.- Baking the AO into our new generated black image. Preparing the AO settings: go to the "world" tab in the settings panel, mark the checkbox of Ambient occlusion and set it to "multiply". Scroll down to the "Gather" pannel and change the samples to something between 20-25 --We have the model ready to bake the AO map. Go to the render tab, scroll down to the "bake" panel (click on the "bake" pannel if it is closed) and use the following settings: --Then click "bake" and wait until the baking process is completed (this will take a while depending on your machine) --Once finished, you can hit "N" in the viewport to open a toolbar, go to the "display" menu, and click in the "texture solid" checkbox. This way you can see the AO map we have just generated on the model and check if it has been correctly generated. ------If you see black strange black faces where it shouldn't, the polygon normals are probably facing the wrong direction. This could be fixed selecting the black faces and then hit "W" and select in the pop-up menu "flip normals". ------If you find the problem where there are dotted black parts, it's probably because there are two or more polygons overlapping each other. You'll have to tweak the model sightly to fix this issue. --Once the bake is finished and you're happy with it, remember to save the image generated so it doesn't get lost. In the UV editor select Image->save image As... 4.- Separating the mesh by materials Now that we have our AO map, and the model has a second UV coordinates for the AO, we have to separate it's pieces again and export the parts one by one. To separate by materials, enter "edit mode". Make sure you don't have anything selected hitting "A" twice. Go to the materials tab, select the first material on the list, and click "select" button. This will select all the faces that have that material assigned. Once selected hit "P" and select "selection" in the pop-up menu. Repeat this step for each material (prop) you have imported. NOTE: Now that you only need to export the objects into .daes again, is a VERY NICE moment to save the .blend file in case the export process goes wrong. 5.- Exporting the meshes back to .dae files. This is the last part. You have to export the objects one by one. Make sure the following requirements are met: - There's nothing else on the scene except the mesh you want to export (even hid objects breaks the export) - You have to remove every material applied on the mesh. - There are no lights, armatures or other objects in the scene. - You have your object selected. Then you simply go to File->export-> Collada (.dae) and select the file to export or overwrite the old one. After that, reload the .blend file and repeat this step with the rest of the objects (or hit CTRL+Z a few times until you get back the other meshes and repeat the process with the next one) I hope it's somewhat understandable and useful .


 1 point
 -
Alright, I've finally been able to tame the UV mapping ! I've build a large texture image with many actual Stonehenge surface photos so that I get a wide surface on which I can dispatch the several blocks without losing too much of the rock's real texture scale. But still, the texture is a bit blurry. I'll maybe try another way to have it even sharper. For the use in Blender, I've resized down the texture to 1024x1024. The model is still not scaled to 0AD's, because the array modifier didn't allowed me to rescale the model properly. I'll do that next, now the array is applied for good.1 point
-
Good news? I hope. Waiting the new alpha!1 point
-
Hi, Just wanted to say that I am now working on finishing my model of Stonehenge. Enrique, thank you very much for the advices, that are really helpful in the process. I think I post you an update before tomorrow.1 point
-
Sorry that I have not replied for literal months. I have been quite busy with school courses for a good while and have not felt motivated enough to write another article. Now to answer the questions. Not a bad blurb! Can I put it into the Spartans house entity as-is? It's good enough for a simple thing like a house, while more complex topics would get longer articles. But since the entity blurbs don't have an attribution system, I would amend your text to "According to Plutarch, Spartan houses were..." Is that acceptable? Thank you for the supportive words. I always found Lycurgus's law code to be one of the most interesting sort as of yet. Feel free to change it as you wish. The second made the doors what? I would assume you mean only allowed doors constructed with saws as tools, but either way I think that part of that sentence needs some work. (Face Palm!) Sloppy me. I have revised to what I consider a more acceptable form. I will try to be a bit more careful next time. I will in the next few months attempt to acheive the daunting task of writing a biography on Iphikrates. While I do have a few ancient sources that mention him, would any of you be able to refer me to a reliable biography on him? Thanks again. Expect another article in a couple months.1 point