

Scallact
-
Posts
37 -
Joined
-
Last visited
Posts posted by Scallact
-
-
The Long Dark
X-Plane flight sim (NotAGame)
Subnautica / Below Zero
Civ 5
FreeCell
-
 1
1
-
-
Hi, excellent job !
I guess it's the Sinai peninsula ?
What method did you use to import the elevation files ?
-
13 minutes ago, SettlersIVGold said:
Just to clarify, do you mean that after Alpha 26 there will be no further development put into the game, or do you mean there will be no more "Alpha" stage development as you wish not to double up on the 26 letters of the alphabet, and therefore will be shifting into Beta phase? Personally, I hope for the latter, as I find this game very enjoyable and am sorry that I do not have the technical skills, nor funds, to assist in making sure it continues in development and grows to meet its full potential.
Look at the date, it was a joke. ;-)
-
 1
1
-
-
1 hour ago, andy5995 said:
@ScallactThis is a random map I started to make. It imports the pmp file from the Corinthian Isthmus 2v2 skirmish map:
Thanks, that's what I thought it was for. Nice job!
-
 1
1
-
-
12 hours ago, Palaxin said:
Very helpful indeed! The Atlas import function is far from perfect, and I really wanted to be able to "sculpt" my own heightmaps in GIMP and import them without loosing any quality. My initial idea was to experiment with symmetrical heightmaps, and maps where mountains/hills are not used as obstacles, but as tactical features.
I have found a more straightforward way to to the second part: heightmap import. With a small command line utility able to copy binary code from one file to the other. I will complete my post when I have time.
Of course, creating handmade heightmaps might seem a bit daunting. However, I'm more of a graphic guy, and that was the easy part for me ;-) I have developed some nice and accessible methods to build them with GIMP, and will share these in another post in the coming weeks.-
3
-
-
15 hours ago, andy5995 said:
Not wanting to go too far off-topic here, but you can also get heightmaps from existing skirmish maps for use in generating random maps. For example, when Jebel Barkel is generated, it imports a pmp file:
[...]
One application for this method is that if you have a 2v2 skirmish map for example, one might create a random map that allows more flexibility with the number of players, using the same terrain as a nice skirmish map.
") There's some extra info in trac ticket 4816.
There's some extra info in trac ticket 4816.
If I understand well, this is useful to transfer an existing heightmap to another (especially random maps) ?
-
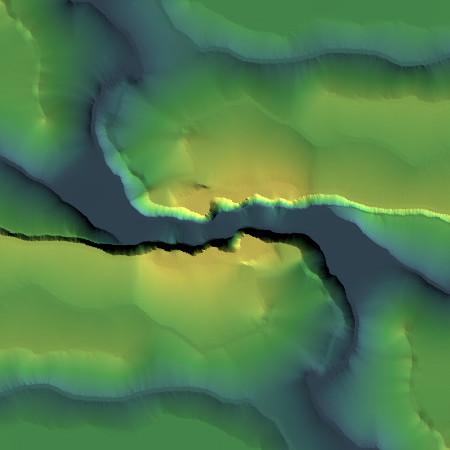
Hi,
Here is an example of import with the method above.
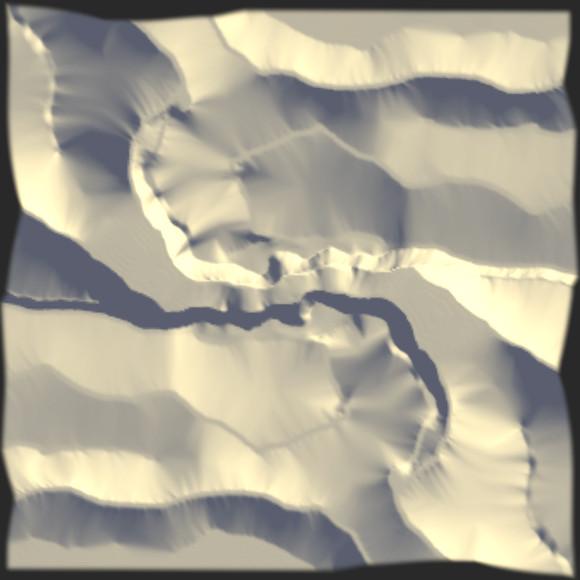
The first image is made from the height map in GIMP with some shading and altitude gradient.
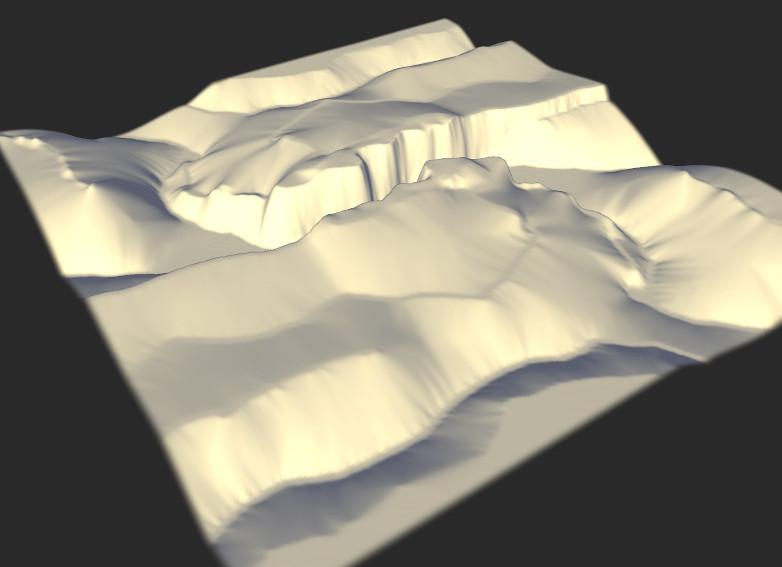
The 2 others are from the Atlas, with some basic terrain covering so that we see the relief well. The map size is mediumCheers!
P.S: the height map is shown before resizing to 321x321px, it's much higher resolution than the Atlas shots.
-
Just now, wowgetoffyourcellphone said:
My frustration comes from the exaggerated affect applied to the map in Atlas. This happened when the number of height units was increased some years ago and was never fixed. As a result, you have to use a very small range within the grayscale image.
I take this into account. Also, with this method, we don't lose any height precision. We have access to the full 65536 discrete height values.
I strongly suggest to allway keep a copy of the original file you're working on, and only apply the linear curves in the last steps, as indicated in this tutorial.
Just don't be afraid to apply some curves with some crazy small output value. I can guarantee the 16bit exported file is still very precise! :-)-
1
-
-
When I have some time, I'd also like to do a guide on how to design very nice height maps with GIMP. Here's an example enhanced with some shading for better viewing.
P.S: uploading a 33kb jpg fails, I'll try another time.
-
1
-
-
Hi everyone,
Thanks to Palaxin for his tutorial. I was frustrated by the quality of the Atlas import, and have decided decided to tackle the expert method. The problem for me was that a script is needed, because of the way the .bmp files are encoded.
After some research, I found out that .tif file have a much friendlier encoding for our use, and we can literally copy-paste the pixels block inside the .pmp as is. As long as the tif file is correctly formatted. The good news is that GIMP nowadays supports 16 bits integer images and export!
I wrote a detailed tutorial, please tell me if something is unclear. Here we go:
Preparation
Create and save a basic map with the Atlas. Resize it and note the size, it's very important.
The map is made of two files: a .pmp and a .xml. In this tutorial, we will paste the height map into the pmp.Sizes
Your initial height map can be any size. I've included a resize step in the process. But, depending on the size selected for your map in the Atlas, the final .tif height map must have the right number of pixels.
Here are the corresponding sizes in pixels:Tiny: 129x129 Small: 193x193 Normal: 257x257 Medium: 321x321 Large: 385x385 Very Large:449x449 Giant: 513x513
Note 1: It is essential that all your exports are: uncompressed tif images, grayscale, with 16 bit integer precision, and no alpha channel. Every other setup changes the number of digits for each pixel, and will mess up your map quite badly.Note 2: With the method here, the map will become a mirror copy of your original height map. If you don't want that, you can add the following point to the "Export operations":
2a) Image > Transform > Vertical mirror
I. Elevation file export with GIMP
IA) (only once per size) Create a a uniformly white image and follow the export operations. This is the .tif file used to find the extent of the pixels. You need to do that only once for each map size. I suggest you name it "white_template_size.tif".IB) Open your elevation file in GIMP and follow the export operations. If it's an .xcf file, be careful NOT to hit Save at any point during the operations.
Export operations1) Image > Flatten Image
this ensures there is no alpha channel and only one layer2) if you original file is not the right size:
Image > Scale Image, select the "pixel" unit and enter the right size.3) Image > Mode > Grayscale
4) Image > Precision
choose 16-bit integer, linear light5) (IB only) File > Export
choose a name for your file, add something like "_full_height", and add the .tif extension
choose Compression : none, and uncheck all boxes
export
note: you will probably have to try different curve settings, so it's useful to keep and reopen the "full_height" file for subsequent tries.6) (IB only) Colors > Curves
check the "linear" icon on the top right
select the top-right point of the curve
in the "output" field, enter a small number (I usually start with 5.00) and validate
note: you can use Colors > Levels as well. Select "linear", enter your value in the rightmost "output levels" field.7) File > Export As...
choose a name for your file and add the .tif extension (let's call it MyMap_size.tif)
choose "Compression : none", and uncheck all boxes
export
II. Height map import with hexadecimal editor
You'll need an hexadecimal editor which allows to select large blocks with SHIFT. On Linux, I use the Bless Hex Editor.
1) Open "white_template_size.tif" and MyMap_size.tif with the hex editor side by side.
note: on the editor, the cursor's position is referenced as "Offset" followed by an hexadecimal address2) On the white_template file, notice that most of it is filled with "FF". This tells us where the actual pixels start and end. Go to the end of the file and place the cursor just after the last "FF". It's usually a "12". Read the offset.
3) On the MyMap file, go to the end of the file, and place the cursor at the exact same offset. It should also be a "12".
4) Scroll back to the start of this file. If you observe the white_template, you should notice that there are 8 positions before the "FF" start. Back to MyMap, count 8 double-digits and SHIFT+clic on the next one. A big block should be selected. COPY.
5) Open the .pmp file with the hex editor. Place the cursor at offset "10". It means 16 in base 10, so the cursor is actually at the 17th position.
6) Press the "INSERT" key. The info bar should now indicate "OVR" instead of "INS".
7) PASTE.
8) Save, open your map in Atlas. The relief is probably too accentuated, or too flat. Repeat the operations, starting from Ib) 6) above. Adjust the output of the curve with a different value. Don't forget to always set the curves in linear mode.
Cheers,
Pascal-
1
-
1
-
-
I agree, this makes the otherwise nice function to quickly create a map barely usable.
-
1
-
what games do you play besides 0ad?
in Introductions & Off-Topic Discussion
Posted
P.S: A little word on the Long Dark: it's a survival game in its purest form. Most other survival games that I know have a first phase where surviving is a bit though, and then you just collect resources to build/craft more and more powerful things. Not at all in this game: it's survival from start to end. And the only possible ending is death (permanent in survival mode).
It's the anti-hero of survival games, in a sense.
And it's beautiful. Go check it if you like this kind of games.