wowgetoffyourcellphone Posted May 14, 2020 Report Share Posted May 14, 2020 (edited) 1. Here is the standard background I use: 2. Taking a screenshot of the unit in Atlas with the "Big Screenshot" option, it looks like this (note, I use a custom scenario map with a bright ground texture for ease of cutting in Photoshop) 3. A. I cut the unit out of the background, B. copy the unit into a 2nd layer (this is important), C. resize it to 256x256, D. then add the background texture at the top of this tutorial. E. From there I adjust the Layer Styles (effects) of each of the unit layers to give the final product. This is what the file looks like for me: 4. These are the layer settings I use. First, to get that nice brownish background glow (THIS IS WHAT IS MISSING FROM MANY OF THE NEWER PORTRAITS IN THE GAME): 5. Here, I create the drop shadow effect: 6. Sometimes I add a subtle Bevel and Emboss to help the unit stand out a bit from the background. THIS IS SUBTLE, and usually used on a unit with dark edges, like dark hair or a dark horse. Sometimes I don't even use it. As an example, I used this effect to make the Balearic Slinger's head stand out a bit more, otherwise it would have blended into the drop shadow. Spoiler 5. Here is the final product: Further Examples: Spoiler unit_portrait.psd Edited May 14, 2020 by wowgetoffyourcellphone 1 7 Quote Link to comment Share on other sites More sharing options...
Lion.Kanzen Posted May 14, 2020 Report Share Posted May 14, 2020 I copycat your technique since beginning. But there some icons in the game (vanilla) that weren't worked properly example actual Haststi unit. Quote Link to comment Share on other sites More sharing options...
Carltonus Posted May 14, 2020 Report Share Posted May 14, 2020 (edited) 11 hours ago, wowgetoffyourcellphone said: The new Athenian cavalry images look great. Have the images of the Carthaginian siege engines (ballista and oxybeles) been updated in the main game for next alpha? Currently they're not unlike the other factions that have them. Edited May 15, 2020 by Carltonus Fix, checked Delenda Est and the ship images are updated 1 Quote Link to comment Share on other sites More sharing options...
wowgetoffyourcellphone Posted May 19, 2020 Author Report Share Posted May 19, 2020 (edited) That's pretty close. The only difference I see is that my example has some intentional dithering/noise in the background glow, while yours is a smooth gradient. In step 4 you'll see the noise slider is set to 30% on the orange glow. It makes the background have a bit of grain to it and looks a bit less photoshoppy than a 100% smooth gradient. Edited May 19, 2020 by wowgetoffyourcellphone 1 Quote Link to comment Share on other sites More sharing options...
Stan` Posted May 29, 2020 Report Share Posted May 29, 2020 Made another attempt at Themistocles using your background athen_themistocles.xcf gaul_brennus.xcf 2 Quote Link to comment Share on other sites More sharing options...
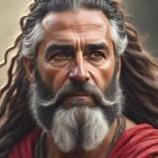
Stan` Posted May 29, 2020 Report Share Posted May 29, 2020 Looks like I had another one lying around rome_marcellus.xcf 3 Quote Link to comment Share on other sites More sharing options...
wowgetoffyourcellphone Posted May 29, 2020 Author Report Share Posted May 29, 2020 2 hours ago, Stan` said: Looks like I had another one lying around rome_marcellus.xcf 730.2 kB · 1 download 1 Quote Link to comment Share on other sites More sharing options...
Stan` Posted May 29, 2020 Report Share Posted May 29, 2020 Yeah I noticed afterwards that my glow should be black Quote Link to comment Share on other sites More sharing options...
Lion.Kanzen Posted May 29, 2020 Report Share Posted May 29, 2020 4 hours ago, Stan` said: Made another attempt at Themistocles using your background athen_themistocles.xcf 648.73 kB · 1 download gaul_brennus.xcf 624.94 kB · 0 downloads Woe change the concept , that is the old. Now is very different. But there some portrait with wrong technique in the repo. Quote Link to comment Share on other sites More sharing options...
Lion.Kanzen Posted May 31, 2020 Report Share Posted May 31, 2020 (edited) @Stan` Edited May 31, 2020 by Lion.Kanzen 1 Quote Link to comment Share on other sites More sharing options...
wowgetoffyourcellphone Posted May 31, 2020 Author Report Share Posted May 31, 2020 For techniologies, Delenda Est uses slightly different background glow (bluish): Result: Quote Link to comment Share on other sites More sharing options...
Lion.Kanzen Posted May 31, 2020 Report Share Posted May 31, 2020 28 minutes ago, wowgetoffyourcellphone said: For techniologies, Delenda Est uses slightly different background glow (bluish): Result: @Stan` which you prefer? Quote Link to comment Share on other sites More sharing options...
Stan` Posted June 1, 2020 Report Share Posted June 1, 2020 9 hours ago, wowgetoffyourcellphone said: For techniologies, Delenda Est uses slightly different background glow (bluish): It was supposed to be for the rice field do you have a special background for structures too ? Quote Link to comment Share on other sites More sharing options...
wowgetoffyourcellphone Posted June 1, 2020 Author Report Share Posted June 1, 2020 54 minutes ago, Stan` said: It was supposed to be for the rice field do you have a special background for structures too ? No, entities had the orange glow, while techs had the blue glow. Quote Link to comment Share on other sites More sharing options...
Stan` Posted June 1, 2020 Report Share Posted June 1, 2020 Maybe you have a better icon for the rice field though. I didn't want to fall into the rice bowl cliché and the plant itsefl looks too much like the normal field. Quote Link to comment Share on other sites More sharing options...
wowgetoffyourcellphone Posted June 1, 2020 Author Report Share Posted June 1, 2020 The rice paddy is just a replacement for the barley field right? No reason why they can't share icons. Quote Link to comment Share on other sites More sharing options...
Stan` Posted June 1, 2020 Report Share Posted June 1, 2020 18 minutes ago, wowgetoffyourcellphone said: The rice paddy is just a replacement for the barley field right? No reason why they can't share icons. Some wanted to make it a special building to show both existed 1 Quote Link to comment Share on other sites More sharing options...
Recommended Posts
Join the conversation
You can post now and register later. If you have an account, sign in now to post with your account.