Leaderboard


.thumb.png.0d87fc71cb8a644c5d862ceabac1e0d5.png)

Popular Content
Showing content with the highest reputation on 2014-04-11 in all areas
-
:furious:I honestly thought this was an April fools day joke...So you're scrapping the whole ancient warfare theme?3 points
-
Salute. Don't worry about that. Understood. Blender files (version 2.69): wolf_animations.zip3 points
-
I just took a look at them and wow. Top-notch animations Strannik, really good stuff. And you pulled them off without any IK setup or fancy stuff. Since the animations are all done with forward kinematics setup, I think there's not need to bake all frames, which means smaller animation files (I have to test it first though) You may already know this, but I'll mention it anyway. You can store several actions for the same armature using the actor editor. This way you can have all the animations in the same blender file, which can be handy if you need to reuse any pose, make small animation variations or just to have everything more organized. I made a short video of how it works (you can append the different actions from the different blender files you attached into the same blender file too)2 points
-
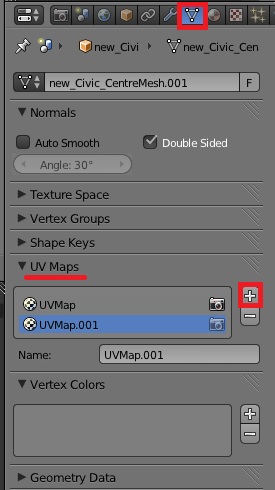
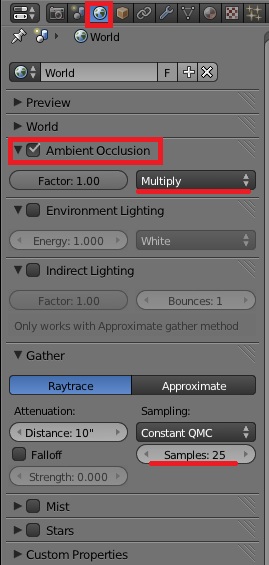
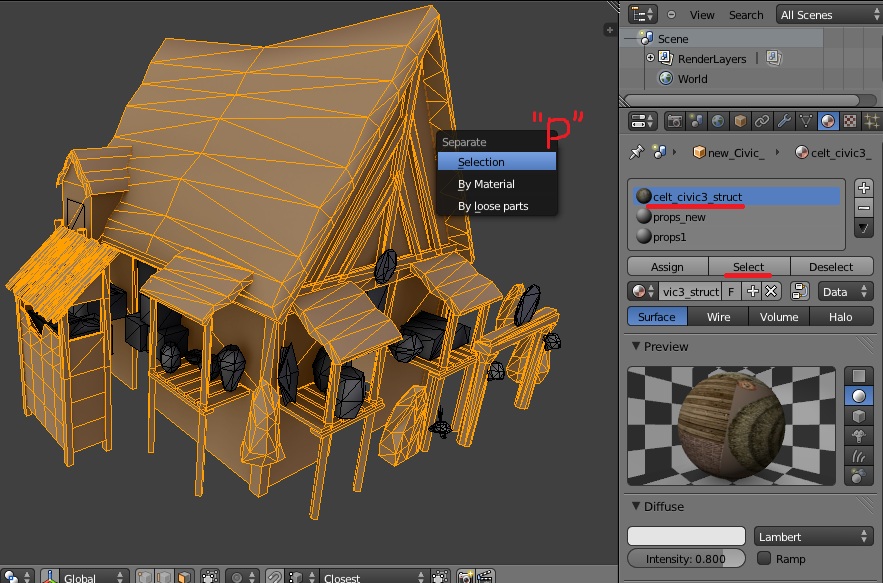
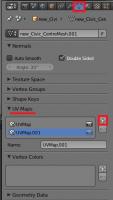
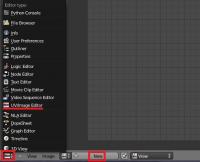
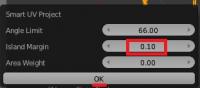
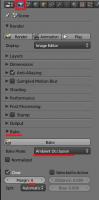
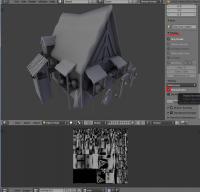
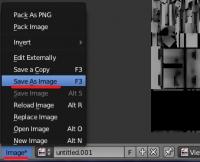
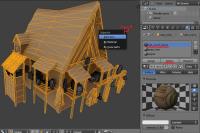
Introduction This is a guide covering how to import assets from the game to blender, create a second UV coordinates, bake the AO maps and export again. The game's buildings are usually divided in different .dae files (one per diffuse texture used) Usually, they consist in one main ".dae" file located in "meshes/structural" and one or more ".dae" children (props) that are attached to the main file, this "prop" daes are located in "meshes/props". (this is not always the case) In this example, we're going to bake the AO map for the celtic civil centre. 1.- Import the mesh into blender3D Inside blender, remove the starting cube, camera and point light. Go to file->import-> Collada (.dae) and select the .dae file to import. This building consists on three files: celt_civic3.dae, celt_civic3_props_1.dae and celt_civic3_props_new.dae If blender shows an error importing: *Note: The file may be imported rotated -90º in the X axis. To solve this, simply center the pivot point at the origin with SHIFT+C, select the cursor for your pivot point, select the asset and hit "R" for rotate, "X" for the axis, and then type "90" on the numpad and hit enter. Each time you import an asset, it is important that you create a new material with the name of the .dae or the texture that is going to use if you know it. This will let us separate the object again after we join all the meshes together. 2.- Set up a new UV coordinates. Select all your meshes and join them with CTRL+J Go to "object data" panel, scroll down to UV Maps menu and click the "+" sign to create a new UV coordinates. --Select the building, enter in edit mode with TAB. --Open a window with the UV/Image editor. Click in "new image" and "ok" in the pop-up menu. This creates a new 1024*1024 black image where we will bake the Ambient occlusion. --Now let's unwrap the model automatically. Go to object mode, select the model, use "CTRL+A" and select "apply scale" this will recalculate the scale of our building, so the polygons could be unwrapped nicely. --Enter "edit mode" with TAB. select all with "A" and hit "U" and select "Smart UV Project" in the pop-up menu. --In the next menu select the following settings: 3.- Baking the AO into our new generated black image. Preparing the AO settings: go to the "world" tab in the settings panel, mark the checkbox of Ambient occlusion and set it to "multiply". Scroll down to the "Gather" pannel and change the samples to something between 20-25 --We have the model ready to bake the AO map. Go to the render tab, scroll down to the "bake" panel (click on the "bake" pannel if it is closed) and use the following settings: --Then click "bake" and wait until the baking process is completed (this will take a while depending on your machine) --Once finished, you can hit "N" in the viewport to open a toolbar, go to the "display" menu, and click in the "texture solid" checkbox. This way you can see the AO map we have just generated on the model and check if it has been correctly generated. ------If you see black strange black faces where it shouldn't, the polygon normals are probably facing the wrong direction. This could be fixed selecting the black faces and then hit "W" and select in the pop-up menu "flip normals". ------If you find the problem where there are dotted black parts, it's probably because there are two or more polygons overlapping each other. You'll have to tweak the model sightly to fix this issue. --Once the bake is finished and you're happy with it, remember to save the image generated so it doesn't get lost. In the UV editor select Image->save image As... 4.- Separating the mesh by materials Now that we have our AO map, and the model has a second UV coordinates for the AO, we have to separate it's pieces again and export the parts one by one. To separate by materials, enter "edit mode". Make sure you don't have anything selected hitting "A" twice. Go to the materials tab, select the first material on the list, and click "select" button. This will select all the faces that have that material assigned. Once selected hit "P" and select "selection" in the pop-up menu. Repeat this step for each material (prop) you have imported. NOTE: Now that you only need to export the objects into .daes again, is a VERY NICE moment to save the .blend file in case the export process goes wrong. 5.- Exporting the meshes back to .dae files. This is the last part. You have to export the objects one by one. Make sure the following requirements are met: - There's nothing else on the scene except the mesh you want to export (even hid objects breaks the export) - You have to remove every material applied on the mesh. - There are no lights, armatures or other objects in the scene. - You have your object selected. Then you simply go to File->export-> Collada (.dae) and select the file to export or overwrite the old one. After that, reload the .blend file and repeat this step with the rest of the objects (or hit CTRL+Z a few times until you get back the other meshes and repeat the process with the next one) I hope it's somewhat understandable and useful .


 1 point
 -
Hi, For the last few days I have worked on a maze map. Unfortunately I currently don't have much time to work on it, but it is already quite playable, so I want to showcase it here. Screenshots: (The screenshots are pretty large!) 2 players 4 players 8 players The complexity depends on the size Tiny map with 8 players... From above Civic center macro shot Oasis in the center Another civic center Old screenshots: Early stage Different trees, bushes Source code: Feel free to edit the map and do whatever you want with it. The code is somewhat well-commented.1 point
-
1 point
-
In that case we need placer foundations first (premade foundations on which you can only build a certain building aka trading posts in AOE3. I created some kind of storehouse using existing props and eye-candy only in Atlas, suggestions for improvements?1 point
-
Sorry, was netbook only couple of days, so tested again, with this at the very beginning: var m = {};var o = {};m.num = num || 5;m.str = str || "abc";m.obj = obj || {};m.arr = arr || [];m.prp = o.prp || "xyz"; Only the last line produces no warning.1 point
-
If the engine restricts something, it's for performance (the resolution is hard-coded, else the compiler can't optimalize the code good enough), but you aren't even restricted to our pathfinder. The pathfinder is just a component, like there are so many in JS or C++. F.e. the plane uses its own, scripted unitMotion component, with a small build in pathfinder. It doesn't take any form of obstruction into account (so the pathfinder is just drawing straight lines), that's why it's possible to script it. When we say "it's impossible", we mostly mean it on an economic base (too much work, will be too slow, ...). The pathfinder restricts the units for sure (else there's no point in pathfinding, if units can just walk through everything), but you don't have to use the pathfinder coded in the Engine.1 point
-
This is the April Fools joke that just keeps on giving.1 point
-
IIRC baking to the cache is only available for physics/cloth/fluid/particle/smoke simulations and such, baking an armature action just inserts a keyframe on every frame with each position of every bone. So you remove the keyframes by hand or start the animation from scratch.1 point
-
You can make a building with the visuals of a tree, use garrison to hide the unit in there, and use the garrison and attack states of the building to show an animated unit in the tree using the prop system. If you want the unit to jump from tree to tree you'll need further coding1 point
-
I'm just feeling guilty while all the rest of you are busy posting/ helping each other out, I'm sitting my @#$% off (albeit with work). I have transferred the file to my mobile, and will start reading it. EDIT: Linked is my research notes for the Viking Longships. https://dl.dropboxusercontent.com/u/47464522/viking%20research.pdf1 point
-
fixed1 point
-
Couple features of game play that bother me. First not being able to build in neutral and claimed territory. I think this really needs to change. The one reason I think the rule is there, is cause if you build in an enemy zone you will get attacked? Well yeah then let the player get attacked then. This should be allowed. Second thing is the Roman fort. Its life should not deteriorate if units are gathered inside. And wtf happened to repair building? Lol... Come on. Third thing is that forts are to weak.... Think about what it is... A wooden structure that's solid as heck, how can a hand full of units cause so much damage? ... Those are the annoying things... But now on the bright side..... The in game sound needs a bit more tone to it......... More birds... Animal sounds, ocean waves... Forest ambient, and wind... You know .. Something that compliments Gaia I'd like to see more different types of bushes, trees, and whatnot. it will certainly make a huge difference1 point
-
Ah, just found this video you posted. It's very handy, as I can immediately see it's related to promoted units. Fix will be in in a few minutes.1 point
-
I like it. I'm not so sure about the playability but I think you know of this yourself. Something similar could be used to place roads in a city map (I have thought about making wall_builder.js capable of adding branches for this purpose but maybe that's not the best idea in the first place).1 point
-
It's one of the relatively few remaining planned gameplay features we don't have yet. So indeed, our attention should be turning to it soon Another thing that will change, or should IMO, is the interaction of territories and diplomacy. That is, what happens when your ally expands and takes over some of your buildings. Well currently the territory manager doesn't know anything about diplomacy, so your buildings will start to decay as if they were in enemy territory, but I would argue that shouldn't happen. There is also the possibility of building some things in ally territory. Really, there's a lot that can change once we have the code in place. It won't be 100% realistic because that's not our goal, rather a balance between historical accuracy and what is most fun and challenging.1 point
-
Well the the design choice is incorrect. Yes the forts were temporary, but only when the Romans decided to leave did they dismantle the encampment. Otherwise they maintained it.1 point
-
Salute. Almin, thanks. There is no problem with a criticism for me. Indeed attack animation is bad. I'll try to improve or discard it and use a new concept. This great model is created and rigged by Micket. I don't work in gaming industry. As I wrote earlier this is the first time I do animations. Sanderd17, understood. Thanks for an explanation. I'll be posting previews of animations and updating archive. Wolf run cycle animation: Wolf idle 01 animation: Wolf idle 02 animation: Improved wolf death animation:1 point
-
Salute. Here is a walk cycle animation preview:1 point